

What’s the difference between word processing and desktop publishing? In a nutshell, it’s in how you design your document. Most folks use a word processor like an old-fashioned typewriter. A desktop publishing application allows far more creativity in choosing where to place text, how to align graphics, and how to edit formats. Desktop publishing is more visual and intuitive, allowing your imagination a free hand at creating a document.
How to create a new Pages document
To create a new Pages document, follow these steps:1. Click the Pages icon on the Dock.
If the Pages icon doesn’t appear on your Dock, click the Launchpad icon and then click the Pages icon (which looks like a document and pen). If you haven’t installed the three Apple productivity applications yet — Pages, Numbers, and Keynote — click the App Store icon in your Dock and download them for free!
2. Click the New Document button at the lower-left corner of the Open dialog.Pages displays the Template Chooser window, shown in the following figure.
You can also create a new Pages document at any time from the File menu. Just choose File→ New to display the Template Chooser window.
3. In the list to the left, click the type of document you want to create.The thumbnails on the right are updated with templates that match your choice.
4. Click the template that most closely matches your needs.To start with a blank page, choose the Blank template from the Basic group.
5. Click the Choose button to open a new document in the template you selected.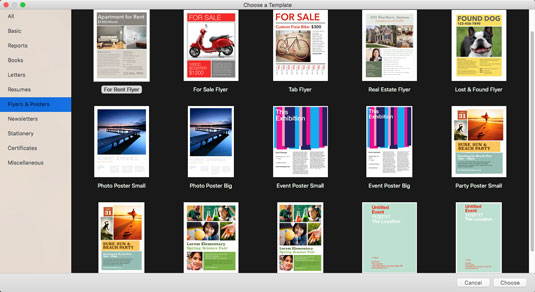 Select a template from the Template Chooser window.
How to open an existing Pages document
Of course, you can always open a Pages document from a Finder window. Just double-click the document icon. (The All My Files location in the Finder window sidebar makes it easy to track down a document.) You can also open a Pages document from within the program. Follow these steps:1. Launch Pages as described in the preceding section.
2. Press Command +O to display the Open dialog.
The Open dialog operates much the same as a Finder window in Icon, List, or Column view mode. To open a document you’ve already saved in your iCloud Drive, click the Pages item under the iCloud heading in the sidebar at the left of the dialog and double-click the desired document thumbnail in the display at the right side of the dialog. To open a document on your internal drive or network, click the desired location in the Open dialog sidebar. (If you’re into convenience like I am, click one of the locations under the Favorites heading to jump immediately to common folders such as your Downloads or Documents folders.)
3. Click the desired drive in the Devices list at the left of the dialog, and then click folders and subfolders until you locate the Pages document.You can also click in the Search box at the top of the Open dialog and type in a portion of the document name or its contents.
If you’re using Icon view mode (or you’re displaying the Preview column in Column view mode), you can hover the pointer over a document thumbnail and quickly flip through the different pages by clicking on the left and right arrows that appear. This “find” feature can help you identify a particular Pages document without even opening it.
4. Double-click the thumbnail (or filename) to load it.If you want to open a Pages document you’ve edited in the recent past, things get even easier. Just choose File → Open Recent, and you can open the document with a single click from the submenu that appears.
Pages can open, edit, and save documents created with the Mac version of Microsoft Word. However, Pages doesn’t support every feature within a Word document – for the full list of what Pages supports, visit the webpage.
How to save your work in Pages
Pages fully supports the macOS Auto-Save feature, but you may feel the need to manually save your work after you finish a significant edit (or if you need to take a break while designing). If you’re editing a document that has already been saved at least once, press Command +S. A new version of the document is saved to its current location — and you can continue with your work.However, if you’re working on a new document that hasn’t previously been saved, follow these steps to save it:
- With the Pages document open, press Command +S.
- Type a filename for your new document.
- Open the Where pop-up menu, and choose a location in which to save the document. Note that Pages defaults to your iCloud Drive as the target location. This way, you can open and edit your Pages document on any Mac or iOS device that shares the same Apple ID. Alternatively, click the button sporting the down arrow to expand the Save As sheet. This allows you to navigate to a different location on your hard drive or network, or to create a new folder to store this Pages project.
- Click Save.
You can create a version of a Pages document by choosing File→ Save. To revert the current document to an older version, choose File→ Revert To. Pages gives you the option of reverting to the last saved version, or you can click Browse All Versions to choose from multiple versions of the document.
Tour the Pages Window
Before you dive into any real work, let me show you around the Pages window. You’ll find the following major components and controls, as shown in the following figure:- Pages list: This thumbnail list displays all the pages you’ve created within your document. (For a single-page document, of course, the Page list contains only a single thumbnail.) You can switch instantly between different pages in your document by clicking the desired thumbnail in the list. If the list isn’t visible, click the View button at the left side of the Pages toolbar and click Show Page Thumbnails.
- Layout pane: This section takes up most of the Pages window. It’s where you design and edit each page in your document.
- Toolbar: Yep, Pages has its own toolbar. It keeps all the most common application controls within easy, one-click reach.
- Inspector: This window extension allows you to quickly switch the appearance of selected paragraphs, characters, and lists (in Format mode) or specify settings that affect the entire document (in Document Setup mode). You can hide and display the Inspector from the View menu, or by clicking the Format or Document buttons on the toolbar.
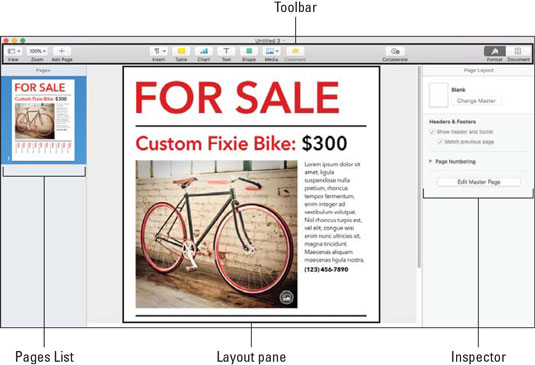 The major points of interest in the Pages window.
How to enter and edit text in Pages
If you’ve used a modern word processing program, you’ll feel right at home typing within Pages. The bar-shaped text cursor, which looks like a capital letter I, indicates where the text you enter will appear in a Pages document. To enter text, simply begin typing. To edit existing text in your Pages document, select and highlight the text. As you type, Pages replaces the existing text. You can delete text by clicking and dragging across the characters to highlight them and then pressing Delete.How to use text, shapes, and graphics boxes in Pages
Within Pages, you’ll quickly learn that text, shapes, and graphics appear in boxes, which can be resized by clicking and dragging one of the handles that appear around the edges of the box. (Click the box to select it and hover the mouse cursor over one of the square handles; you’ll see that it changes to a double-sided arrow, indicating that Pages is ready to resize the box.)You can also move a box, including all the stuff it contains, to another location within the Layout pane. Click inside the box, and drag the box to the desired spot. Note that Pages displays yellow alignment lines to help you align the box with other elements around it (or with regular divisions of the page, such as the vertical center of a poster or flyer).
To select text or graphics within a box, you must first click the box to select it and then double-click the line of text or the graphic you want to change.
Cut, copy, and paste in Pages
“Hang on, Mark. You’ve covered moving stuff, but what if you want to copy a block of text or a photo to a second location? Or how about cutting something from a document open in another application?” Good questions. That’s when you can call on the power of the cut, copy, and paste features within Pages. The next few sections explain these actions.Cutting stuff
Cutting selected text, shapes or graphics removes them from your Pages document and places that material on the Clipboard. (Think of the Clipboard as a holding area for snippets of text and graphics you want to manipulate.) To cut, select some material and choose Edit → Cut or press Command +X.Copying text and images
When you copy text, shapes, or graphics, the original selection remains untouched, and a copy of the selection is placed on the Clipboard. Select some material and choose Edit → Copy or press Command +C. To copy selected items by dragging, hold down the Option key while you drag the items to their destination.If you cut or copy a new selection to the Clipboard, it erases what was there. In other words, the Clipboard holds only the latest material you cut or copied.
Pasting from the Clipboard
Wondering what you can do with the stuff that’s stored on the Clipboard? Pasting the contents of the Clipboard places the material at the current location of the insertion cursor.You must paste the contents before you cut or copy again to avoid losing what’s on the Clipboard.
To paste the Clipboard contents, click to place the insertion cursor at the location you want and choose Edit→Paste or press Command +V.How to format text the easy way
If you feel that some (or all) of the text in your Pages document needs a facelift, you can format that text any way you like. Formatting lets you change the color, font family, character size, and attributes as necessary.After the text is selected, you can apply basic formatting in two ways:
- Use the Inspector. The Inspector appears at the right side of the Pages window (refer to the figure). The controls it displays vary according to the selection you’ve made. (Click the Format button on the right side of the toolbar, which looks like a tiny paintbrush, to display and hide the Inspector.) Click to select a font control to display a pop-up menu, and then click your choice. For example, select a portion of text and open the Font Family pop-up menu to change the font family from vanilla Arial to something more daring. You can also select characteristics, such as the text’s paragraph style, or choose italic or bold. The Inspector also provides buttons for both vertical and horizontal text alignment.
- Use the Format menu. Most controls displayed within the Format section of the Inspector are also available from the Format menu. Click Format and hover the mouse cursor over the Font menu item, and you can then apply bold, italic, and underlining to the selected text. You can also make the text bigger or smaller. To change the alignment from the Format menu, click Format and hover the mouse cursor over the Text menu item.
How to add tables in Pages
In the world of word processing, a table is a grid that holds text, shapes and graphics for easy comparison. You can create a custom table layout within Pages with a few simple clicks.Follow these steps:
1. Click to place the insertion cursor where you want the table to appear.
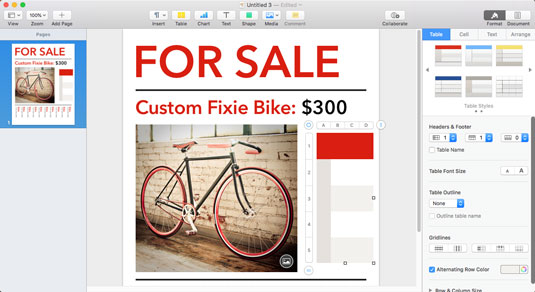
2. Click the Table button on the Pages toolbar.
Pages displays thumbnail images of different table styles. You have a selection of colors. Some tables also include highlighted rows and columns. Use the left and right buttons to display different styles of thumbnails until you find the one that’s closest to the table you need.
Don’t worry if the style isn’t exactly right. You can always change the layout by selecting the table and displaying the Format Inspector, where you can fine-tune all sorts of font, color, grid, and border options.
3. Click the style thumbnail to insert the table. If you need to change the number of rows or columns in your table, Pages makes it easy. To add or delete rows or columns directly from the table, select it and click the row and column buttons that appear. (Each bears two horizontal or vertical lines, as shown.)4. Click within a cell in the table to enter text.
The table cell automatically resizes and wraps the text you enter to fit.
You can paste material from the Clipboard into a table.
 Use Table controls to tweak your table.
Here are a few pointers on how to dress up your table and make its data more attractive and readable:
- Change the borders on a selected cell. Click the Format icon on the toolbar to open the Inspector, click the Cell tab, and then click the desired button in the Border section.
Select a range of cells in a table by holding down Shift as you click. Hold down Command and click to select multiple cells that aren’t contiguous.
- Add a background color to selected cells, or fill them with an image for a background. Click the Cell tab, and then click the Fill section in the Inspector and choose a type of background.
How to add photos in Pages
You can choose between two methods of adding a picture within your Pages document:- As a floating object: You place the image in a particular spot, and it doesn’t move even if you make changes to the text. To add a floating object, drag an image file from a Finder window and place it at the spot you want within your document. Alternatively, you can click the Media button on the toolbar, click Photos, navigate to the location where the file is saved, and click the image thumbnail. The figure shows the Media Browser in action.
Click the magnifying glass icon within the Media Browser to search for a specific item using keywords or by filename.
Note that a floating object (such as a shape or image) can be sent to the background, where text does not wrap around it. To bring back a background object as a regular floating object, click the object to select it and choose Arrange→ Bring to Front.
- As an inline object: The image flows with the surrounding text as you make layout changes. To add an inline object, hold down the Command key as you drag an image file from a Finder window and place it where you want within your document. You can also click the Media toolbar button and click Photos to display the Media Browser. Navigate to the location where the file is saved, hold down the Command key, and drag the image thumbnail to the spot where you want it in the document.
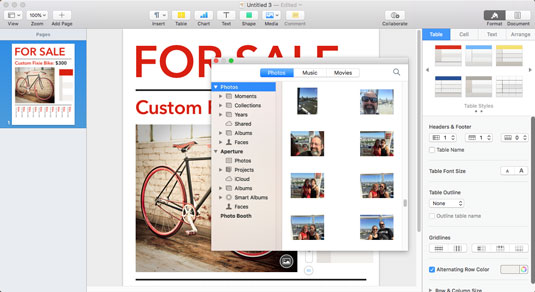 Hey, isn’t that the Pages Media Browser?
To resize an image object, click the image to select it and drag one of the selection handles that appear along its border. (The handles look like tiny squares.) The side-selection handles drag only that edge of the frame. The corner-selection handles resize both adjoining edges of the selection frame. Hold down the Shift key to make the vertical and horizontal proportions remain fixed.
Adding a shape as a background in Pages
To add a shape (such as a rectangle or circle) as a background for existing text, follow these steps:- Click to place the insertion cursor anywhere on the page where you want the shape to appear.
- Click the Shape button on the Pages toolbar and choose a shape. The shape appears in your document.
- Click inside the shape and drag it to a new spot. Shapes can be resized or moved in the same manner as image boxes.
You can type over a shape set as a background. Before you do, though, select the shape, and choose Arrange→ Send to Back.
Are you sure about that spelling?
Pages can check spelling as you type (the default setting) or after you complete your document. If you find automatic spell-checking distracting, you should pick the latter method.Spell-checking only confirms that a word matches an entry in the Pages dictionary, not that it’s the right word for the job! If you’ve ever “red” a document that someone else “rote,” you understand.
To check spelling as you type, follow these steps:- Click the Edit menu, and hover the pointer over the Spelling and Grammar menu item.
- Choose Check Spelling While Typing from the submenu that appears. If a possible misspelling is found, Pages underlines the word with a red dashed line.
- Right-click the word to choose a possible correct spelling from the list, or choose Ignore Spelling if it’s spelled correctly. To turn off automatic spell-checking, click the Check Spelling While Typing menu item again to deselect it.
- Click within the document to place the insertion cursor where the spell check should begin.
- Click Edit, hover the pointer over the Spelling and Grammar menu item, and choose Check Document Now from the submenu that appears.
- Right-click any possible misspellings, and choose the correct spelling, or choose Ignore Spelling if the word is spelled correctly.
Printing Your Pages Documents
Ready to start the presses? You can print your Pages document on real paper, of course, but don’t forget that you can also save a tree by creating an electronic PDF instead of a printout. You’ll find the PDF dropdown menu at the bottom of the standard Mojave Print dialog.To print your Pages document on old-fashioned paper, follow these steps:
- Within Pages, choose File →Print. Pages displays the Print sheet.
- Click in the Copies field, and enter the number of copies you need.
- Select the pages to print:
- To print the entire document, select All.
- To print a range of selected pages, select the From radio button and enter the starting and ending pages.
- Click the Print button to send the document to your printer.
Sharing That Poster with Others
Besides printing — which is, after all, so very passé these days — you can choose to share your Pages document electronically via the Internet or your network:- Send a Copy: To send a copy of the actual document (which the recipient can open using Pages on his or her own Mac or iOS device), click Share on the Pages menu, and hover the pointer over the Send a Copy item. You can send the document via Mail, Notes or Messages, or you can make it available through AirDrop (if the recipient is within range of your iMac’s Wi-Fi signal).
If you decide to send your Pages document as an email attachment, don’t forget that most ISPs have a maximum message size. If your document is too large, your mail server probably will reject it.
- Export: You’re not limited to sharing over that Internet thing! Pages can also export your work directly to your drive in one of six formats: a PDF file, a Microsoft Word document, an ePub file (for use with electronic book apps like iBooks), a document compatible with the previous version of Pages, a Rich Text Format document, or even plain text. (Remember when everything was in plain text?) Choose File→ Export To, and pick your format; Pages displays any options you can set for that format. When you’re ready, click Next and select the location where Pages should save the file. Click Export, and sit back while your favorite desktop publishing application does all the work.
If the recipient of your document doesn’t need to edit your work, create a PDF file, which keeps your document as close as possible to how it appears in Pages.
- Collaborate: You can choose to share your document with others — and optionally allow them to edit it — using the Collaborate toolbar button. (You determine their access from the Sharing Options that appear when you click the Collaborate toolbar button.) Pages stores your document on your iCloud Drive, and sends a link to the individuals you choose via Mail, Messages, Facebook, or Twitter. Once that lucky person clicks the link, Pages opens your document in all its glory, ready for them to view or edit.
Your iCloud Drive must be active and you must be signed in to send the Collaborate sharing invitation, and the recipients you specify must be signed in using their Apple ID to receive it.


