

Shields can be simple or complex. They are sold preassembled or as kits. Kits allow you more freedom to assemble the Arduino shield as you need it to be. Some kits require you to assemble the circuitry of the boards, although more complex shields may already be largely assembled, needing only header pins.
Shields enable you to use your Arduino for more than one purpose and to change that purpose easily. They neatly package the electronics for that circuit in the same footprint as an Arduino, and are stackable to combine different functionalities. But they all have to use the same pins on the Arduino, so if you stack shields, watch out for those that need to use the same pins. They always connect the GND pins, too, because any communication by your Arduino and another device needs a common GND.
Arduino shield combinations
In theory, shields could be stacked on top of each other forever, but you should take some points into consideration before combining them:- Physical size: Some shields just don’t fit on top of one another. Components that are higher than the header sockets may touch the underside of any board on top of it. This situation, which can cause short circuits if a connection is made that shouldn’t be, can seriously damage your boards.
- Obstruction of inputs and outputs: If an input or output is obstructed by another shield, it becomes redundant. For example, there’s no point having a joystick shield or an LCD shield under another shield because no more than one can be used.
- Power requirements: Some hardware requires a lot of power. Although it is all right for shields to use the same power and ground pins, there is a limit to the amount of current that can flow through the other input/output (I/O) pins: 40mA per pin and 200mA max between all I/O pins. Exceed this, and you run the risk of seriously damaging your board and any other attached shield. In most cases, you can easily remedy this problem by powering your Arduino and shields from an external power supply so that the current isn’t passed through the Arduino. Make sure to use a common GND if you’re communicating between a board using I2C, SPI, or serial.
- Pins: Some shields require the use of certain pins. It’s important to make sure that shields aren’t doubling up on the same pins. In the best case, the hardware will just be confused; in the worst case, you can send voltage to the wrong place and damage your board.
- Software: Some of these shields need specific libraries to work. There can be conflicts in libraries calling on the same functions, so make sure to read up on what’s required for your shield.
- Interference with radio/Wi-Fi/GPS/GSM: Wireless devices need space to work. Move antennas or aerials away from the board to get a clear signal. If an antenna is mounted on the board, it’s generally a bad idea to cover it. Always try to place wireless shields at the top of the stack.
Arduino shield reviews
To give you an idea of available shields, check out some of the most interesting and useful Arduino shields on the market and shows you where to look for more information.The prices listed are subject to change so always do you research before making a purchase decision. A lot of feedback on all of these products is available online, so always read the comments and forums to get a good understanding of what you’re buying.
This range of shields covers a vast number of different uses and the huge potential of Arduino projects. For many projects, a shield is all you need, but a shield is also an excellent stepping-stone for proving a concept before refining or miniaturizing your project.
Prices provided are from a range of distributors to show the approximate value of the items. If you are a savvy shopper or are looking to buy in bulk, you may be able to reduce the cost.
Proto shield kit Rev3
Made by: ArduinoPrice: $9.90 from Arduino Store
Pins used: None
The Proto shield is a platform for building custom circuits on your Arduino. Many Arduino shields add a specific function to your Arduino, but with a Proto Shield, you can decide how to use it. Take your existing breadboard layouts and solder them to the surface of the Proto shield to make your project more durable. Proto shields also come in a larger size to match the Arduino Mega’s footprint. Another handy feature of these shields is the space to attach SMD parts, which can be difficult to do otherwise.
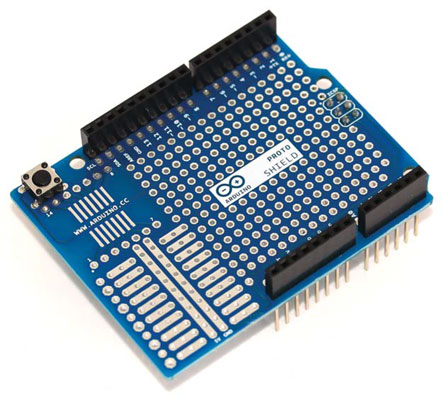 A fully assembled Proto shield.
The Proto shield is sold either fully assembled or as a kit that requires soldering.
You can find details about the shield on the Arduino product page.
ProtoScrew shield
Made by: WingShield IndustriesPrice: $14.95 from Adafruit
Pins used: None
ProtoScrew shield is similar to the regular Proto shield but has large screw terminals connected to the pins as well. This feature is great for applications that have lots of inputs that may need changing or swapping, or just for easier assembly and disassembly. Changing a piece of wire is much easier with screw terminals than with soldering, so bear this in mind when planning your next project.
ProtoScrew shield is sold as a kit and requires soldering. You can find more details on the Adafruit product page.
Adafruit Wave shield v1.1
Made by: AdafruitPrice: $22.00 from Adafruit
Pins used: 13, 12, 11, 10, 5, 4, 3, 2 on the Uno R3
The Wave shield is a relatively cheap kit that allows you to play sounds or music with your Arduino. The Wave shield allows you to play WAV files directly from an SD card, making it easy to upload and change the sound files from your computer. To use the shield, you need the WaveHC library, which is available from the product page and Google Code.
 A fully assembled Wave shield.
The Wave shield is sold as a kit and requires soldering. The SD card reader must use pins 13, 12, and 11 because they support a high-speed Serial Peripheral Interface (SPI), which is a protocol needed to transfer data quickly. Pin 10 is used to communicate with the SD card reader, and pins 5, 4, 3, and 2 are used to talk to the digital-to-analog converter (DAC), which converts a digital music signal into an analog voltage.
For more details, visit the product page on Adafruit’s website.
MP3 player shield
Made by: SparkFunPrice: $24.95 from SparkFun
Pins used: 13, 12, 11, 9, 8, 7, 6, 5, 4, 3, 2 on the Uno R3
Turn your Arduino into an MP3 player with the easy-to-assemble MP3 player shield from SparkFun! Not only can it decode MP3 files, it’s also capable of decoding Ogg Vorbis, AAC, WMA, and MIDI. The MP3 shield also has a microSD card reader for ease of uploading files, and it has a 3.5mm mini jack that you can connect to most speaker systems.
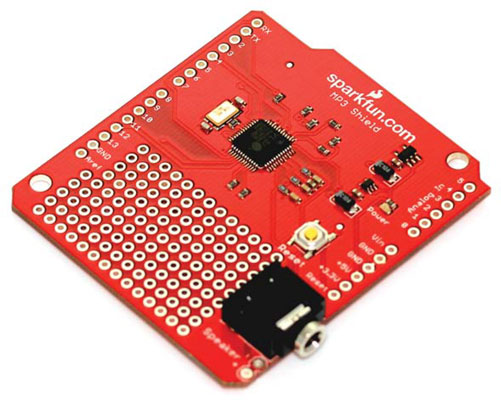 An MP3 shield kit.
The MP3 player shield is assembled but requires minor soldering to attach the header pins or header sockets. The SD card reader uses pins 13, 12, and 11. You use pin 9 to talk with the SD card reader. Use pins 8, 7, 6, and 2 talk to MP3 audio decoder VS1053B, and use pins 4 and 3 for additional MIDI functionality.
For more details, visit the SparkFun products page. Also see the tutorial page. The comments below the tutorial address many of the issues with this guide. One user has even written a library to make your life easier — a great example of the Arduino community supporting existing products.
Always read the comments and forum entries on products and kits. These comments often contain a lot of detail on the ease of (or difficulty with) a product. This is also the place to voice your own problems. Just be sure that you’re not repeating something that’s solved further down the page; otherwise, you’ll be advised to read the manual!
MIDI shield
Made by: SparkFunPrice: $19.95 from SparkFun
Pins used: Uses pins 2, 3, 4, 6, 7, A1, A0 on the Uno R3
MIDI (Music Instrument Digital Interface) revolutionized the music industry in the 1980s and is still widely used now to connect instruments, computer, stage effects, and other hardware. With the MIDI shield, you can interface with anything that can send or receive MIDI data and incorporate it into your Arduino project.
The MIDI shield is sold as a kit and requires soldering. For more details, visit the SparkFun product page. You can find some excellent general tutorials on MIDI on Arduino’s site and a lot of excellent reference material at tigoe.net and Hinton Instruments.
RGB LCD shield with 16 x 2 character display
Made by: AdafruitPrice: $24.95 from Adafruit
Pins used: Uses pins A4 and A5 on the Uno R3
This handy LCD (liquid crystal display) shield packages everything you need onto one board. LCDs are found in older mobile phones and Nintendo GameBoys (wow, that sounds old). They use a film that sits over a solid-colored, usually backlit surface. The pixels of this film can be turned on or off to make shapes, text, or graphics, and this is what you control with your Arduino. At the center of the shield is an RGB LCD display, so instead of being stuck with just one color, you can choose from any RGB color.
The RGB backlight is controlled directly from your Arduino. The display is a 16 x 2 character display (no graphics), which means you can write two rows of 16 characters. You can choose from two displays: colored text on a dark background (negative) or dark text on a colored background (positive). A variety of LCD character displays with various backlighting and dimensions is available, so be sure to shop around.
The RGB LCD shield is sold as a kit and requires soldering. Instead of using nine pins or more, the LCD, backlight, and buttons together use just two. By using the I2C to communicate with the shield, you can use only analog pin 4, which is the data (SDA) line, and analog pin 5, which is the clock (SCL) line. This protocol is used in many devices, so it is extremely useful to know about it. For more details on I2C, check John Boxall’s excellent tutorial.
Shields are also available that use the same technology but don’t limit you to letters and numbers. If you’re looking to display your own graphics, you might want to use the SparkFun color LCD shield, which uses a Nokia 6100 screen, or the larger TFT touch shield.
2.8” TFT touch shield with capacitive touch
Made by: AdafruitPrice: $44.95 from Adafruit
Pins used: 4, 8, 9, 10, 11, 12, 13, A4, A5
If an LCD display isn’t enough for you, try the TFT touch shield to add full color and touch input to your project. This display is a TFT LCD screen — a variation on a standard LCD screen that uses thin-film transistor (TFT) technology to improve the image quality — with a resolution of 240 x 320 pixels and 18-bit colors, giving you 262,144 shades. The screen is also fitted with a resistive touchscreen to register finger presses anywhere on the surface of the screen.
The TFT touch shield is sold fully assembled and requires no soldering, so you can simply plug it on top of your Arduino. The touch shield needs a lot of pins to function and leaves you with only digital pins 2 and 3 and analog pins 4 and 5. Pin 12 is also available if you're not using the microSD reader.
Check out Adafruit’s products page. Adafruit has also kindly written a complete library for the TFT to draw pixels, shapes, and text and a library for the touchscreen that detects x, y, and z horizontal movement, vertical movement, and pressure.
Joystick shield
Made by: SparkFunPrice: $12.95 from SparkFun
Pins used: 2, 3, 4, 5, 6, A0, A1
The joystick shield has all the functions of a modern game controller on a single Arduino-compatible board. It provides not only four pushbuttons to assign to various functions but also a hidden button in the control stick itself. With the ergonomic control stick, you can smoothly transition between x and y axes to perform movements with great accuracy.
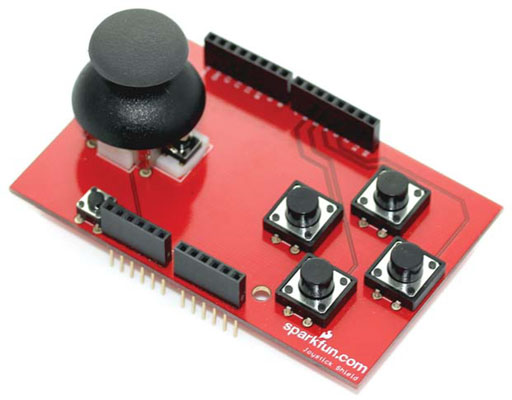 A joystick shield.
The joystick shield is sold as a kit and requires soldering. It uses only five digital pins and two analog pins, leaving many other Arduino pins free for other uses. It has five pushbuttons, using digital pins 2 to 6. The movement of the joystick is measured using two potentiometers: analog 0 maps the x, or horizontal, movement; analog 1 maps the y, or vertical, movement.
You can find more details on the SparkFun product page.
Adafruit motor/stepper/servo shield kit v2.3
Made by: AdafruitPrice: $19.95 from Adafruit
Pins used: 9, 10, A4, A5
Love motors? Want to try them all? Then the Adafruit motor/stepper/servo shield is the one for you. The shield is aptly named, enabling you to run all those motors you love. You can connect up to two 5V hobby servos, two stepper motors, or four bidirectional DC motors. The screw terminals make attaching and switching motors easy. When dealing with motors, it’s always important to make sure that you have enough current to drive them all, so a handy screw terminal on the shield allows you to power your motors independently of your Arduino.
The Adafruit motor/stepper/servo shield is sold as a kit and requires soldering. Pins A4 and A5 control any connected DC or stepper motors, and pins 9 and 10 control any connected servos. This leaves you with a lot of pins free to be used for other inputs or outputs.
You can find many details on the Adafruit product page and in the in-depth tutorial. Be aware of how much load is on the motor because the shield is designed to provide up to 600 mA per motor, with 1.2A peak current. If you’re approaching 1A, include a heat sink on the motor driver to dissipate the heat.
Also, the nice people at Adafruit provide an easy-to-use library for your motor project. Happy motoring!
LiPower shield
Made by: SparkFunPrice: $29.95 from SparkFun
Pins used: 3
If you want to make your Arduino project more mobile, batteries are the answer. Rather than use bulky AA or AAA battery packs, the LiPower shield allows you to use rechargeable lithium batteries instead. Although lithium batteries are rated as only 3.7V, some clever hardware steps them up to 5V to make them sufficient to power your Arduino.
The LiPower shield is assembled but requires minor soldering to attach the header pins or header sockets. Because the LiPower shield is there to provide power and not consume it, only one pin is in use. Pin 3 can be configured as an alert interrupt pin to signal whenever the battery drops to 32 percent or lower.
For more details, check out the SparkFun product page. You find interesting notes on the hardware regarding the difficulties with charging lithium batteries, so make sure to read all the comments below the product description.
Many other smaller lithium breakout boards are available that supply the standard 3.7V, such as the SparkFun USB LiPoly charger and the Adafruit micro Lipo. These breakout boards are perfect when paired with an appropriate low-voltage Arduino, such as the Arduino MKR1000. Boards such as the Arduino MRK1000 are useful when trying to reduce the size of your Arduino project.
Adafruit Ultimate GPS logger shield
Made by: AdafruitPrice: $44.95 from Adafruit
Pins used: 7, 8, 10, 11, 12, 13, A4, A5
The Adafruit Ultimate GPS logger shield lets you track and store location information using the Global Positioning System. You can find your location within a few meters. Use it to create GPS art or to map all your movements over the month. It’s also great for giving you an extremely accurate time. Data is stored on a microSD card as a TXT file, which can then be overlaid onto Google Maps or visualized in some other way.
With the ever-increasing storage capacity of SD cards, you can store much more data on an SD card than your Arduino can on its own internal memory. This extra capacity is especially useful because it keeps your data-logging device mobile without the need for a computer, so you can leave that bulky laptop at home and send your GPS device out into the world!
The Adafruit Ultimate GPS logger shield is sold without attached header pins and requires soldering. Pins 10, 11, 12, and 13 are used for communication with the SD card. The GPS module uses either the hardware serial connection (pins 0 and 1) or two pins for a software serial connection (pins 7 and 8). You can enable other optional functions, such as a signaling LED to indicate when data is logged, a pin to monitor the pulse from the GPS synchronization clock, and a pin to detect when an SD card is in the slot.
Get the shield and more information on Adafruit. You can view an in-depth tutorial on Adafruit’s site, which details everything from construction of the kit to the Arduino code, along with uses for the GPS data.
Adafruit FONA 800 shield
Made by: AdafruitPrice: $39.95 from Adafruit
Pin requirements: 2, 3, 4
The Adafruit FONA 800 shield turns your modest Arduino into a functional mobile phone. With this shield, you can send and receive calls, text messages, and even data. All you need is a prepaid SIM card and an antenna, and you’re ready to communicate with the world. By using serial commands you can send codes to talk to the SIM800L module.
The Adafruit FONA 800 shield is sold without attached header pins. You also need to purchase an antenna with an SMA connector; Adafruit offers a Slim Sticker-type GSM/Cellular quad-band antenna. The Arduino talks with the SIM800L via pins 2 and 3 using the SoftwareSerial library.
The SIM card should have enough credit to perform the actions you’re trying to do. Those offering unlimited text messages are especially useful. Other optional extras are a mic and a speaker; without them, you won't be able to do anything more than call and hang up.
You can view an in-depth tutorial on Adafruit’s site.
Geiger counter – radiation sensor board shield
Made by: LiberiumPrice: $170 from Cooking Hacks
Pin requirements: 2, 3, 4, 5, 6, 7, 8, 9, 10, 11, 12, 13
The radiation sensor board is probably one of the most impressive Arduino shields. It allows you to monitor radiation levels in the environment. This board was made to help the people of Japan monitor radiation levels following the radiation leakages in Fukushima in March 2011. The Geiger counter can use various Geiger tubes to detect different types and levels of radiation. There is also an LCD display, an LED, and a piezo speaker for feedback.
This shield uses Geiger tubes that operate at dangerously high voltages (400V–1000V), so it requires extreme care. It is best to keep the radiation sensor board in an enclosure to keep it out of human contact. Radiation is dangerous, but so is electricity. If you don’t know what you’re doing, don’t mess around.
The piezo speaker and LED are connected to pin 2, which triggers an interrupt with every pulse that the Geiger tube generates. Depending on the tube used and the number of pulses or counts per minute (cpm), you can determine the radiation level in Sieverts per hour. Pins 3 to 8 are used for the LCD display to generate the sensor readings in detail. Pins 9 to 13 are used for the LED bar to give clear visual feedback of the radiation level. The first three LEDs are green. The last two are red, showing that a high and potentially dangerous level of radiation is being approached.More details on this project can be found on the Cooking Hacks product page


