

 ©Shutterstock/FabrikaSimf
Many kinds of printers are available, and you have several ways to set them up. up I cover the basics here.
When you shop for a new printer to work with your Chromebook, if you stick with major brands (Brother, Canon, Epson, HP, and Lexmark, for example), chances are your printer and your Chromebook will get along just fine. Still, it’s probably wise to ensure that any new printer you are thinking of buying will work with your Chromebook with no fuss. It’s a good idea to ask a salesperson, read the specs, and read reviews.
Direct connect printing on your Chromebook
Direct connect, which is the easiest type of printing to set up, involves connecting a USB cable from your printer to your Chromebook. You need to follow the instructions that came with your printer, and if they vary from the steps here, definitely go with the printer’s instructions! Otherwise, follow these steps:- Turn on the printer and connect the USB cable from your printer to a USB plug on your Chromebook.
- On your Chromebook screen, click the status area to open the Settings view and then click the Settings icon(which looks like a tiny gear near the top-right corner).
The Settings window opens.
- Scroll all the way down in the Settings window and click Advanced.
You see the Advanced settings section in the Settings window.
- Keep scrolling until you find Printing; then click Printers.
- Click Add Printer.
The Add a Nearby Printer window appears and your printer should appear in a list. (Your printer might be the only one in the list.)
- Click the printer that is shown.
It should match the make and model of printer that your Chromebook is connected to.
- Click Save.
That’s all you should need to do.
Here’s a bit of trivia: The symbol with the three little dots is sometimes called a Twinkie. If you’re not sure why this is, go buy a Twinkie and look at it from underneath. You will find three little holes there, which is where the manufacturer injects a whipped-cream-like substance into the bread-like substance. Enjoy!
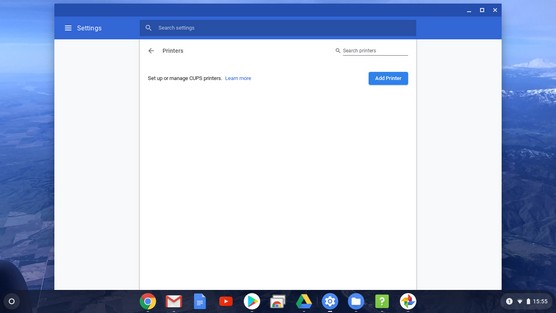 Setting up a local printer for your Chromebook.
Wi-Fi printing from your Chromebook
Several brands of printers support Wi-Fi printing so that you don’t have to connect a USB cable to your printer. One great advantage of having a Wi-Fi–supported printer is that you can print from anyplace in your home or office.Be sure to follow your printer’s setup instructions for this type of printing, in case they vary from the procedure outlined here. Here are the basics of setting up Wi-Fi printing on your Chromebook:
- Turn on your printer and follow its setup instructions to connect it to your Wi-Fi network.
Have your Wi-Fi network identifier and password handy. Your Wi-Fi network identifier is the name of the network to which you connect your Chromebook. - On your Chromebook screen, click the status area to open the Settings view and then click the Settings icon (which looks like a tiny gear near the top right corner of the status window).
The Settings window appears.
- Scroll all the way down in the Settings window, and click Advanced.
The Advanced settings section in the Settings window appears. - Keep scrolling until you find Printing; then click Printers.
- Click Add Printer.
The Add a Nearby Printer window appears. Your printer should appear in a list. If you don’t see it, check to see whether the printer is still turned on.
- Click the printer that matches the make and model of printer that your Chromebook is connected to.
- Click Save.
That’s all you should need to do.
Use this guide to learn about cloud printing with your Chromebook.


