

In place of many resident applications, Chromebook uses web-based applications that you access through the Google Web Store and Google Play Store. Because so many functions are obscure, some Chromebook settings — such as cloud printing, email vacation responders, and function keys — can be a little challenging to set up or use.
This Cheat Sheet shows you how to take advantage of these functions and shortcut keys.
Cloud Printing on Your Chromebook
Part of what makes Chromebook’s operating system, Chrome OS, so fast is its support of a limited number of hardware devices on the market, including printers. But that doesn’t mean that Chromebook’s users are limited. Thankfully, Google has rolled out a way to print over the web: cloud printing.
Cloud printing allows you to connect a printer to the Internet and access it using your Google account. Several printers on the market are cloud-printing–enabled, but if your printer isn’t, don’t fret. You can still set it up for printing.
To set up cloud printing with a classic printer (that is, one that isn’t Google cloud-printing–enabled), you need a computer — one that isn’t a Chromebook— and an Internet connection. Then follow these steps:
- Plug your printer into your non-Chromebook computer and power it on.
- Open the Chrome browser on the computer.
Ensure that you’re logged into Chrome with the same Google Account that you use to access your Chromebook. If you’re not, click the Disconnect Your Google Account button and then log in with the correct credentials before proceeding!
- After the Chrome browser loads, click the Settings button in the top-right corner of the browser.
A menu appears. - Click Settings.
Your Chrome browser settings appear. - Click Show Advanced Settings.
- Click Printing.
Several additional options appear. - In the Print section, choose Google Cloud Print.
- In the Google Cloud Print window, click Manage Cloud Print devices.
A list appears, displaying the devices on your network that are available to be registered with Google Cloud Print. - Locate the Classic Printers section and click Add Printers.
A page loads, giving you the option to add every printer installed on your device. - Deselect every printer except for the printer you just connected to your non-Chromebook computer; then click Add Printer.
A confirmation page appears.
At this point, you can print from your Chromebook as long as the computer to which your classic printer is connected is turned on and connected to the Internet.
To test that you successfully set up your printer for cloud printing, follow these steps:
- With your Chromebook, open a Chrome web browser.
- Click the Settings button in the top-right corner.
A menu appears. - Click Print.
Print options appear in a window. - Click the printer in the Destination section on the left side of the screen.
The Select a Destination window appears. Click See More to have the option to select a different printer destination. - Select your cloud printer.
The window disappears, and your selection is indicated in the Destination area of the print window. - Click Print.
Your document prints to the selected printer.
If your document didn’t print, ensure the following:
- The printer to which you’re printing is turned on.
- The computer that’s connected to your printer is turned on.
- The computer that’s connected to your printer is connected to the Internet.
- Chrome is open on the computer that’s connected to your printer.
How to Set a Vacation Responder on Your Chromebook
Whether you’re on vacation or just away from your desk, Chromebook allows you to create an auto-responder that sends an automated response, written by you, to every email you receive.
The automated response is usually just a note saying that you’re out right now, but that you’ll get in touch when you get back. Then, when you return to your desk, you can get to the business of replying more formally and personally to the emails you received while you were away.
To set up your vacation responder, follow these steps:
- Open Gmail.
- Click the Settings icon in the top-right corner of the window.
It looks like a little gear, and it opens the Settings window. - In the Settings window, click See All Settings.
The Settings editor appears in the main email area. You will be in the General tab. - Scroll to the bottom of these settings to the Vacation Responder section and select the Vacation Responder On button.
- Enter the date of the first day you want your responder to begin working.
If you know the date of the last day you want your vacation responder to be working, enter it. Otherwise skip it.
If you do not set a last day for your vacation responder, you must turn your vacation responder on manually by selecting the Vacation Responder Off button. Otherwise, Gmail continues to automatically send replies to each email you receive forever. - In the Subject field, enter the subject for your responder email.
For example, you might call it “Out of Office” or “Vacation Auto-Responder.” - In the large text box below the Subject field, type the message for your vacation responder email.
For example, you might say, “I am away from my office until July 10. I will respond to your message as soon as possible when I return. If you need help immediately, please contact ____. - If you want your auto-responder message to be sent only to people in your contacts, select the Only Send a Response to People in my Contacts check box.
For instance, you might do this because you don’t want complete strangers to know you will not be at home. - Click Save Changes.
Now, anyone who sends you an email while you’re away will receive your auto response.
People who send you frequent email messages will receive the auto-response message only once every four days.
Chromebook Keyboard Shortcuts
Numerous key combinations perform a litany of tasks on your Chromebook so that you don’t have to navigate and click your way through the Chrome OS menu system. The following tables show shortcut key combinations to make your experience on a Chromebook more intuitive and efficient.
When you see a keyboard shortcut like Ctrl+N, you should press the Ctrl and N keys at the same time. When you see a keyboard shortcut like Ctrl+Shift+N, press the Ctrl, Shift, and N keys at the same time.
Shortcuts for Chromebook and apps
| Shortcut | Function | |
| Ctrl+Alt+/ | Open the list of available keyboard shortcuts. | |
| Ctrl+/ | Open Help center. | |
| Ctrl+Alt+Z | Enable or disable accessibility features if you’re not signed in with a Google Account. If you are signed in, you can configure the accessibility feature on the Settings page. | |
| Ctrl+O | Open a file. | |
| Ctrl+Shift+W | Close the current application window. | |
| Alt+[ | Dock application window on the left side of the screen. | |
| Alt+] | Dock application window on the right side of the screen. | |
| Alt+Shift+= | Move window to center of screen. | |
| Alt+= | Maximize the application window. | |
| Alt+- | Minimize the application window. | |
| Alt+Search+M | Move active window between displays. | |
| Shift+Search+Esc | Unpin an app from the shelf. | |
| Ctrl+Shift+T | Reopen the last tab or window you’ve closed. Google Chrome remembers the last ten tabs you’ve closed. | |
| Alt+1 through Alt+8 | Activate shelf items 1 through 8. | |
| Search+1 through Search+= | Use F1 to F12. | |
| Alt+9 | Go to the last icon on the shelf. | |
| Alt+Tab | Go to the next window you have open. | |
| Alt+Shift+Tab | Go to the previous window you have open. | |
| Shift+Alt+L | Place focus on the App Launcher.
Press Tab or the right arrow to focus on the next item in the shelf Press Shift+Tab or the left arrow to focus on the previous item in the shelf. Press the spacebar or Enter to activate buttons, including page actions and browser actions. Press Shift+Increase Volume to open the context menu for the button (if available). Press Esc to return focus to the page. |
|
| Shift+Search+Volume Up | Open right-click menus for focused items. | |
| Ctrl+Alt+Shift+Reload Key | Rotate Window 360 degrees. | |
| Ctrl+Shift+Reload Key | Rotate display 90 degrees (you’ll be asked to confirm). | |
| Ctrl+Shift+= | Zoom in entire screen. | |
| Ctrl+Chift+- | Zoom out entire screen. | |
| Ctrl+Shift+0 (zero) | Reset screen zoom level. | |
| Ctrl+Alt+(Reveal All Windows key) | Take a screen shot of the current window. | |
| Ctrl+(Reveal All Windows key) | Take a screen shot of the entire screen. | |
| Search+Esc | Bring up the Task Manager. | |
| Full Screen key | Toggle full screen. | |
| Ctrl+Full Screen key (confirm) | Configure one or more monitors. | |
| Alt+Full Screen key | Swap primary monitors. | |
| Speaker Off key | Mute sound. | |
| Alt+Shift+M | Open the Files app. | |
| Ctrl+. (period) | Display hidden files in the Files app. | |
| Select the file and press Space | Preview a file in the Files app. | |
| Alt+Shift+S | Open the Status area. | |
| Alt+Shift+N | Display notifications. | |
| Search key | Open/Close the Launcher. | |
| Shift+Search | Open/Close the full-screen Launcher. | |
| Search+L | Lock your Chromebook (requires your Chromebook password or PIN to unlock). | |
| Ctrl+Shift+Q | Log out of the Chromebook. | |
| Ctrl+Alt+. (period) | Switch to the next Chromebook user. | |
| Ctrl+Alt+, (comma) | Switch to the previous Chromebook user. | |
| Alt+Shift+I (letter I) | Send feedback to Google. | |
| Shift+Search+L | Put your Chromebook in sleep mode. | |
| Brightness Up key | Make the display brighter. | |
| Brightness Down key | Make the display dimmer. | |
Shortcuts for Chrome Browser Pages
| Shortcut | Function | |
| Windows and Tabs | ||
| Ctrl+N | Open a new Chrome browser window. | |
| Ctrl+Shift+N | Open a new Chrome browser window in incognito mode. | |
| Ctrl+T | Open a new Chrome browser tab. | |
| Ctrl+W | Close the current Chrome browser tab. | |
| Ctrl+1 through Ctrl+8 | Go to the Chrome browser tab at the specified position. | |
| Ctrl+9 | Go to the last Chrome browser tab in the window. | |
| Ctrl+Tab | Go to the next Chrome browser tab in the window. | |
| Ctrl+Shift+Tab | Go to the previous Chrome browser tab in the window. | |
| Ctrl+click a link | Open the link in a new Chrome browser tab in the background. | |
| Ctrl+Shift+click a link | Open the link in a new Chrome browser tab and switch to the newly opened tab. | |
| Shift+click a link | Open the link in a new Chrome browser window. | |
| Drag a link to a Chrome browser tab’s address bar | Open the link in the Chrome browser tab. | |
| Drag a link to a blank area on the Chrome browser tab strip | Open the link in a new Chrome browser tab. | |
| Type a URL in the address bar, then press Alt+Enter | Open the URL in a new Chrome browser tab. | |
| Press Esc while dragging a Chrome browser tab | Return the Chrome browser tab to its original position. | |
| Browsing History | ||
| Ctrl+H | Open the History page. | |
| Alt+left arrow | Go to previous page in your Chrome browser browsing history. | |
| Alt+right arrow | Go to the next page in your Chrome browser browsing history. | |
| Viewing Web Pages | ||
| Alt+up arrow | Scroll up. | |
| Alt+down arrow | Scroll down. | |
| Alt+left arrow | Go to previous page. | |
| Alt+right arrow | Go to next page. | |
| Spacebar | Scroll down the web page. | |
| Ctrl+Alt+up arrow | Go to top of page. | |
| Ctrl+Alt+down arrow | Go to bottom of page. | |
| Ctrl+Enter | Add www. and .com to your input in the address bar and open the resulting URL | |
| Ctrl+Forward (the right arrow key near the Esc key) and Ctrl+Back (the left arrow key near the Esc key) | Go to the next or previous one. Panes include:
· Status area, which contains the time, network icon, and battery icon in the bottom-right corner of the screen · App Launcher · Address bar · Bookmarks bar (if visible) · Web content (including any infobars) · Downloads bar (if visible) |
|
Keeping your Chromebook up to date
Part of what makes Chromebook’s operating system, ChromeOS, so appealing is its simplicity and ease of use. Keeping your Chromebook up to date is essential for correct functionality and vital for security.
ChromeOS, your Chromebook’s operating system, does an excellent job of keeping itself up to date. To do this, follow these steps:
- Open the Settings app. Click the clock area at the lower right corner of the screen, then click the little gear. The Settings app will open.
- In the menu on the left side of the Settings app, scroll down and click on About ChromeOS.
- If ChromeOS has recently downloaded an update, you will see the message, “Nearly up to date! Restart your device to finish updating.” Before you click Restart, make sure you don’t have any open work in progress, such as a photo you are editing, or an email message you are composing. When you’re ready, click Restart. Your Chromebook will reboot and will now run the latest version of ChromeOS.
- If you don’t see the message “Nearly up to date!” as noted in Step 3, you’ll see the button labeled Check for updates. Click that button. Most of the time, it will come back and tell you, “Your Chromebook is up to date.”
The preceding steps are provided so that you can be sure that ChromeOS is up to date. If you never take these steps, your Chromebook will automatically download the latest ChromeOS when it is available.
Then, your Chromebook will display a notification (shown below) that tells you that the new version of ChromeOS is available, directing you to restart your Chromebook to install the update.
Running the latest version of ChromeOS assures you your Chromebook operating system is stable and secure.

ChromeOS update notification
Keeping installed apps up to date
A separate, easy procedure is used to keep your Chromebook’s installed apps up to date. The procedure is straightforward, and after you do this a couple of times, you’ll click right through it without having to think much about it. Follow these steps:
- Open the Google Play app (click the Launcher and click on the Google Play icon). The Google Play app will start and open a new window.
- Click on your photo/avatar/initial in the upper-right corner of the Google Play window.
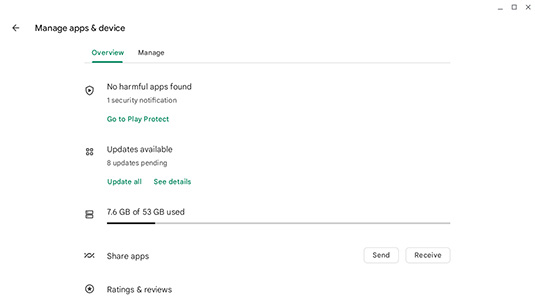
- Click on Manage apps & device. The Manage apps & device pane opens, displaying the Overview tab.
- In the Manage apps & device window, you may see an “Updates available” message (see Figure 2). If so, click on Update all just beneath it. All of the apps that need an update will be automatically updated.
You can also update apps one at a time by clicking See details and then clicking the Update button for each app you want to update.
Click on See details if you want to view which apps need updating and observe the updates performed on each app. Your Chromebook will download and then install each one. When each update is installed, it will drop off the list until all have been completed.
In the Manage apps & device window, if you instead see the “All apps up to date” message, rest easy: You’re running the latest versions of everything on your Chromebook.
I recommend you do this simple procedure at least monthly. You can create a recurring calendar invite in your Google Calendar, or whatever calendar app you use.
Using the Play Store to update Chromebook apps


