


You can use the Nikon Wireless Mobile Utility (WMU) app to connect your camera wirelessly to an Android or iOS smart device. You can then use the device to view your photos and transfer low-resolution versions of your favorites so that you can share them online, using your device's Internet connection.
You can also use the app to trigger the camera's shutter release wirelessly. Unfortunately, you can't use this feature for movie recording. It's not that great for still photography, either, because you can't adjust any camera settings with the smart device. You can only trigger the shutter release. Still, if you need to position the camera in one part of the room and yourself in another, it's a workable option.
After the devices are connected and you launch the WMU app, your smart device displays a screen with two icons: Take Photos and View Photos, as shown on the left in the figure. The figure shows the screen as it appears on an Android tablet; the design may vary if you use a different device or operating system.
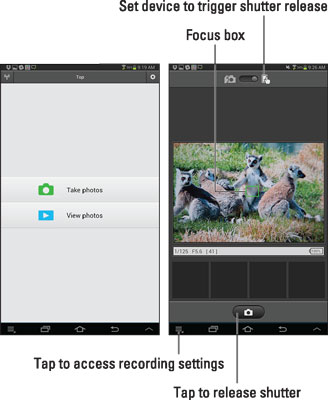
Tap the Take Photos icon to display the screen shown on the right in the figure. (Again, this screen is the Android version; things look a little different in the iOS version of the app.) On an Android device, tap the icon at the top of the screen that looks like a finger on a tablet, which tells the device that you're going to use it as a camera remote control. The camera shifts to Live View mode, with the live preview appearing on the smart device. You also see some shooting data, such as shutter speed and f-stop — again, though, you can't adjust the settings from the smart device.
As in normal Live View, a focus box is used to indicate the area of the frame that will be used to establish focus if you use autofocusing. The exact focusing procedure depends on the current Live View autofocusing settings. To use the default autofocus settings, tap your subject on the device screen to move the focus box over it. The focus box turns green when focus is achieved, as shown in the figure.
Before taking the picture, you may want to investigate a few additional options available from the Take Photos screen. In the figure, the icon that brings up the options in the Android version of the app is labeled. You can choose to download the picture to the device automatically, and you can delay the shutter release by enabling the app's self-timer option. Leave the other option, Live View, turned on to keep the live preview visible on your device.
When everything's ready to go, tap the camera icon at the bottom of the screen to take the picture.


