


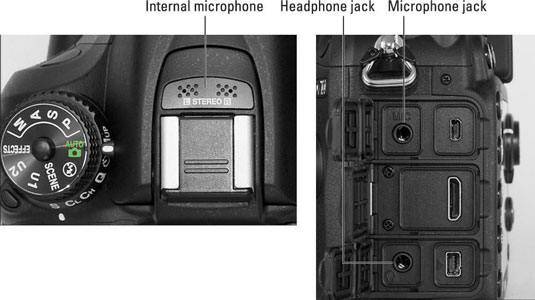
You can record sound using the Nikon D7100’s built-in microphone, labeled on the left, or you can attach the optional Nikon ME-1 stereo microphone to the jack labeled on the right in the figure. You can even attach headphones via the headphone jack, also labeled in the figure, to monitor sound recording.
One way to adjust audio-recording options is to select Movie Settings from the Shooting menu, press OK, and then select Microphone, as shown on the left. Press the Multi Selector right to display the settings shown on the right in the figure. Some of the menu options can be a little intimidating until you know what’s what:
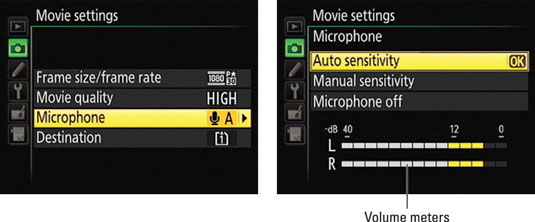
Volume meters: The two bars at the bottom of the screen (labeled “Volume meters”) indicate the sound levels being picked up by the microphone. For stereo sound, the top bar represents the left audio channel; the bottom bar, the right channel. For monaural sound, both bars reflect the same data.
Audio levels are measured in decibels (dB), and levels on the volume meter range from –40 (very, very soft) to 0 (as loud as can be measured digitally). Ideally, sound should peak consistently in the –12 range. The indicators on the meter turn yellow in this range. If the sound level is too high, the volume meters will peak at 0 and appear red — a warning that audio may be distorted.
Microphone settings: You can choose from three microphone options:
Auto Sensitivity: The camera automatically adjusts the volume according to the level of the ambient noise. This setting is the default.
Manual Sensitivity: Choose this option and press the Multi Selector right to display the manual sound level control. Press the Multi Selector up and down to adjust the microphone volume; settings range from 1 to 20. Again, the volume meters serve as your guide to the correct microphone sensitivity.

Microphone Off: Choose this setting to record a movie with no sound or when you’re using an off-camera microphone and don’t want the camera itself to record audio.
After you're familiar with how the audio settings work, you may prefer to adjust them via the movie Live View control strip. Just press the i button to display the control strip, highlight the Microphone icon, and press OK to display volume indicators over the screen.
Press the Multi Selector up and down to adjust the volume. Move the indicator all the way to the top of the scale to shift to the Auto setting; go all the way to the bottom to turn audio recording off.
If you have headphones attached, you can use the control strip to adjust headphone volume. Scroll to the second screen of the control strip to access the adjustment. (This is one setting you can't control via a menu option.)
Either way, you must adjust microphone levels and headphone volume before starting the recording; you can’t change them while recording is in progress.
To see the current settings without going to the menu or control strip, look in the spot labeled Microphone.
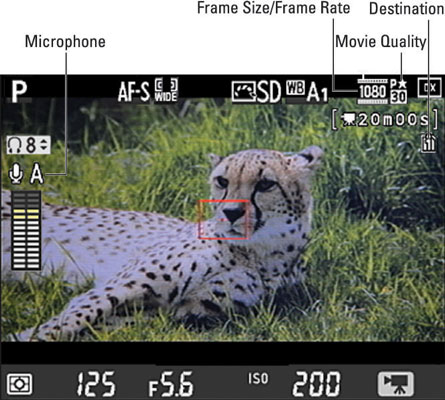
For example, the symbol in the figure shows that the mic is enabled and set to automatic volume adjustment. If you have headphones attached, a headphone volume symbol appears directly above the microphone symbol, as shown in the figure.


