


In the P, S, and A exposure modes on your Nikon D5500, you have some input over exposure: In P mode, you can rotate the Command dial to choose from different combinations of aperture and shutter speed; in S mode, you can dial in the shutter speed; and in A mode, you can select the aperture setting.
But because these are semiautomatic modes, the camera controls the final exposure. If your picture turns out too bright or too dark in P mode, you can’t simply choose a different f‐stop/shutter speed combo because they all deliver the same exposure.
And changing the shutter speed in S mode or adjusting the f‐stop in A mode won’t help either because as soon as you change the setting that you’re controlling, the camera automatically adjusts the other setting to produce the same exposure it initially delivered. What about changing the ISO? Nope, the camera just recalculates the f‐stop or shutter speed it needs to maintain the “proper” exposure at that ISO.
Not to worry: You actually do have final say over exposure in P, S, and A modes. The secret is Exposure Compensation, a feature that tells the camera to produce a brighter or darker exposure on your next shot.
How the camera arrives at the brighter or darker image depends on the exposure mode: In A mode, the camera adjusts the shutter speed but leaves your selected f‐stop in force. In S mode, the camera adjusts the f‐stop and keeps its hands off the shutter speed control. In P, the camera decides whether to adjust aperture, shutter speed, or both. In all three modes, the camera may also adjust ISO if you enable Auto ISO Sensitivity Control.
The camera can adjust f‐stop only so much, according to the aperture range of your lens. And the range of shutter speeds, too, is limited by the camera itself. So there’s no guarantee that the camera can actually deliver a better exposure when you dial in Exposure Compensation.
With that background out of the way, here are the details about this feature:
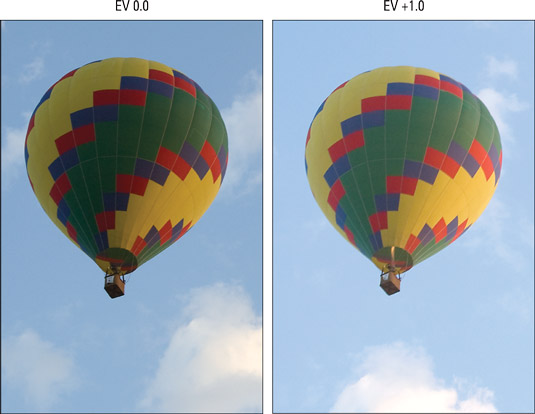
Exposure Compensation settings are stated in terms of EV numbers, as in EV +2.0. Possible values range from EV +5.0 to EV –5.0. (EV stands for exposure value.) Each full number on the EV scale represents an exposure shift of one stop. A setting of EV 0.0 results in no exposure adjustment. For a brighter image, raise the Exposure Compensation value; for a darker image, lower the value.
Where and how you check the current setting depends on the display, as follows:
Information display: This one’s straightforward: The setting appears. In addition, the meter shows the amount of compensation being applied. For example, the meter indicator appears one stop toward the positive end of the meter, reflecting the EV +1.0 setting.
Live View display: If Exposure Compensation is turned on, you see the plus/minus symbol; otherwise, that area of the display appears empty.
 These indicators tell you whether Exposure Compensation is enabled.
To view the selected adjustment amount in Live View mode, press the Exposure Compensation button.
Viewfinder: The viewfinder also displays the plus/minus symbol only, but again, you can press the Exposure Compensation button to temporarily view the EV setting. Or just look at the exposure meter: As in the Information display, the exposure meter tells you how much exposure shift is in force.
You can change the Exposure Compensation setting in two ways:
Press the Exposure Compensation button while rotating the Command dial. Pressing the button automatically activates the setting, and you can spin the Command dial to enter the amount of adjustment you want to apply.
Use the control strip. Press the i button or tap the i symbol on the touchscreen to activate the strip and then select the Exposure Compensation option to display the screen where you can set the amount of adjustment.
 One way to adjust Exposure Compensation is via the control strip.
As you adjust the setting in Live View mode, the monitor brightness updates to show you how the change will affect exposure. However, the preview can only show an adjustment up to +/– EV 3.0, even though you can set the adjustment as high as +/– EV 5.0.
You also can enable this feature in several Scene modes and Night Vision Effects mode. Using Exposure Compensation isn’t limited to the P, S, and A exposure modes. To check whether the feature is available for your selected mode, just look at the Information display or Live View display or press the Exposure Compensation button.
Exposure Compensation is also available for shooting movies.
In the P, S, A, and M exposure modes, your Exposure Compensation setting remains in force until you change it, even if you power off the camera. So make a habit of checking the setting before each shoot, or always set the value back to EV 0.0 after taking the last shot for which you want to apply compensation.
For the Scene and Effects modes that allow you to set Exposure Compensation, the adjustment is reset to zero compensation when you turn the camera off or choose a different exposure mode.
When you use flash, the Exposure Compensation setting affects both background brightness and flash power. But you can further modify the flash power through a related option, Flash Compensation.
Exposure Compensation affects the meter in M exposure mode. Although the camera doesn’t change your selected exposure settings in M (manual) exposure mode if Exposure Compensation is enabled, the exposure meter is affected: It indicates whether your shot will be properly exposed based on the Exposure Compensation setting. So if you don’t realize that Exposure Compensation is enabled, you may mistakenly adjust your exposure settings when they’re actually on target.


