


One of the many advantages of investing in the Rebel T6i/750D is that you can customize it to suit the way you like to shoot. Open Setup Menu 1, shown here, to access the following options:
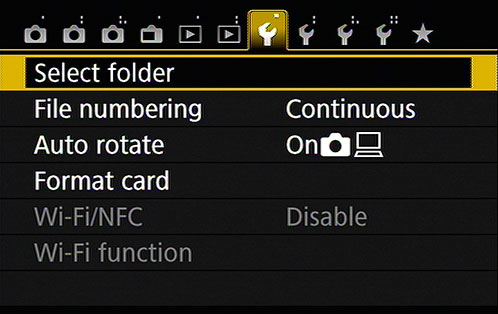
Select Folder: By default, your camera creates an initial file‐storage folder named 100Canon and puts as many as 9,999 images in that folder. When you reach image 9999, the camera creates a new folder, named 101Canon, for your next 9,999 images. The camera also creates a new folder if you perform a manual file‐numbering reset.
If your memory card contains multiple folders, you must use the Select Folder option to choose the folder where you want to store the next photos you shoot. But selecting the menu option also leads to another neat feature: You can create your own storage folders at any time. You might create separate folders for each person who uses the camera, for example. Here's how to view which folder is active and choose a different one:
See which folder is currently selected. Choose Select Folder to display a list of all folders, with the current one highlighted and appearing in blue type. The number to the right of the folder name shows you how many pictures are in the folder. You also see a thumbnail view of the first and last pictures in the folder, along with the file numbers of those two photos.
Choose a different folder. Highlight the folder by using the cross keys and then press the Set button.
File Numbering: This option controls how the camera names your picture files:
Continuous: This is the default; the camera numbers your files sequentially, from 0001 to 9999, and places all images in the same folder (100Canon, by default) unless you specify otherwise using the Select Folder option described in the previous bullet point. This numbering sequence is retained even if you change memory cards.
When you reach picture 9999, the camera automatically creates a new folder (101Canon, by default) and restarts the file numbering at 0001 — again, the folder issue being dependent on the status of the Select Folder option.
Auto Reset: If you switch to this option, the camera restarts file numbering at 0001 each time you put in a different memory card or create a new folder. We don't recommend this option because it's easy to wind up with multiple photos that have the same file number if you're not careful about storing them in separate folders.
Beware of one gotcha that applies both to the Continuous and Auto Reset options: If you swap memory cards and the new card already contains images, the camera may pick up numbering from the last image on the new card, which throws a monkey wrench into things. To avoid this problem, format the new card before putting it into the camera, as explained later in this list.
Manual Reset: Select this setting if you want the camera to begin a new numbering sequence, starting at 0001, for your next shot. A new folder is automatically created to store your new files. The camera then returns to whichever mode you previously used (Continuous or Auto Reset) to number subsequent pictures.
Auto Rotate: By default, your picture files include a piece of data that indicates whether the camera was oriented in the vertical or horizontal position when you shot the frame. Then, when you view the picture on the camera monitor or on the computer screen, the image is automatically rotated to the correct orientation. You also can choose to rotate the pictures only on the computer monitor or disable rotation altogether.
When both computer and camera display rotation are enabled, you see a little camera icon and computer monitor icon next to the word On. If you see just the computer monitor icon, the pictures aren't rotated on the camera monitor. Choose Off to disable rotation on both displays.
Even if automatic rotation is disabled, you can rotate a picture during playback using the Rotate Image option on Playback Menu 1.
Format Card: The first time you insert a new memory card, use this option to format the card, a maintenance function that wipes out any existing data on the card and prepares it for use by the camera.
If you previously used your card in another device, such as a digital music player, copy those files to your computer before you format the card. You lose all data on the card when you format it.
When you choose the Format option from the menu, you can perform a normal card formatting process or a low‐level formatting by tapping the Low Level Format check box or by pressing the Erase button (the one marked with a trash‐can symbol) to select the box. This option gives your memory card a deeper level of cleansing than ordinary formatting and thus takes longer to perform. Normally, a regular formatting will do, although performing a low‐level formatting can be helpful if your card seems to be running more slowly than usual.
However — and this is a however for anyone with a high‐security clearance who's shooting pictures that should never fall into enemy hands — a regular‐level formatting leaves enough bits of data intact that a determined computer whiz could recover your images. To prevent that possibility, do a low‐level formatting or crush the card under your heel. Or run over it with your car. You can never be too safe.
Wi‐Fi/NFC: By default, the Wi‐Fi interface is turned off. When you're ready to take advantage of the Wi‐Fi features, set the option to Enable. Note that movie recording is disabled when the Wi‐Fi feature is turned on. By the way, NFC stands for Near Field Communication, which is another technology that enables devices in close proximity, such as smartphones, to connect and share data.
Wi‐Fi Function: This option is the route to the various wireless connectivity options built into your camera.
Eye‐Fi Settings: If an Eye‐Fi memory card is installed, this menu option appears and enables you to control the wireless transmission between the camera and your computer. When no Eye‐Fi card is installed, the menu option is hidden, as it is in the figure.


