


The following list explains options for erasing a single file, a group of files, or all files — again, with the exception of protected files:

- Eraseimages one at a time: Display the photo in single-image view or select it in Index view. Then press the Erase button. The words Cancel and Erase appear at the bottom of the screen. To zap that file into digital oblivion, tap Erase or press the right cross key to highlight Erase and then press the Set button.
 During picture playback, press the Erase button to delete the displayed image or movie.
 - Erase all images: To erase all files, head for Playback Menu 1. Choose Erase Images and then choose All Images on Card, as shown on the right. On the confirmation screen that appears, choose OK.
 Choose these Playback Menu 1 options to quickly delete all unprotected files.
• Erase all images in a selected folder: If your card contains more than one folder, you can limit the image dump to a specific folder. Instead of selecting All Images on Card from the screen shown on the right, choose All Images in Folder. Choose the folder you want to empty and then tap the Set symbol or press the Set button.
- Erase a batch of selected files:After choosing Erase Images from Playback Menu 1, choose the Select and Erase Images option, as shown on the left in the following figure. If the camera is set to single-image playback mode, you see the current image in the monitor. At the top of the screen, a check box appears, as shown on the right.
 Tag a file as ready for the trash by tapping the Set symbol or pressing the Set button.
To the right of the check box is a number showing you how many files are currently tagged for erasure. To tag the current file, tap the check box, tap the Set icon at the bottom of the screen, or press the Set button. A check mark then appears in the box, and the picture is officially marked for erasure. If you change your mind, use the same techniques to remove the check mark.
To tag more files, use the normal playback techniques to scroll through your pictures, adding the check mark to all the files you want to trash.
A couple of tips on using this option:

- To take a closer look at the current image, press the Magnify button or pinch outward on the touchscreen. The display zooms just as it does when you perform those actions during regular playback.
To exit the magnified view, tap the exit arrow (near the top-right corner of the screen) or press the Index/Reduce button.
- If you don't need to inspect each image closely, you can display up to three thumbnails per screen. Just press the Index/Reduce button to shift to the three-thumbnail display. Use the same methods to tag images for erasure and to scroll through files as you do when viewing them one at a time.To return to full‐frame view, press the Magnify button or pinch outward on the touchscreen.
- To take a closer look at the current image, press the Magnify button or pinch outward on the touchscreen. The display zooms just as it does when you perform those actions during regular playback.
When you finish selecting images, press the Erase button or tap the Erase symbol on the touchscreen. You see a confirmation screen asking whether you really want to get rid of the selected images; if you're ready to take the leap, choose OK.
- Select a range of files: Here's an even faster way to select a group of consecutive files: After selecting Erase Images from Playback Menu 1, choose Select Range to display the screen shown on the left here. Then move the blue box over the first image you want to delete (tap the thumbnail or use the cross keys) and either tap the Set First Img symbol or press the Set button. The symbol then changes to read Set Last Img (not shown in the figure).
 Use Select Range to quickly select and delete a consecutive series of files.
Next, move the blue box over the last file in the group and tap Set Last Img or press the Set button. The camera immediately selects the first and last files and all files in between, as shown on the right in the figure. If you're satisfied that all the files you want to delete are selected, tap the trash can symbol in the lower-left corner of the screen or press the Erase button. A confirmation screen appears; choose OK.
- Erase files found by the Image Search function. By using the Image Search function, you can tell the camera to locate all files that meet certain parameters — date shot, type of file, assigned rating, and so on. After completing the search, choose Erase Images from Playback Menu 1, as shown on the left here, which displays a different set of options than normal, as shown on the right in the figure. Choose All Found Images to delete just the files turned up by the search.
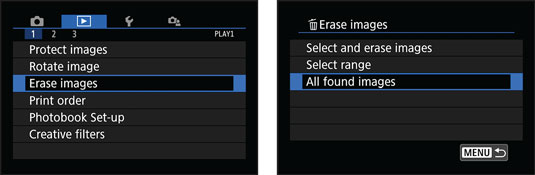 When the Image Search function is active, choose All Found Images to erase files that met the search criteria.


