


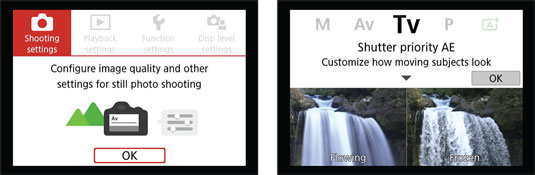
For example, when you press the Menu button, you get a description of the contents of the current menu, as shown on the left. And when you rotate the Mode dial to choose an exposure mode, the display describes what that mode is designed to do. The right side of the figure shows the screen that appears if you select the Tv (shutter-priority autoexposure) exposure mode, for example.
 In Guided Display mode, the camera offers simplified menus and brief details about the feature you're currently using.
Additionally, after you exit the screen that describes the exposure mode, the camera displays available picture-taking settings along with input on certain options. If you choose OK from the Tv screen shown on the right, for example, you see the screen shown on the left, explaining that the main setting associated with the TV mode is the shutter speed, which determines whether moving objects appear blurry or sharp. As you change that setting, the screen updates to offer input on how your picture will be affected, as shown on the right in the following figure.
 Here are two guided screens that appear when you use the Tv exposure mode (shutter-priority autoexposure).
Guided mode is fine for users who don't aspire to master their camera or the ins and outs of photography. Standard mode is a better choice, for several reasons:
- Although the Guided screens make understanding some options easier, in many cases, they can be just as baffling as the Standard screens. Take a look at the left screen, for example. The illustration indicates that you can choose a number at the left end of the scale to blur motion (flowing) and the other to freeze it. But unless you're already a seasoned Canon user, you might not figure out that the two curved arrows atop the shutter speed setting represent the Main dial, indicating that you rotate that dial to change the setting. Nor is there any indication that the setting involved is named shutter speed.
- The Guided screens often focus on one particular aspect of a camera setting without explaining how that setting affects other characteristics of your picture. When you change the shutter speed, for example, the camera has to make adjustments to one or two other critical settings, aperture and ISO, in order to properly expose the picture. Those settings have their own impact on the look of your picture.
- Standard mode also saves you some steps as you make certain camera adjustments. For example, you don't have to go to the bother of dismissing the initial menu screen to get to the menu items.
- When you use the Guided mode, you can't access the My Menu feature, which enables you to create a custom menu that contains the menu options you use most.
- Most other Canon dSLRs don't offer a Guided mode, so if you're moving to the T7i/D800 from a previous Canon model that used standard displays, using Guided mode requires you to do unnecessary retraining. If you step up to a more advanced Canon model in the future, you also likely won't have the option to use Guided mode.
- Press the Menu button to display the menu screen.
- Select the Display Level Settings tab, as shown on the left here.
You can display the tab by tapping it at the top of the screen or by rotating the Main dial until the tab is highlighted.
 Choose the Display Level Settings tab to turn the Guided mode features on or off.
 - Tap OK or press the Set button.
You see the screen shown on the right. Each option turns a separate function of the Guided mode system on or off. By default, all four are turned on, as shown in the figure.
- Set the Shooting Screen and Menu Display options to Standard.
To change a setting, tap it or use the cross keys to highlight it and then press Set to display the two options available for each setting. Tap Standard or press the up/down cross keys to highlight it. Then tap Set or press the Set button to return to the initial menu screen. The affected screens should now appear as shown here.
 Here's how the menu and Quick Control screens appear in Standard mode.
The right screen, which displays shooting information, is labeled Shooting Screen in the menu, but its official name is the Quick Control screen. This screen is the central station for viewfinder photography.
- (Optional) Disable the Mode Guide and Feature Guide options.
The Mode Guide, when enabled, displays a brief description of your chosen exposure mode for a few seconds after you rotate the Mode dial to select that setting. Similarly, the Feature Guide provides text hints for some options as you select them.
- Press Menu to exit the menu system.


