


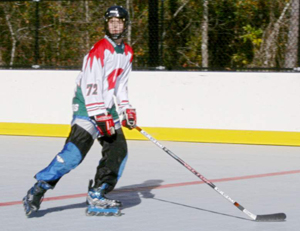
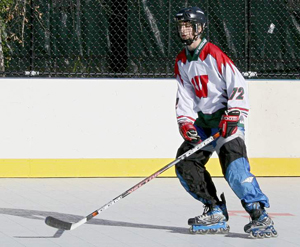
A fast shutter speed is the key to capturing a blur-free shot of a moving subject, whether it's a spinning Ferris wheel, a butterfly flitting from flower to flower, or a hockey-playing teen. In the first image below, a shutter speed of 1/125 second was too slow for the Canon EOS 70D to catch the subject without blur. For this subject, who was moving at a fairly rapid speed, a shutter speed of 1/1000 second was needed to freeze the action, as shown in the second figure below. (The backgrounds are blurry in both shots because the camera settings used produced a shallow depth of field; in the first image below, the skater is a little farther from the background, blurring the background more than in the second image below.)
Try the techniques in the following steps to photograph a subject in motion:
Set the Mode dial to Tv (shutter-priority autoexposure).
In this mode, you control shutter speed, and the camera chooses the f-stop that will produce a good exposure.
Rotate the Main dial to select the shutter speed.
The shutter speed you need depends on how fast your subject is moving, so you have to experiment. Another factor that affects your ability to stop action is the direction of subject motion. A car moving toward you can be stopped with a lower shutter speed than one moving across your field of view, for example. Generally speaking, 1/500 second should be plenty for all but the fastest subjects — speeding hockey players, race cars, or boats, for example. For slower subjects, you can even go as low as 1/250 or 1/125 second.
You also can take an entirely different approach to capturing action: Instead of choosing a fast shutter speed, select a speed slow enough to blur the moving objects, which can create a heightened sense of motion and, in scenes that feature very colorful subjects, cool abstract images. This approach was used when shooting the carnival ride featured in the figure below. For the left image, the shutter speed was set to 1/30 second; for the right version, the shutter speed was set to 1/5 second. In both cases, a tripod was used, but because nearly everything in the frame was moving, the entirety of both photos is blurry — the 1/5 second version is simply more blurry because of the slower shutter.

If the aperture value blinks after you set the shutter speed, the camera can't select an f-stop that will properly expose the photo at that shutter speed and the current ISO setting.
Raise the ISO setting to produce a brighter exposure, if needed.
In dim lighting, you may not be able to create a good exposure at your chosen shutter speed without taking this step. Raising the ISO increases the possibility of noise, but a noisy shot is better than a blurry shot.
If Auto ISO is in force, ISO may go up automatically when you increase the shutter speed. Auto ISO can be a big help when you're shooting fast-paced action; just be sure to limit the camera to choosing an ISO setting that doesn't produce an objectionable level of noise.
For rapid-fire shooting, set the Drive mode to one of the Continuous settings.
In High-speed Continuous mode, you can take approximately seven frames per second; Low-speed Continuous gives you about three frames per second. The camera continues to record images as long as the shutter button is pressed. You can access the Drive mode setting by pressing the Drive button or by using the Quick Control screen.
If possible, use manual focusing; otherwise select AI Servo AF (autofocus) mode and 19-Point Automatic AF Area Mode.
With manual focusing, you eliminate the time the camera needs to lock focus during autofocusing. Of course, focusing manually gets a little tricky if your subject is moving in a way that requires you to change the focusing distance quickly from shot to shot. In that case, try these two autofocus settings for best performance:
Set the AF (autofocus) mode to AI Servo (continuous-servo autofocus). Press the AF button or use the Quick Control screen to access this setting.
Set the AF Area Mode setting to 19-Point Automatic. Press the button shown in the margin to access the setting; keep pressing the button to cycle through the available settings. You also can adjust the option via the Quick Control screen.
By default, the center focus point is used as the starting focusing target when AI Servo mode is in force. If you want to choose a different point, use the Multi-selector, Quick Control dial, or Main dial to do so. (Or just tap the point you want to use.)
Frame your subject under the selected focus point, press the shutter button halfway to set the initial focusing distance, and then reframe as necessary to keep the subject within the 19-point autofocusing area, indicated by the brackets in the center portion of the viewfinder. As long as you keep the shutter button pressed halfway, the camera continues to adjust focus up to the time you actually take the shot.
Compose the subject to allow for movement across the frame.
Don't zoom in so far that your subject might zip out of the frame before you take the shot — frame a little wider than usual. You can always crop the photo later to a tighter composition. For an alternate effect, try panning with the movement. The central subject will remain relatively sharp but the background will be blurred.
These action-shooting strategies also are helpful for shooting candid portraits of kids and pets. Even if they aren't running, leaping, or otherwise cavorting when you pick up your camera, snapping a shot before they move or change positions is often tough. So, if an interaction or scene catches your eye, set your camera into action mode and then just fire off a series of shots as fast as you can.
One other key to shooting sports, wildlife, or any moving subject: Before you even put your eye to the viewfinder, spend time studying your subject so that you get an idea of when it will move, where it will move, and how it will move. The more you can anticipate the action, the better your chances of capturing it.


