


When you select the Custom Functions menu on your Canon EOS 70D, which is available only when the Mode dial is set to P, Tv, Av, M, B, or C, you delve into submenus containing advanced camera settings. Navigating these screens involves a few special techniques.
Initially, you see the screen shown in the following figure. Some explanation may help you make sense of it:
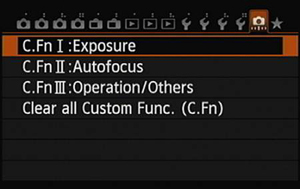
Custom Functions are grouped into three categories: Exposure, Autofocus, and Operation/Others. The fourth item on the menu enables you to reset all Custom Functions to their default settings. (This option doesn't work while the Mode dial is set to C, which represents the Custom User Mode.)
After you select a Custom Functions category, you see a menu option in that category, as shown on the left in the figure below. The category number and name appear in the upper-left corner of the screen. In the figure, for example, Custom Function I (C.Fn I), Exposure, is visible.
 The Custom Functions screens aren't as complex as they first appear.
The number of the selected function appears in the upper-right corner, and its name appears to the left. In the figure, the first menu item in the Exposure category, Exposure Level Increments, is selected.
Settings for the current function appear in the middle of the screen. Some screens contain numbered items, in which case the blue text indicates the current setting, and the default setting is represented by the number 0.
On other screens, you can turn multiple items on or off via one screen. On these screens, a check mark next to a feature means that it's enabled.
At the bottom of the screen, the top row of numbers represents the functions in the category, with the currently selected function indicated with a tiny horizontal bar over the number. The lower row shows the number of the current setting for each Custom Function; again, 0 represents the default. So in the figure, all the Custom Functions are currently using the default settings. (A horizontal line instead of a number means that the function is one of those that controls multiple features at a time via the checkmark system.)
To scroll from one Custom Function to the next, tap the left or right scroll arrow at the top of the screen, rotate the Quick Control dial, or press the Multi-controller left or right. When you reach the setting you want to adjust, use either of these techniques:
Touchscreen: Tap the setting you want to use. (In some cases, you may need to tap the up/down arrows on the right side of the screen — not shown in the figures — to scroll the list of settings.)
From here, the process depends on whether you're looking at a screen that enables you to choose only one option or a screen that enables you to select multiple options. In the first case, the Set icon appears, as shown on the right in the above figure. Tap that icon to lock in your choice and exit the setting screen. Your selected setting appears in blue and the number at the bottom of the screen updates to show the number of the option you selected.
For screens that contain the check mark lists, toggle the check mark next to an item on and off by tapping it. When you finish, tap OK to wrap things up or tap Cancel to exit the screen without making any changes.
Buttons: Press the Set button to activate the settings. Use the Quick Control dial or press the Multi-controller up/down to move the highlight box over the option you want to use and then press the Set button. In check box lists, press Set to toggle the check mark on and off; highlight the OK symbol and press Set to finalize your changes. Highlight Cancel and press Set to exit the screen instead.
To exit the Custom Function screens, press the Menu button or tap the Menu icon in the lower right of the screen (see the left screen in the above figure).


