


For all other photos, you can apply most Retouch menu features in two ways:
- Go the regular menu route. Press the Menu button and then press the Multi Selector right to access the strip of menu icons on the left side of the screen. Select the Retouch menu icon, labeled on the left in the following figure, and then press the Multi Selector right to access the menu options. Select a retouching tool and press OK to display thumbnails of your photos, as shown on the right in the figure. Use the Multi Selector to move the yellow selection box over the photo you want to adjust. Then press OK to access settings related to the retouching tool.
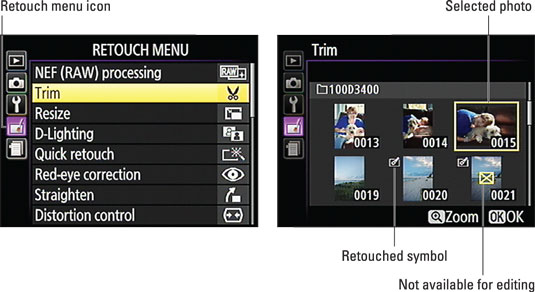 After selecting a Retouch menu option (left), use the Multi Selector to highlight the photo you want to edit (right).
If a photo can't be altered, an X appears over the thumbnail (see the thumbnail labeled Not available for editing). Normally, you get the no-go signal because you already applied a certain Retouch menu option to a picture. For example, you can't edit a photo after you crop it using the Trim tool.

- Use the Playback mode i button menu. In single-image view (one photo displayed at a time), scroll to the photo you want to edit. In thumbnails or Calendar view, use the Multi Selector to move the yellow selection box over the photo. Then press the i button. A mini-menu offering options available during picture playback appears, as shown on the left in the following figure. Highlight Retouch and press the Multi Selector right to display Retouch menu options superimposed over your photo, as shown on the right. Select a tool and press OK to display options related to that tool.
 In Playback mode, you can press the i button to access the Retouch menu.
However, you can't use the i button method to access the Image Overlay menu item. That feature, which combines two Raw (NEF) photos to create a third, blended image, is available only when you display the Retouch menu by pressing the Menu button.
A few other facts to note:
- Your originals remain intact. When you apply a Retouch menu tool, the camera creates a copy of your original photo and makes the changes to the copy. A retouch symbol appears near the image thumbnail to tell you that you're looking at an altered photo.
- All Retouch menu tools work with either JPEG or Raw (NEF) originals except Image Overlay and NEF (Raw) Processing. Those two tools work only with Raw files. If you snapped the photo using the Raw+JPEG Image Quality setting, the camera uses the JPEG file as the basis for the retouched copy for all tools except Image Overlay and NEF (Raw) Processing.
- Retouched copies for all alterations except Image Overlay are saved in the JPEG file format. The retouched copy uses the same JPEG quality setting as the original (Fine, Normal, or Basic). Retouched copies of Raw originals are saved in the JPEG Fine format. For Image Overlay, the retouched image is stored using the current Image Quality and Image Size settings.
- You can apply each correction to a picture only once. The exception, again, is Image Overlay. If you save the composite in the Raw format, you can combine the composite with a third Raw image. In fact, you can keep combining photos until your memory card is full if the urge hits you.
- The camera automatically assigns the next available file number to the retouched image. Make note of the filename of the retouched version so that you can easily track it down later.

- When applying certain filters, you can press the Zoom In button to see a magnified view of the adjusted photo. If so, you see the word Zoom along with a symbol that looks like the button at the bottom of the screen. Release the button to exit the magnified display.
- You can compare the original and the retouched version by using the Side-by-Side Comparison menu option. This menu option appears only when the camera is in playback mode. Start by displaying or selecting either the original or the retouched version. Then press the i button, choose Retouch, select Side-by-Side Comparison, and press OK. You see the original image on one side and the retouched version on the other, as shown. At the top of the screen, a label indicates the Retouch tool that you applied to the photo — Trim, in the figure.
 Use Side-by-Side Comparison to see whether you prefer the retouched version to the original.
These tricks work in Side-by-Side Comparison display:
- If you applied more than one Retouch tool to the picture, press the Multi Selector right and left to display thumbnails that show how each tool affected the picture.
- If you create multiple retouched versions of the same original — for example, you create a monochrome version, save it, and then crop the original image and save that — use a different technique to compare the versions. First, press the Multi Selector right or left to surround the After image with the yellow selection box. Then press the Multi Selector up and down to scroll through the retouched versions.

To exit Side-by-Side Comparison view and return to picture playback, press the Playback button. The monitor automatically displays the picture you were viewing before you selected the Side-by-Side Comparison option. To instead see the companion image, move the yellow selection box over its thumbnail in the Side-by-Side Comparison display. Then press OK instead of the Playback button.


