


 Lucy with the background removed.
To accomplish this bit of photo-editing magic, follow these steps:
1. Select the picture whose background you want to remove.
2. On the Picture Tools → Format tab, click the Remove Background button (found in the Adjust group).
When you do, PowerPoint attempts to determine which part of your picture is the subject of the picture and which part is the background. PowerPoint creates a bounding rectangle that contains what it believes to be the subject of the picture. Then it analyzes the colors in the picture to determine what it believes to be the background portions of the picture. The background is then displayed in purple. In addition, a special Background Removal tab appears on the Ribbon.
This figure shows PowerPoint’s initial attempt at removing the background from the picture of Lucy. As you can see, PowerPoint has found most of Lucy’s head but managed to cut off the top of her head, her nose, and her right eye. The result is a little disconcerting.
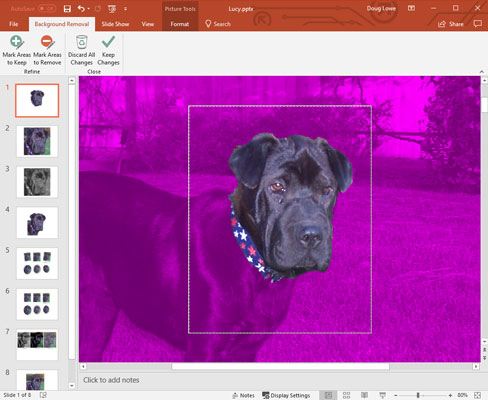 PowerPoint’s initial attempt at removing the background.
3. If necessary, resize the bounding rectangle to properly enclose the subject.
This figure shows the results after I resized the bounding rectangle to include all of Lucy’s head.
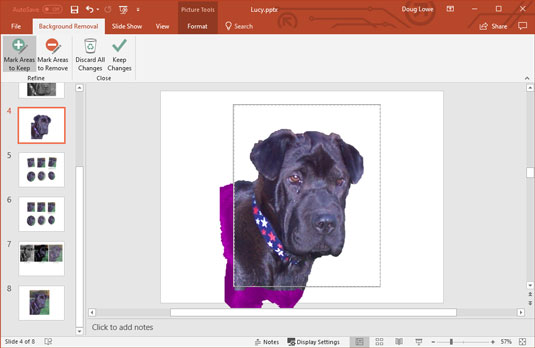 Background removal after fiddling with the bounding rectangle and marking areas to keep and remove.
4. If necessary, use the Mark Areas to Keep and Mark Areas to Remove buttons to refine the location of the picture’s background.
For example, if an area that’s part of the subject is shown as background, click the Mark Areas to Keep button. Then, either click in the area you want included or click and drag a line across a large portion of the area to be included. PowerPoint will attempt to discern which part of the picture you marked and include that area in the picture’s subject. Note that you don’t have to circle the area you want to include, nor do you have to be too precise. PowerPoint will do its best to figure out which portions of the image to include based on your mark.
Similarly, if PowerPoint has mistaken part of the background for the subject, click the Mark Areas to Remove button and click or draw a line within the area that should be removed.
If PowerPoint misinterprets your mark, press Ctrl+Z to undo your action. Or, click the Delete Mark button and then click the mark you want to delete.
5. Repeat Step 4 until you’ve successfully removed the picture’s background.6. Click the Keep Changes button.
The slide returns to normal, with the background of your picture removed.
