

Chatting during a Teams meeting
The most common activity I do in Microsoft Teams is chat with other people. And I find it especially helpful to be able to chat with colleagues during a Teams meeting. A group chat is created automatically at the start of every Teams meeting that includes all the meeting participants. The chat window appears on the right side of the screen. While a meeting is going on and people are presenting and talking with audio, other people can be chatting in the chat window. This simple mechanism proves to be incredibly powerful. For example, suppose you missed something the presenter said. Rather than interrupt the entire meeting and ask the presenter to repeat him or herself, you can just type in the chat and ask someone in the chat for clarification or to fill in a gap. I find I do this all the time in large meetings.After a meeting has ended the chat continues to be active and anyone can continue posting messages. For recurring meetings, the chat will carry over from meeting to meeting, so there is always a record of past meetings and anyone on the meeting invite can jump into the chat for upcoming meetings. I have seen larger companies use this to keep track of agenda items for upcoming meetings. People will post in the recurring meetings chat through the week and then during the meeting the team will review the chat and discuss the items during the meeting.
I like to turn off message notifications during a meeting if a lot of people are chatting while someone is speaking on audio. A notification will chime with each new message, and I find it can be distracting. You can find the option to turn off sound for incoming messages on the notifications section of your settings. Click on your profile picture that appears in the top-right corner of the Teams screen and select Settings. In the drop-down menu that appears, select Notifications and look for the section called Other. There you will find a setting for Notification Sounds that you can set to Off.
Capturing a Teams meeting with a recording
I cannot tell you how many times a recording of a meeting has saved my team a lot of headache. A recording captures everything that happened in the meeting. A recording can be shared with others who were not part of the meeting, and reviewed by those who were part of the meeting. If everyone understands and agrees that meetings will be recorded, I highly recommend recording meetings.Teams won’t let you record a call with two people or fewer due to privacy considerations. Once a call has more than two people, it becomes a meeting and you can record it.
Teams notifies the meeting attendees when a recording begins. However, I like to make sure everyone is completely clear and comfortable with recording the meeting beforehand so that there aren’t any issues down the road by mentioning at the start that I intend to record the meeting.Recording a meeting is easy to do in Teams. To begin the recording:
- Join an existing meeting or start a new one.
- Open the meeting controls by selecting the ellipsis from the toolbar.
- Select Start Recording from the pop-up menu that appears, as shown.
 Starting a recording of a Teams meeting.
Once the recording starts, everyone in the meeting will be informed.
- To end the recording, click the ellipsis again and select Stop Recording. You can also end the recording by ending the meeting. The recording will be made available to the meeting channel, as shown. Anyone in the channel can click the recording to view the meeting.
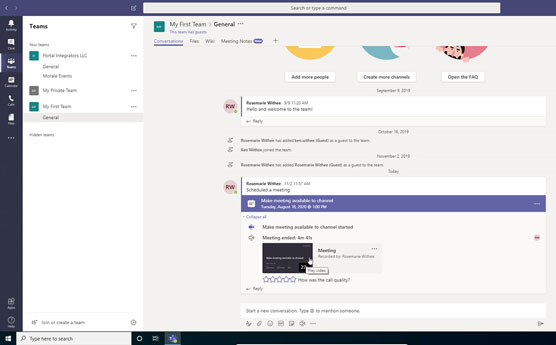 Viewing a meeting recording in a channel.
A recording of a meeting is an incredibly powerful thing. You can share it with others who weren’t able to attend the meeting, or use it down the road as a reminder of what was discussed and/or decided upon. The recording itself is in a service called Microsoft Stream. You can get a direct link to the meeting by selecting the ellipsis from the recording in the channel and then selecting Get Link, as shown. In addition, you can open the recording directly in Stream or even make the recording its own tab in the channel.
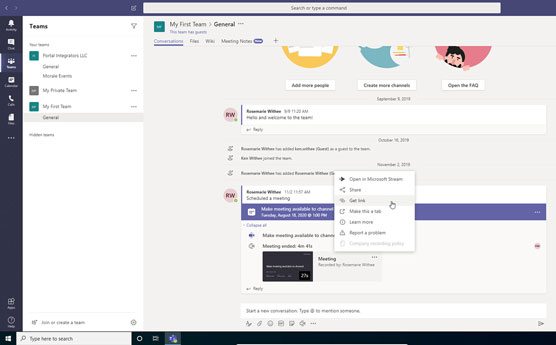 Getting the direct link to the recording of a meeting.
Keeping noise under control with mute
When I am in a meeting, I like to keep my microphone muted unless I am speaking. That way the other participants don’t hear any background noise that might be happening around me. Most people follow this same meeting etiquette, but everyone forgets from time to time. Someone might ask if everyone could please mute their microphone, but this can be disruptive to the meeting.When you are in a Teams meeting, you can mute the microphone of other participants. I have used this many times when someone’s microphone is picking up background noise, such as a barking dog, but I don’t want to disrupt the meeting by asking the person to mute his or her microphone.
To mute one of the participants of the meeting, go to the meeting roster that appears along the right side of the meeting window, select the person’s name, and choose Mute Participant. To mute everyone, select Mute All from the roster. Both options are shown here. The participants you mute will be notified that you muted them, and they can unmute themselves at any time.
 Muting the microphone of a meeting participant in Teams.
After you mute someone, it is a good idea to send that person a private chat message to let him or her know you did it. Almost every time I have done this, the person thanks me and lets me know that he or she just ran to grab a coffee or use the bathroom and forgot to mute the microphone.
Blurring your background
I love the flexibility of being able to hold a meeting with team members anywhere I have an Internet connection. And using video adds tremendous value to the meeting; however, it also introduces a challenge. What if you find yourself working somewhere you don’t want everyone to see? For example, I often take a meeting from home instead of walking into my office. When I am sitting at my kitchen table, you can see our makeshift open pantry in the background. It would be a great background if I was in a meeting with chefs, but it can be distracting for any other type of meeting.Teams has a cool feature that lets you blur your background but keep your face in focus when on a video call. Everyone in the meeting can see you clearly, even when you move your head around while you are talking, but whatever is behind you and in the background is blurred. No more worrying about any dirty laundry, literally, that might be making an appearance without your knowledge!
Before you join a meeting, you are presented with toggles to turn on your camera and microphone. In between those toggles is a blur toggle, as shown, that you can use to blur your background. When you toggle on the blur option, your background will be become blurry, but your face will stay in focus. If you have already joined the meeting, you can find the blur option in the More Actions pop-up menu, as shown.
 Blurring the background before joining a Teams meeting.
 Blurring the background after joining a Teams meeting.
If you don’t have a video camera that supports the blur option connected to Teams, you won’t see the toggle to turn on your camera and blur your background. This is a common theme in Teams and Microsoft products in general. Elements of the user interface will appear and disappear if a required component (like a camera that supports the blur feature) is not attached.
Taking notes
Recording a meeting is ideal for capturing the meeting in its entirety, but as a practical matter, what you usually need at the completion of a meeting are meeting notes. You can use the notes, also called meeting minutes, to capture a record of key decisions and action items.Teams has a feature designed for capturing meeting notes. The notes are shared so that everyone in the meeting can contribute and view notes as they are added. I can’t tell you how many times I have been in a meeting and someone took down notes incorrectly. A simple miscommunication can have ripple effects down the road. When everyone is reviewing and adding to the meeting notes in real time during the meeting, the possibility of miscommunication is greatly reduced.
You can add notes about a meeting before the meeting starts or during the meeting. If a meeting was set up and tied to a Teams channel, you can go into the channel and discuss the meeting there. If the meeting did not have a channel, you can still add notes.
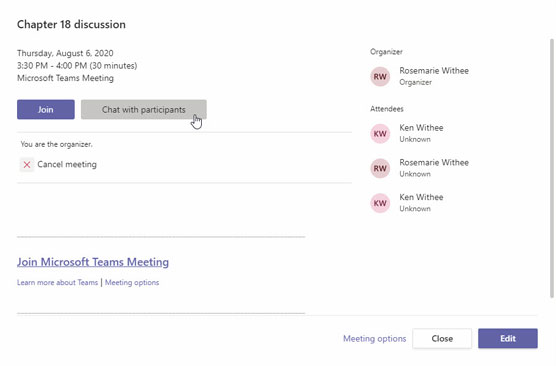
To add pre-meeting notes, follow these steps:
- Open your calendar and select the meeting you want to add notes to.
- Choose to chat with participants, as shown.
Teams will create a chat for the meeting, and all meeting participants are automatically added to it. When the meeting takes place, the chat will be part of the meeting.
 Adding pre-meeting notes to a meeting.
Once a meeting starts, you can add official notes to the meeting beyond chat. To open the meeting notes or to start taking notes, follow these steps:
- From the meeting options menu, select the Show Meeting Notes option. If you have already created notes for the meeting, the meeting notes will open on the right side of the screen, as shown. Or, if notes haven’t been added to the meeting yet, will have the option to create notes for the meeting once the meeting has started, as shown. To create new meeting notes, continue to Step 2.
- Click the Take Notes button. Teams will create meeting notes for the meeting, and you will be able to see the new notes section along the right side of the screen. You can now add notes or review any pre-meeting notes added before the meeting started.
 Creating meeting notes for a Teams meeting.
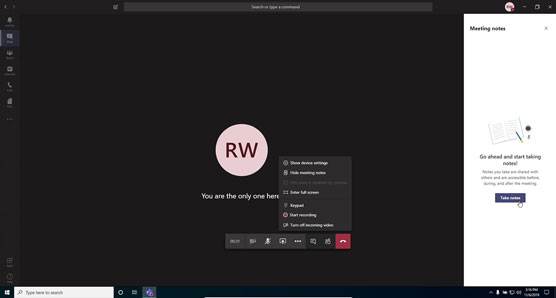 Reviewing and adding meeting notes during a meeting.
When you add meeting notes, members of the channel, or meeting chat, will be notified so that everyone can follow along and add their own notes or review existing notes.
You can even add the meeting notes as a tab to the meeting. You find the option to add the meeting notes as a tab by clicking the ellipsis toward the top of the notes screen and choosing to add the notes as a tab.
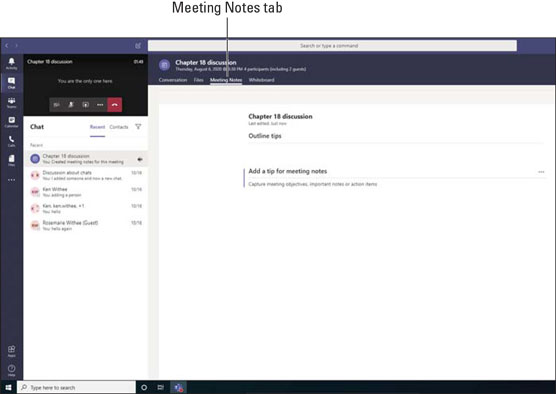 Viewing meeting notes as a tab.
Using a Whiteboard in Teams
Some of the most productive meetings I have had over my career are with a group of people standing in front of a whiteboard sketching out ideas. It is an aspect of communication that is hard to beat. Microsoft has recognized this and added a feature to Teams called Whiteboard.Microsoft Whiteboard is a shared screen that allows you to sketch diagrams. The way you draw on your screen depends on your device. If you are using a standard desktop computer, you use your mouse or a graphics tablet that connects a digital pen to your computer. If you are using a device that has a touch screen, you can use your finger to draw on the screen. My favorite way to sketch on the Teams Whiteboard is with the stylus pen on my Surface laptop. I find it very natural and easy to use.
To use the Whiteboard feature in Teams, follow these steps:
- Join an existing Teams meeting or start a new one.
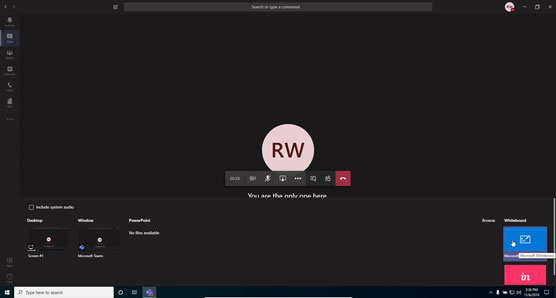
- From the meeting controls, expand the Share dialog box by selecting the icon that looks like a computer monitor with an arrow going through it. The bottom of the screen will expand, and you will see options for sharing your screen, a window on your screen, or a PowerPoint file. On the right side of your screen you will see the option for Whiteboard, as shown.
- Select Whiteboard and the screen will update, displaying a digital whiteboard, as shown.
You can select the pen color and pen width and begin drawing on the screen. Everyone in the meeting will see what you are drawing, and they can jump in and add their own drawings or edit an existing drawing.
The whiteboard persists even after the meeting so that you can always go back to it and add new sketches or modify existing sketches. Once you activate the whiteboard, it will be displayed as a tab on the channel or chat. You can export the state of the whiteboard at any time by clicking the settings icon in the top-right of the screen and choosing Export Image. I like to do this in order to lock the whiteboard and capture the state at any given time. This is much the same as taking a picture of a physical whiteboard to make sure you have the drawing on hand in case anyone comes along and erases it.
 Opening the whiteboard from the sharing box in a Teams meeting.
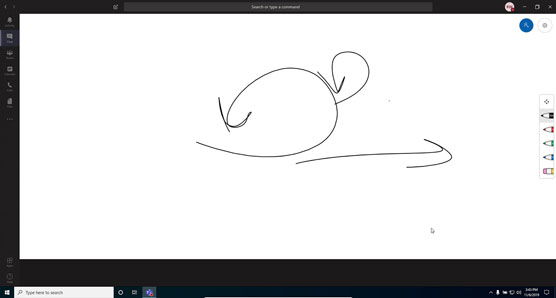 Sketching on a shared digital whiteboard in Teams.
Every team in Teams has a digital whiteboard that can be used for meetings.
Sharing your screen
Screen sharing is one of my favorite aspects of digital meetings. I use screen sharing all the time. I even use screen sharing when the people I need to share with are in the same room as I am. Without screen sharing, I would have to have everyone huddle around my computer so that I could show them my screen. With screen sharing, I can share what I am seeing on my screen and they can see it on their screens.It is much easier to look at your own computer screen than to look over the shoulder of someone else. Using Teams, you can share your screen with others, and they can share their screen with you.
During a Teams meeting, you can share your entire screen, a specific window, a PowerPoint presentation, or a whiteboard (covered in the previous section). Personally, I like to share just the window or PowerPoint slide I am talking about in the meeting. For example, if I am showing a website, I just share the web browser window instead of my entire desktop. If I am walking through a PowerPoint presentation, I just share the PowerPoint window.There are many reasons you might not want to show your entire desktop. For example, your digital desktop might be messy with various files that you are in the middle of organizing. Or, you might have sensitive material that should not be seen or recorded by everyone in the meeting. Regardless of the reason, you can share just what you want the team to focus on and leave the rest of your desktop hidden.
To share your desktop, a window, or a PowerPoint presentation, follow these steps:
- Join an existing Teams meeting or start a new one.
- From the meeting controls, expand the Share dialog box by selecting the icon that looks like a computer monitor with an arrow going through it. The bottom of the screen will expand, and you will see options for sharing your screen, a window on your screen, or a PowerPoint file.
- Select the option you want to share with the meeting. A red box will outline what is being shared with others so that you know exactly what they can see.
- To stop presenting, select the Stop Presenting button at the top of the display window, as shown.
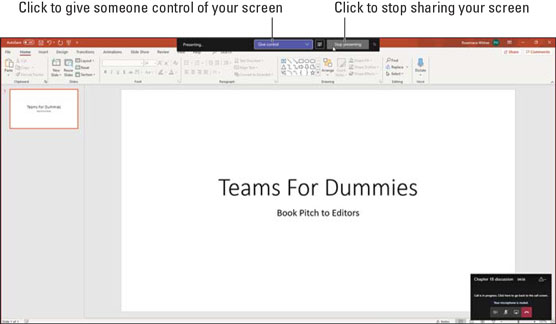 Sharing a PowerPoint presentation during a Teams meeting.
Taking control of someone else’s screen
In the previous section, you discover how to share your screen with others. You can also have someone else take control of your screen or ask to take control of someone else’s screen. When you take control of another person’s screen through Teams, you can move that person’s mouse around and type on his or her screen using your own mouse and keyboard. I use this frequently when I want to show someone how to do something on his or her computer.Someone cannot take control of your screen without your permission. If someone requests to take control of your screen, you will see a message appear asking if you want to allow the person to take control of your screen or not. If you approve the request, that person will be able to control your mouse on your screen; however, if you deny the request, that person won’t be able to take control.
To give control of a shared screen, select the Give Control button that appears at the top of the sharing area. When you select this button, a drop-down menu appears that lists everyone in the meeting. You can choose who to give control of your screen to. You can take back control using the same method.Organizing teams to fit your meeting needs
I tend to like the defaults of how Teams is laid out for most meetings. Teams will often make smart decisions and switch between showing people on the main screen and showing a presentation on the main screen. Teams will also detect who is speaking and enlarge that person’s video so that you can focus on the person speaking.However, you might want to take control and shift how you view things. You can switch between people and presentations by clicking on the videos of the participants or the presentations. You can also take the video of a participant and pin it so that it is always displayed. Sometimes I like to pop a video out of Teams and drag it over to another monitor. All this flexibility ensures you can adjust a meeting to fit your needs.
Using Teams while a meeting is in progress
During a meeting, most of the Teams screens are dedicated to the meeting. This is valuable when you want to focus on the meeting. However, you can still use other parts of Teams when a meeting is in progress. For example, if there is a large meeting that I need to listen in on but not focus all of my attention, I will minimize the meeting and use other portions of Teams. Minimizing the meeting is as simple as clicking on another portion of Teams, such as another channel or chat. When you click outside of the meeting, Teams automatically minimizes the meeting into a small window at the top of the left navigation pane, as shown. To go back to the meeting and maximize the window on your screen, simply click inside the meeting window.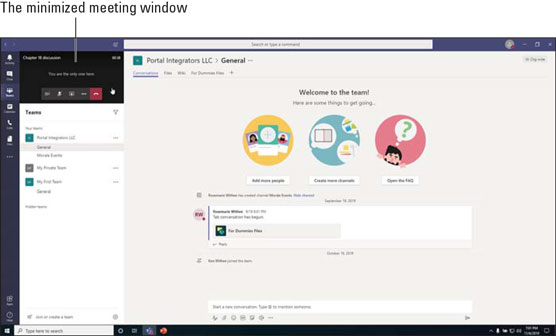 A Teams meeting that has been minimized.