Traditional design tools for VR and AR
A number of popular 3D computer graphic programs are currently on the market. None of these tools was built specifically with content development for VR or AR in mind, but nearly all of them transition fairly seamlessly to that task. These graphics programs were created to build out 3D graphics out of the box, so utilizing them to create 3D graphics for VR or AR experiences is a natural step.3ds Max, Cinema 4D, Maya, and Modo are all examples of full-featured, diverse 3D graphic applications you can use to create 3D graphics and models. You can then export these models to a format that your development environment can understand as part of your 3D workflow. Depending on your needs, this could mean importing single models for your environments, importing entire scenes created in these 3D packages, or even rendering and importing 360-degree imagery to be brought into your development environment as a texture alone.
360-degree photos are often utilized for VR experiences. When discussing 360-degree photos, you may hear terms such as equirectangular projection or cubemap. These terms refer to various ways of how an image may be projected for display in 360 degrees. A cubemap image is an image that consists of six square image faces that represent a view from one of six perspectives: up, down, left, right, forward, or backward. An equirectangular image is an image consisting of one single image face containing the entire 360-degree image, causing more distortion the closer you get to the poles (top and bottom) of the image. And more projection types are always being defined.
Google recently announced “equi-angular” images, which seek to solve some of the shortcomings of equirectangular or cubemap images.When you’re viewing an equirectangular or cubemap image in 2D, you may notice that it looks a bit odd. Equirectangular images seem stretched at the top and bottom, while cubemaps appear divided into six square images. In VR environments, these images are “projected” onto 3D models (equirectangular images onto a sphere, cubemaps onto a cube) where they appear as normal 360-degree environments to a user within that environment.
This image illustrates the differences between an equirectangular image on the left and a cubemap image on the right. While they may appear strange as 2D images, when projected onto the inside sphere or cube, respectively, these images appear “correct” to a user whose view is positioned within the sphere or cube.
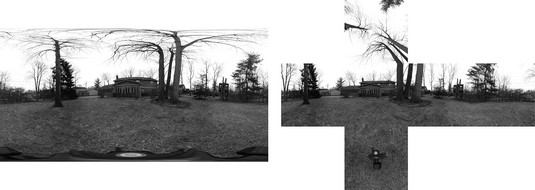 Examples of equirectangular and cubemap images.
Each of these applications has a different set of strengths worth keeping in mind as you evaluate your options for creating graphics for your VR/AR application. For example, modeling in 3ds Max is incredibly robust, whereas animation in Maya and Cinema are considered very powerful and fast. Evaluate how you’ll be utilizing each package, and find the platform that best fits the direction of your asset creation.
The image below shows Modo in use.
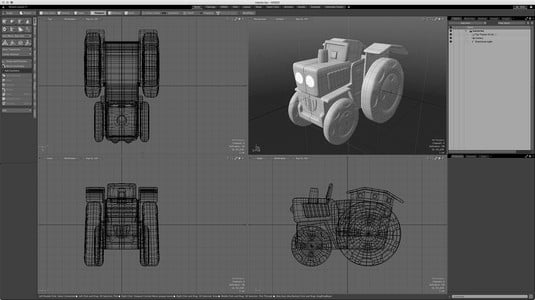 Modo’s UI for 3D modeling.
Every 3D tool is different, but the basics are very similar. This image shows a different modeling tools interface, Blender, for comparison.
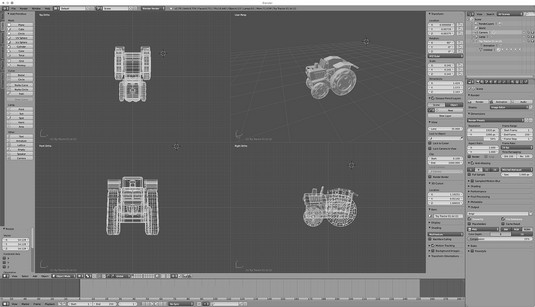 Blender’s UI.
If you’re interested in diving into the world of 3D modeling for VR, be advised that the waters can be very deep! Don’t be discouraged if it takes a bit of time to learn 3D modeling, even if you’re a power user in other programs. The transition from the 2D world of the screen to a 3D world can be difficult for even the most experienced 2D graphics artists. In 2D work, you need to visualize only the side facing the user. In 3D for VR/AR, you have to concentrate on all sides of an object, because any side may end up being presented to the user. Keep working at it! 3D is everywhere in today’s world. Those skill sets are in high demand, and the demand will only grow as VR and AR grow as well.
There can be drawbacks to some of the higher-powered 3D modeling programs. 3D modeling software is processor-intensive work — many of the programs require a fairly powerful computer to run. Many of these programs can also be expensive to purchase and keep up to date. Most of them have trial periods (typically 30 days) in which you may download and try them out to see if they’re right for you. Often, however, 30 days is hardly enough to even scratch the surface of what these programs can do.
If you’re just beginning to learn 3D modeling, almost any 3D program can teach you the basics. Most of these programs share similar traits or terminology, so learning the basics from one program can carry over skills to other programs. Some of the programs carry “student,” “light,” or “indie” versions, which are either full or slightly scaled-back versions of their software that can be purchased or subscribed to for a much lower price than the full versions.If none of these options is available to you, there are also free versions of 3D software available. In-browser solutions such as Sketchup Free can be used to create and export models to VR or AR. A more full-featured solution for users looking to kick the tires of a professional modeling package without the associated cost of a high-end 3D modeling package is Blender. Blender is a free and open-source 3D modeling suite. It’s cross-platform and tailored to run well even on older, less-powerful computers.
The Blender community is large and diverse, and there are many tutorials available for learning Blender — from the Blender site itself, to YouTube, to Blender For Dummies (Wiley). For those just starting out in 3D modeling, Blender is a great way to test the waters and start your journey.
After you’ve established a baseline of skills for 3D modeling, you can decide if you’d like to move on to one of the other modeling tools. If you plan on working in the industry at a studio or agency, research what toolset those studios are typically using. Blender is a great tool for learning 3D modeling, but many studios have a preference for working with one of the higher-powered tools such as Maya or 3ds Max and often have a workflow tailored to a particular toolset.VR/AR-based design tools
The 3D programs mentioned above were mainly created before VR/AR’s recent rise to prominence. With the ascent of VR and AR, these tools have begun adapting to these new workflows. 3ds Max Interactive, for example, is a VR engine that extends 3ds Max to help non-developers quickly create mobile, PC, and room-scale VR experiences.However, there has also been a rise in new tools specifically catered to designing in VR. Tools such as Google Blocks and Oculus Medium are prime examples of tools built specifically for creating and sharing 3D models within a VR environment.
These programs are vastly different from the traditional 3D modeling application, in that they focus specifically on VR models. These applications require specific hardware (HTC Vive or Oculus Rift for Google Blocks, Oculus Rift for Oculus Medium), and utilize the motion controllers of these hardware devices to sculpt and create 3D models in a virtual world. You can then export the models for use in a traditional 3D modeling engine or directly to your VR or AR development environment.
Blocks currently feels a bit less full-featured than Medium; however, the simplicity of Blocks makes it much easier for new users to pick up quickly. You may find yourself utilizing a tool like Blocks for quickly prototyping 3D objects to modify in other 3D applications. You’ll likely experience a steeper learning curve before you feel comfortable working in Medium; however, you’ll be able to take your models a long way inside Medium without the need for other tools.
The image below shows the tools and palettes available for a user within the Google Blocks VR interface. The 3D well model shown is by Don Carson and is available on Google Poly, Google’s shop for 3D artifacts created in their tools such as Blocks or Tilt Brush.
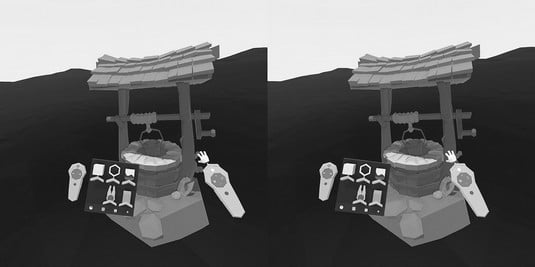 Google Blocks VR interface.
These applications offer an entirely new way of thinking about and creating 3D models. Like many things in the VR and AR world, it’s still early days for these applications, and best practices and ideas are still emerging. Working in VR for 3D modeling could quickly become the de facto standard for creating 3D assets, especially 3D assets that will be utilized in VR or AR setups. Before VR, designers and artists had to acclimate themselves to creating 3D assets in the 2D world of a computer screen. With the rise of VR and AR, the ability to see your 3D assets fully realized in a 3D setting while working on them is a game changer.
Ready-made models for VR and AR design
Premade models are used throughout all industries, from game development to architectural renderings to featured films. Even with a full 3D staff on hand, you can often save time by utilizing a model from one of these resources as a starting point. Like the real world, VR environments often need to be populated with “stuff”; otherwise, they can feel bleak and empty. Many studios use models from sites such as these to populate background items within their environments while concentrating their graphics team on building out the models, which may be the main focus of their application.In these instances, sites such as CGTrader or TurboSquid can be very useful. These sites offer high-quality 3D models that range from simple one-off models to highly detailed environments and everything in between. If you have a need for a model, there is likely a model available on one of these sites that covers your need, or can at least get you started.
Almost anyone of any skill level can sell models on these sites, which makes for a very large marketplace. It also leads to a large variance in quality and price of the assets. So, buyer beware: Make sure you understand exactly what you’re getting before you download. Even if you have no interest in 3D modeling yourself, you need to know what to look for when downloading assets for your application. You need to understand things such as polygon counts, 3D file types, and texturing to ensure that the assets you’re downloading will work for your application.
Google Poly has emerged as an interesting choice for free models. With Tilt Brush and Google Blocks, Google took steps to make the creation of 3D artifacts easier. Google has added to that with Poly, a one-stop shop for users looking for 3D objects or scenes created by users using Tilt Brush and Blocks.Because many of the models in Poly are generated from Blocks, the models generally are simple and low polygon, which may not work stylistically for every scenario. However, they can be a great way to quickly populate VR or AR scenes with 3D objects, and the low-poly models can help ensure that your VR or AR experiences’ performance won’t be slowed by more resource-intensive high-polygon models. This image shows the process of searching for and viewing 3D objects at the Google Poly site.
 The Google Poly interface for searching and browsing models.