

People tend to forget things. You might know how your MATLAB script works on the day you create it and possibly even for a week after that. However, six months down the road, you may find that you don’t remember much about the script at all.
That’s where comments come into play. Using comments helps you to remember what a script does, why it does it in a certain way, and even why you created the script in the first place.
Using the % comment
Anytime MATLAB encounters a percent sign (%), it treats the rest of the line as a comment. Comments are simply text that is used either to describe what is happening in a script or to comment out lines of code that you don’t want to execute.
You can comment out lines of code during the troubleshooting process to determine whether a particular line is the cause of errors in your script. Here, you can see how comments might appear in a script.
% Tell MATLAB what to display on screen.
Prompt = [‘Type your own name, but only if it isn’’t ‘,...
   ‘Wednesday.nType the name of the neighbor ‘,...
   ‘on your right on Wednesday.nHowever, on ‘,...
   ‘a Wednesday with a full moon, type the ‘,...
   ‘name ofnthe neighbor on your left! ‘];
% Obtain the user’s name so it can
% be displayed on screen.
Name = input(Prompt, ‘s’);
% Output a message to make the user feel welcome.
disp([‘Hello ‘, Name]);
When you run this code, you see that the comments haven’t changed how the script works. MATLAB also makes comments easy to see by displaying them in green letters.
Using the %% comment
MATLAB supports a double percent sign comment (%%) that supports special functionality in some cases. Here’s how this comment works:
Acts as a standard command in the Command window.
Allows you to execute a portion (a section) of the code when using the Run and Advance feature.
Creates special output when using the Publish feature.
Using Run and Advance
When you add a %% comment in the Editor window, MATLAB adds a section line above the comment (unless the comment appears at the top of the window), effectively dividing your code into discrete sections. To add a section comment, you type %%, a space, and the comment.
As with standard comments, the %% comment appears in green type. The line above the comment is your cue that this is a special comment. In addition, the position of the text cursor (the insertion point) selects a particular section. The selected section is highlighted in a pale yellow. Only the selected section executes when you click Run and Advance. Here’s how sections work:
Place the cursor at the end of the Prompt = line of code and then click Run and Advance.
Only the first section of code executes. Notice also that the text cursor comes to rest at the beginning of the second section.

Click Run and Advance.
The script displays a prompt asking for a name.
Type a name and press Enter.
Only the second section of code executes. You don’t see the script output.
Place the cursor at the beginning of the second section and then click Run and Advance.
Steps 2 and 3 repeat themselves. You still don’t see any script output.
Click Run and Advance with the text cursor at the beginning of the third%%comment.
You see the script output (the correct output, in fact) without being asked for a name.
Perform Step 5 as often as desired.
The application displays the script output every time without asking for any further information. Using this technique lets you execute just the part of a script that you need to test rather than run the entire script every time.
You can make small changes to the code and still run a particular section.
Publishing information
The section comments let you easily document your script. This section provides just a brief overview of the publishing functionality, but it demonstrates just how amazing this feature really is. To start with, you really do need to create useful section comments — the kind that will make sense as part of a documentation package.
When creating the setup for the script you want to publish, you need to define the output format and a few essentials. The default format is HTML, which is just fine for this example. However, if you don’t make one small change, the output isn’t going to appear quite as you might like it to look.
On the Publish tab of the Editor window, click the down arrow under Publish and choose Edit Publishing Options. You see the Edit Configurations dialog box.
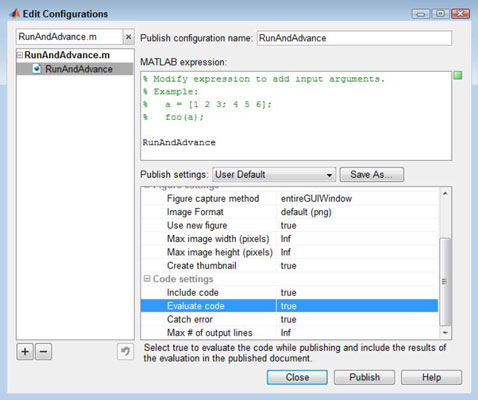
The Evaluate Code option evaluates your script and outputs the result as part of the documentation. Unfortunately, MATLAB can’t evaluate input() functions as part of publishing the documentation for a script. As a consequence, you must set Evaluate Code to false. Click Publish. MATLAB produces an HTML page.
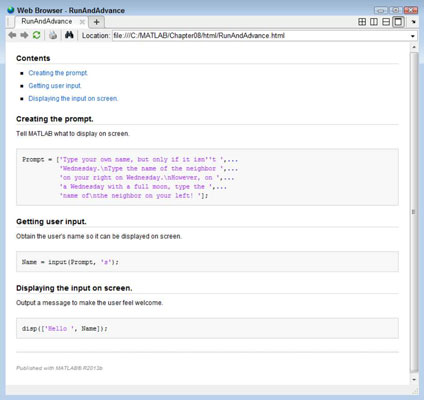
Considering the little work you put into creating the documentation, it really does look quite nice. In fact, it looks professional. When working with complex scripts, documentation like this really does serve a serious need. After you’re done admiring your work, close the HMTL page and the Edit Configurations dialog box.
