
You can bypass emulators and test apps on a phone, a tablet, or maybe an Android-enabled trash compactor. To do so, you have to prepare the device, prepare the development computer, and then hook the two together.
To test an app on a real Android device, follow these steps:
On the Android device, turn on USB debugging.
Various Android versions have their own ways of enabling (or disabling) USB debugging. You can poke around for the debugging option on your own device or visit the #TeamAndroid site for the procedures on some representative Android versions.
You can keep USB debugging on all the time. But if you're nervous about security, turn off USB debugging when you aren't using the device to develop apps.
In your project's branch of the Package Explorer, double-click the AndroidManifest.xml file.
Eclipse offers several ways to examine and edit this file.
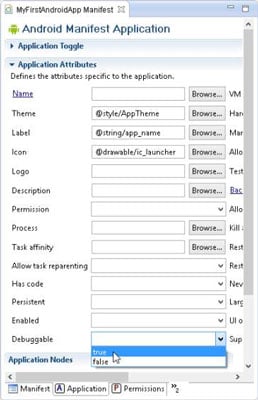
At the bottom of the Eclipse editor, click the Application tab.
Eclipse displays a form like the one shown in the figure.
In the Debuggable drop-down list, choose True. (Refer to the figure.)
When Debuggable is set to True, Android tools can monitor the run of the app.
Remember: The ability to debug is the ability to hack. Debugging also slows down an app. Never distribute an app to the public with Debuggable set to True.
Choose File→Save to store the new AndroidManifest.xml file.
Set up the development computer to communicate with the device.
On Windows: Visit the Android Developers website to download the device's Windows USB driver. Install the driver on the development computer.
On a Mac: /* Do nothing. It just works. */
Using a USB cable, connect the device to the development computer.
Tip: For ways to verify that the device is connected to the development computer, visit the Java Programming for Android Developers for Dummies web page.
In Eclipse, run the project.
A connected device trumps a running emulator. So, if the Android version on the device can handle the project's minimum SDK version, choosing Run→Run As→Android Application installs the app on the connected device.
Eventually, you'll disconnect the device from the development computer. If you're a Windows user, you may dread reading Windows can't stop your device because a program is still using it. To disconnect the device safely, do the following:
Open the Command Prompt window.
On Windows 7 or earlier: Choose Start→All Programs→Accessories→Command Prompt.
On Windows 8: First press Windows+Q. Then type Command Prompt and press Enter.
In the Command Prompt window, navigate to the ANDROID_HOME/platform-tools directory.
For example, if the ANDROID_HOME directory is
C:Users<i>yourName</i>adt-bundle-windows-x86_64sdk
type this command:
cd C:UsersyourNameadt-bundle-windows-x86_64sdkplatform-tools
In the Command Prompt window, type adb kill-server and then press Enter.
The adb kill-server command stops communication between the development computer and any Android devices, real or virtual. In particular,
The development computer no longer talks to the device at the end of the USB cable.
The development computer no longer talks to any emulators it's running.
After issuing the adb kill-server command, you see the friendly Safe to Remove Hardware message.
Unplug the Android device from the development computer.
After unplugging the device, you might want to reestablish communication between the development computer and any emulators you're running. If so, follow Step 5.
In the Command Prompt window, type adb start-server and then press Enter.