


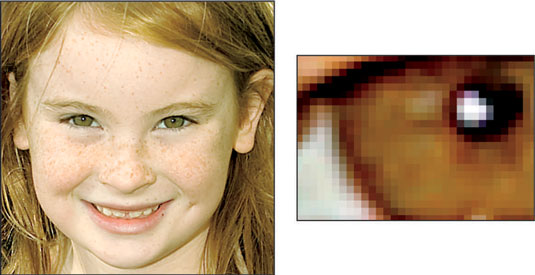
The Image Size setting on your Nikon D3300 determines how many pixels are used to create your photo. Pixels are the square tiles from which digital images are made; you can see some pixels close up in the right image in the figure, which shows a greatly magnified view of the eye area in the left image.
Pixel is short for picture element.
The number of pixels in an image is referred to as resolution. You can define resolution in terms of either the pixel dimensions — the number of horizontal pixels and vertical pixels — or total resolution, which you get by mulTiplying those two values. This number is usually stated in megapixels (or MP, for short), with one megapixel equal to 1 million pixels.
Your camera offers three Image Size options: Large, Medium, and Small. This table lists the resolution values for each setting. (Megapixel values are rounded off.)
| Setting | Resolution |
|---|---|
| Large | 6000 x 4000 (24.0 MP) |
| Medium | 4496 x 3000 (13.5 MP) |
| Small | 2992 x 2000 (6.0 MP) |
However, if you set the Image Quality setting to either Raw (NEF) or Raw + JPEG Fine, which captures one image in the Raw format and one in the JPEG format, images are captured at the Large setting. You can vary the resolution only for pictures taken in the JPEG format.
To choose the right Image Size setting, you need to understand the three ways that resolution affects your pictures:
Print size: Pixel count determines the size at which you can produce a high-quality print. When an image contains too few pixels, details appear muddy, and curved and diagonal lines appear jagged. Such pictures are said to exhibit pixelation.
Depending on your photo printer, you typically need anywhere from 200 to 300 pixels per linear inch, or ppi, for good print quality. To produce an 8 x 10 print at 200 ppi, for example, you need a pixel count of 1600 x 2000, or about 3.2 megapixels.
Even though many photo-editing programs enable you to add pixels to an existing image — known as upsampling — doing so doesn’t enable you to successfully enlarge your photo. In fact, upsampling typically makes matters worse.
To give you a better idea of the impact of resolution on print quality, these figures show you the same image at 300 ppi, at 50 ppi, and then resampled from 50 ppi to 300 ppi (respectively). As you can see, there’s no way around the rule: If you want quality prints, you need the right pixel count from the get-go.
 A high-quality print depends on a high-resolution original.
 At 50 ppi, the image has a jagged, pixelated look.
 Adding pixels in a photo editor doesn’t rescue a low-resolution original.
Screen display size: Resolution doesn’t affect the quality of images viewed on a monitor or television or another screen device the way it does for printed photos. Instead, resolution determines the size at which the image appears. This issue is one of the most misunderstood aspects of digital photography.
For now, just know that you need way fewer pixels for onscreen photos than you do for prints. In fact, even the Small resolution setting creates a picture too big to be viewed in its entirety in many e-mail programs.
File size: Every pixel increases the amount of data required to create the picture file. So a higher-resolution image has a larger file size than a low-resolution image.
Large files present several problems:
You can store fewer images on the memory card, on your computer’s hard drive, and on removable storage media such as DVDs.
The camera needs more time to process and store the image data on the memory card after you press the shutter button. This extra time can hamper fast-action shooting.
When you share photos online, larger files take longer to upload and download.
When you edit photos in your photo software, your computer needs more resources and time to process large files.
As you can see, resolution is a bit of a sticky wicket. What if you aren’t sure how large you want to print your images? What if you want to print your photos and share them online? Take the better-safe-than-sorry route, which leads to the following recommendations:
Always shoot at a resolution suitable for print. You then can create a low-resolution copy of the image for use online.
For everyday images, Medium is a good choice. Large is probably overkill for casual shooting, creating huge files for no good reason. Keep in mind that even at the Small setting, the pixel count (2992 x 2000) gives you enough resolution to produce an 8 x 10-inch print at 200 ppi.
Choose Large for an image that you plan to crop or print very large, or both. The benefit of maxing out the resolution is that you have the flexibility to crop your photo and still generate a decently sized print of the remaining image. The figure offers an example.
When this photograph was shot, the camera couldn’t get close enough to fill the frame with the main interest — the two juvenile herons at the center of the scene. But because the resolution was cranked up to Large, the shot could later be cropped to the composition you see on the right and still produce a great-looking print.
In fact, the cropped image could have been printed at a much larger size than fits here.
 A high-resolution original (left) enabled the photographer to crop the photo and still have enough pixels to produce a quality print (right).
