


By using the NEF (RAW) Processing option on the Retouch menu on your Nikon D5300, you can create a JPEG version of a Raw file right in the camera. Follow these steps:
Press the Playback button to switch to playback mode. Display the picture in the full-frame view.
If necessary, you can shift from thumbnails view to single-image view by pressing OK. Press OK twice if you’re in calendar view.
Press the I button.
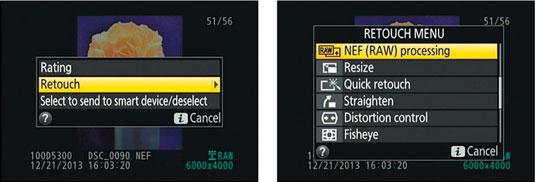
A screen appears.
Highlight Retouch and press the Multi Selector to right to display the Retouch menu. Scroll to the NEF (RAW) Processing option.
Press OK to display your processing options.
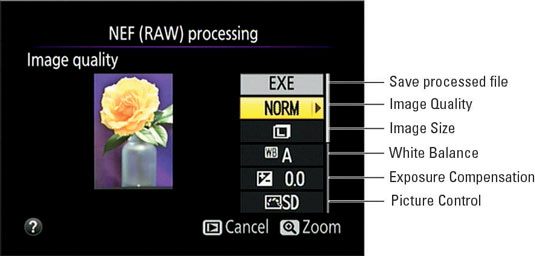
You see a screen where you specify which settings you want the camera to use when creating the JPEG version of the Raw image.
Press the Multi Selector down.
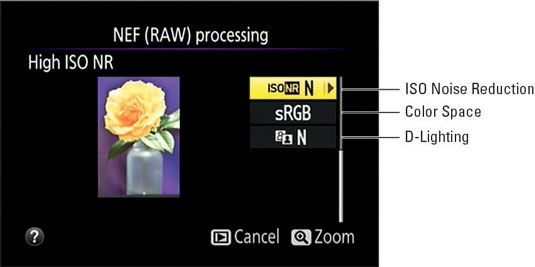
You’ll see the second page of conversion settings.
Set the conversion options.
Along the right side of the screen, you see a column offering the conversion options. After highlighting an option, press the Multi Selector right to display available settings. After selecting a setting, press OK to return to the main Raw conversion screen. Or, if a triangle appears to the right of an option name, press the Multi Selector right to uncover additional options.
If you’re not familiar with all the settings, the following list offers a few general recommendations:
Image Quality: Choose Fine to retain maximum picture quality.
Image Size: Choose Large to retain all the original image pixels.
White Balance: Unless image colors appear to be wrong, stick with the default, Auto. Otherwise, experiment with each setting to see which one renders colors most accurately.
Exposure Compensation: With this option, you can adjust image brightness. When using this feature for Raw conversion, you’re limited to a range of –2.0 and +2.0; when shooting, you can choose from settings ranging from –5.0 to +5.0. Raise the value for a brighter image; lower it for a darker shot. The camera updates the preview to indicate how your setting will affect the picture.
Picture Control: This option enables you to adjust color saturation, contrast, and image sharpness. As with the White Balance and Exposure Compensation settings, the screen updates to show you the effect of the selected Picture Control.
ISO Noise Reduction: If your picture looks noisy—that is, marred by a speckled look—playing with this setting may help eliminate the flaw.
Color Space: This setting determines whether the camera sticks with the default color space, sRGB, or the larger Adobe RGB color space when converting your photo.
D-Lighting: To brighten the darkest part of your picture without also brightening the lightest areas, try adjusting this setting. It’s the post-capture equivalent of the Active D-Lighting feature that’s available during shooting. To darken shadows, try setting the option to Off.
At any time, you can magnify the image by pressing the Zoom In button. Release the button to return to the normal display.
After setting the conversion options, highlight EXE on the first conversion screen and press OK.
The camera records a JPEG copy of your Raw file and displays the copy in the monitor. The camera assigns the next available file number to the image, so the number of the original and the number of the processed JPEG don’t match.
The filename of the processed image begins with CSC, as do all photos that you create via the Retouch menu. You also see the little Retouch menu symbol (the box with a paintbrush) with the photo during playback.
You also can access the Raw processing tool by displaying the Retouch menu and then choosing NEF (RAW) Processing. The camera displays thumbnails of Raw images; use the Multi Selector to highlight an image and then press OK to get to the processing options.
