


Whether you're using Live View for still photography or movie-making, you can choose from the following display styles, each of which adds different types of information to the screen. Press the Info button to cycle through the styles.
Show Photo Indicators: By default, the display uses this mode, where only options related to still photography appear.

Show Movie Indicators: Press Info to display only settings related to movie recording.
Hide Indicators: To declutter the screen a little, press the Info button to cycle from the default display to this mode.

In this display mode, as well in the two described next, you may see four tiny horizontal markers near the corners of the image display area. They appear to show you how much of the vertical image area will not be included in the recorded movie if you set the movie resolution, or frame size, to a setting that produces a 16:9 frame aspect ratio. (The only setting that doesn't produce this ratio is 640 x 424, which captures the same aspect ratio as a still photo, 3:2.)
In the Show Movie Indicators view, the shaded bars at the top and bottom of the image display area serve the same purpose.
Framing Grid: Press Info again to shift to this display. It offers the same framing grid that's available for the viewfinder. The grid is helpful when you need to precisely align objects in your photo.
Virtual Horizon: You also can display the Virtual Horizon indicator. This tool works the same way as the one you can enable through the Setup menu. When the camera is level, the little green triangle appears.

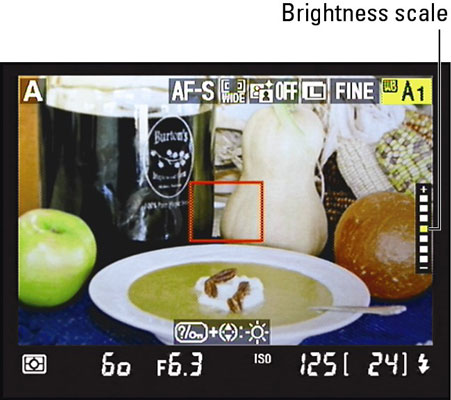
In addition to these options, you can adjust the monitor brightness by pressing and holding the WB button to display the little brightness scale on the right side of the screen. While holding the button, press the Multi Selector up and down to adjust the brightness. The strip of reminder icons along the bottom of the screen is there to jog your memory of what buttons accomplish this function. (When you shoot in the P, S, A, or M exposure modes, rotating the Main command dial while pressing the button changes the White Balance setting, which appears highlighted in the upper-right corner of the screen.)
If you connect your camera to an HDMI (High-Definition Multimedia Interface) device, you no longer see the live scene on your camera monitor. Instead, the view appears on your video display. In that scenario, the arrangement of the shooting information on the screen may appear slightly different than in the examples. Also note that if you connect the camera to an HDMI-CEC device, you may need to adjust an option on the Setup menu. Select HDMI, press OK, and turn off the Device Control option. Otherwise, you can't record a movie or take a picture in Live View mode.
