


When you review still photos on your Canon EOS 60D, you can press the Info button to change the type and amount of shooting data that appear with the photo in the monitor. The data-display options start with the most basic and advance through the other playback display screens.
Displaying photo information and changing the amount to display is a pretty simple matter.
Press the Playback button to enter photo Playback mode.
The amount and type of information displayed carries over. That is, if you chose to show no information last time you reviewed a photo, that’s what you’ll see this time.

Press Info to change display formats.
The four types are No Information, Basic Information, Detailed Information (which includes an overall brightness histogram), and Histogram.
Continue pressing Info to cycle through the different display formats.
When you find the one you want, leave the format there. When you return to Playback mode, you’ll be in the same display format.
No Information (image only) display mode
In the first display mode, officially called No Information display, your LCD appears.

As you might guess, No Information mode includes, well, no information. Well, almost. If the AF Point Display option is enabled in the Playback Menu 2 (or through the Quick Control screen), autofocus points show up as red rectangles corresponding to their location in the viewfinder.
Regardless, you get to see a large, uncluttered view of your image. Pressing the Info button advances you to the next viewing mode.
Displaying basic information
Basic Information mode starts to spoon-feed you some details about your image.
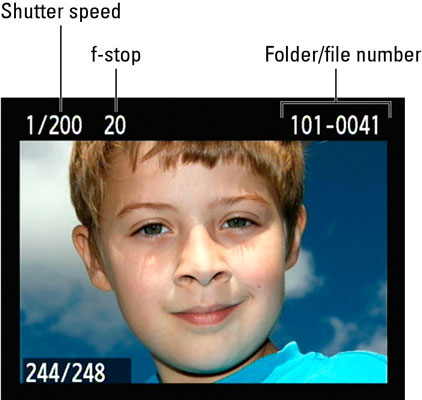
Along the top of the screen are the following bits of information:
Shutter speed and f-stop (aperture)
Exposure compensation: If you used exposure compensation for your shot, that value is noted at the top edge of the display.
Protection: If you protected the image, a little key icon appears.
Rating: If you rated the photo, the rating is shown right by the folder and file number.
Folder number and last four digits of file number
In the bottom-left corner of the LCD are two numbers separated by a slash (/): image number/total images. This pair of values shows you the current image number and the total number of images on the memory card. All information presented in Basic Information mode is also included in the last two more comprehensive modes, too. It’s a more-info-as-you-go approach, with a twist.
Detailed Information display mode
In Detailed Information display mode, the camera presents a thumbnail of your image along with scads of shooting data. To open this screen, first display your photo in full-frame view. The Detailed Information display isn’t available in Index display (when four or nine thumbnails are displayed at a time).

To sort out the maze of other data, it helps to break the display into five rows of information: the row along the top of the screen and the four rows that appear under the image thumbnail and histogram.
Here is what appears in the five rows:
Row 1 data: You see the same data that appears in the two basic display modes. This row doesn’t change, regardless of whether you took the photo in a Creative Zone mode or in a Basic Zone mode.
Row 2 data: Shift your attention to the row of symbols just underneath the thumbnail and histogram.

Exposure mode: Indicates which of the camera's exposure modes you used.
Metering mode: Determines which part of the frame the camera uses when calculating exposure.
Flash/flash compensation amount: See whether the flash fired, and if so, how much you adjusted the flash power using the Flash Compensation feature.
ISO speed: Controls the light sensitivity of the camera’s image sensor.
Highlight Tone Priority: If you enabled this exposure feature for the shot, you see the little D+ symbol.
Row 3 data: Information on this row of the display relates mostly to color settings.

Here’s the scoop:
White Balance setting: Helps ensure accurate photo colors.
White Balance correction: Tells you whether you applied an adjustment to the White Balance setting you used.
Picture Style: Looks similar to the multicontroller on the camera back. Ignore the graphical aspect of the icon. The thing to key on is the letter, which tells you at a glance what picture style you used for the photo.
Row 4 data: This row tells you the following tidbits of information:

Quality and file size: The Quality symbols shown during playback are the same ones used to indicate the Quality setting on the camera menus and Shooting Settings screen.
Original decision data: You can tag an image file with a hidden code indicating that the image hasn’t been altered in a photo program or otherwise tampered with after it was captured.
Color space: Your camera can capture images in two color spaces: sRGB and Adobe RGB. A color space is a definition of the spectrum of colors that an image can contain. You can change color spaces only in advanced exposure modes.
If the photo was shot in a Basic Zone mode, lighting or scene information (such as Daylight or Default setting) is displayed in place of original decision data and color space.
Row 5 data: Wrapping up the smorgasbord of shooting data, the bottom row of the playback screen holds three more pieces of information:
Image number/total images recorded: Again, this pair of numbers indicates the current image number with respect to the total number of images on the current memory card.
Eye-Fi card transmission status: If you use these special memory cards, a small icon depicting a wireless connection appears on pictures that you downloaded to your computer wirelessly.
Date and time: These values show you the exact moment that the image was recorded.
