


One of the best things about your Canon EOS 70D is being able to view pictures right after you shoot them. No more guessing whether you got the shot you want or need to try again; no more wasting money on developing and printing pictures that stink.
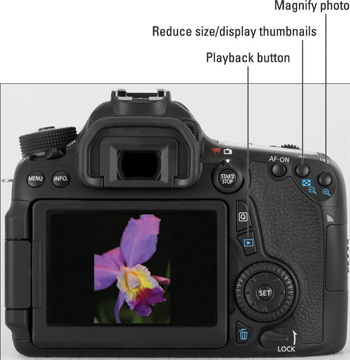
To switch your camera to Playback mode, just press the Playback button, labeled in the following figure.
Here are the absolute basics of Playback mode:
Scrolling through pictures: Rotate the Quick Control dial, press the Multi-controller right or left, or swipe your fingertip horizontally across the touchscreen.
Return to shooting: Press the Playback button or give the shutter button a quick half-press and release it.
For still photos, you may see your image only, as in the figure above, or see a little or a lot of shooting data along with the image. For a movie or video snapshot, you always see at minimum a big playback arrow that you can tap to start playback. For any type of file, you can press the Info button to change how much data appears. You can also display multiple images at a time; the next section tells all.
Switching to Index (thumbnails) view
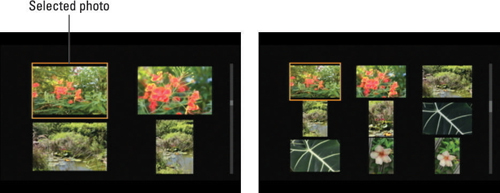
Instead of viewing one image at a time, you can display four or nine thumbnails on the screen, as shown in the figure below. To switch from full-frame view to thumbnails view — called Index view in Canon parlance — you have two options. The simplest is to use the touchscreen: Pinch inward to shift from full-frame to four-thumbnail view; pinch inward again to display nine thumbnails.
The other method is to press the AE Lock button — labeled Reduce size/display thumbnails in the first figure of the article. Your first press displays four thumbnails; press again to display nine thumbnails.
Note the little blue checkerboard and magnifying glass icons under the button. Blue labels are reminders that the button serves a function in Playback mode. In this case, the checkerboard indicates the Index function, and the minus sign in the magnifying glass tells you that pressing the button reduces the size of the thumbnail.
Remember these other factoids about Index display mode:
Select a thumbnail. For some playback operations, you start by selecting a thumbnail. A highlight box surrounds the currently selected thumbnail; for example, in the preceding figure, the upper-left photo is selected.
To select a different file, tap its thumbnail, rotate the Quick Control dial, or press the Multi-controller up, down, right, or left.
Scroll from one screen of thumbnails to another. Swipe your finger up or down the screen or rotate the Main dial.
Reduce the number of thumbnails. For touchscreen operation, pinch outward to reduce the number of thumbnails and return to full-frame view.
If you're in a button-pressing mood, press the AF Point Selection button, labeled Magnify photo in the first figure of the article. This button also has a blue magnifying glass icon, this time with a plus sign in the center to indicate that pressing it enlarges the thumbnail. Press once to switch from nine thumbnails to four; press again to switch from four thumbnails to single-image view.
For a quicker way to shift from Index view to full-frame view, select a photo and then press Set or tap the thumbnail.
Using the Quick Control screen during playback
During playback, you can access a handful of functions via the Quick Control screen. Here's how it works:
Press the Quick Control button.
If you were viewing pictures in Index mode, the camera shifts temporarily to full-frame playback. Then various icons appear on the left and right sides of the screen, as shown in the following figure.

Select one of the playback function icons.
Either tap the icon or press the Multi-controller up or down to select it. The selected icon is surrounded by the orange box; for example, in the figure, the Protect Images feature is active.
The name of the selected feature appears at the bottom of the screen, along with symbols that represent the available settings for that option. For example, in the above figure, you see the two options available for the Protect Images feature (Disable and Enable).
Select the setting you want to use.
Either tap the option or rotate the Main dial or Quick Control dial to select it. You also can press the Multi-controller left or right.
To exit the Quick Control screen, tap the return arrow (labeled in the preceding figure) or press the Quick Control button again.
