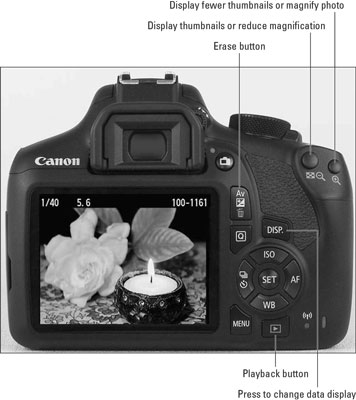
 The default Playback mode displays one picture at a time, with minimal picture data.
Several camera buttons come into play when you're viewing images. Note that with the exception of the DISP button, the labels on the buttons are either all blue or partially blue. Canon likes to color-code things, and blue is the color chosen for playback. In the camera menu system, Playback Menus 1 and 2 are decorated in blue as well. (The black-and-white portions of labels refer to shooting functions.)
Here's a quick-start guide to playback features:
- Scrolling from one image to the next: Press the right cross key to go forward one photo; press the left cross key to go back one.
To skip more quickly through images, rotate the Main dial to enter Jump mode. By default, the camera leaps through photos ten at a time, but you can set up a different system if you prefer.
- Display image thumbnails (Index view): Instead of viewing a single photo, you can switch to Index view, which displays four or nine thumbnails.
To switch from single-image view to four-image view, press the Index/Reduce button, labeled “Display thumbnails” in the preceding figure. Press the button again to display nine thumbnails.
In Index view, movie files are indicated by borders that look like the sprocket holes in old film reels (labeled a movie file in the figure). To play a movie, you must exit Index view; just press Set to do so. Press Set again to open the movie-playback screen.
 You can view four or nine thumbnails at a time.
- Select a file in Index view: When Index view is active, you can perform some file operations, such as erasing a photo or movie. But you first need to select the file by using the cross keys to place a selection box over the file's thumbnail. In the figure, I labeled the selected thumbnails. (In single-image view, the image on the monitor is automatically selected.)
- Scroll from one page of thumbnails to the next: Either rotate the Main dial or press the up/down cross keys. (The Main dial doesn't invoke Jump mode in Index view.)
- Reduce the number of thumbnails: Press the Magnify button. Press once to go from nine thumbnails to four; press again to shift from four thumbnails to single-image view.
You also can press the Set button to switch from Index view to single-image view. The image that was highlighted in Index view appears on the monitor after you press Set.
- Change the amount of shooting data that appears: Press the DISP button to cycle through the various playback display modes, each of which presents a different amount of shooting data.
Jumping through images on your Canon EOS Rebel T7/2000D
If your memory card contains scads of images, here’s a trick you’ll love: By using the Jump feature, you can rotate the Main dial to leapfrog through images rather than press the right or left cross key a bazillion times to get to the picture you want to see. You also can search for the first image shot on a specific date, tell the camera to display only movies or only still shots, or display images with a specific star rating.You can choose from the following Jump options:
- Display Images One by One: This option, in effect, disables jumping, restricting you to browsing pictures one at a time. So, what’s the point? If you select this setting, you can scroll pictures by rotating the Main dial as well as by pressing the right/left cross keys.
- Jump 10 Images: Advance 10 images at a time.
- Jump 100 Images: Advance 100 images at a time.
- Display by Date: If your card contains images shot on different dates, you can jump between dates with this option. For example, if you’re looking at the first of 30 pictures taken on June 1, you can jump past all others from that day to the first image taken on, say, June 5.
- Display by Folder: If you create custom folders on your memory card, this option jumps you from the current folder to the first photo in a different folder.
- Display Movies Only: Does your memory card contain both still photos and movies? If you want to view only the movie files, select this option. Then rotate the Main dial to jump from one movie to the next without seeing any still photos.
- Display Stills Only: This one is the opposite of the Movies option: Movie files are hidden when you use the Main dial to scroll photos. You scroll one picture at a time, just like when you use the Display Images One by One option.
- Display by Image Rating: With the Rating feature, you can assign each photo or movie a rating of one to five stars, which makes it easy to sort out your best work from your worst. If you take this step, you can set up the Jump feature so that only photos that have a specific rating are displayed.
You can establish your Jump preference by using the Quick Control screen or Playback Menu 2, as follows:
- Quick Control screen: After displaying a photo in playback mode, press the Q button to display the Quick Control playback icons, as shown. (If you're viewing images in Index mode, the camera temporarily shifts to single-image view and displays the image that was highlighted.)
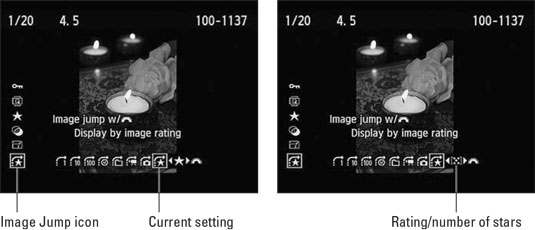 You can specify a Jump method by using the Quick Control screen.
Use the up/down cross keys to highlight the Jump icon, labeled on the left in the figure. Along the bottom of the screen, you see the icons representing the available Jump options, with a highlight box around the currently selected setting. (The text above the icon strip tells you what each symbol represents.) Use the left/right cross keys to highlight the icon representing the jump method you want to use.
If you select the Image Rating option, as shown in the figure, rotate the Main dial to set the number of stars that an image must have in order to be displayed. For example, in the figure, I set the option to five stars. Exit the Quick Control screen by pressing the Q button.
- Playback Menu 2: Select Image Jump, as shown, and then press Set to display the settings screen shown on the right. Use the cross keys to choose a Jump method. Again, if you select the Display by Image Rating option, rotate the Main dial to specify how many stars qualifies an image for jump viewing. Press Set to lock in your choice and return to the initial menu screen.
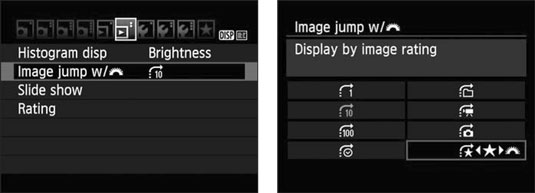 Or select the Jump method from Playback Menu 2.
After selecting a Jump method, take the following steps to jump through your photos:
1. Set the camera to display a single photo.
You can use jumping only when viewing a single photo at a time. To leave Index (thumbnails) mode quickly, press the Set button.
2. Rotate the Main dial.The camera jumps to the next image. The number of images you advance, and whether you see movies as well as still photos, depends on the Jump method you select.
If you select any Jump setting but Display Images One by One, a jump bar appears for a few seconds at the bottom of the monitor, indicating the current Jump setting, as. For the Image Rating Jump method, you also see the number of stars you specified.
3. To return to regular Playback mode, press the right or left cross key.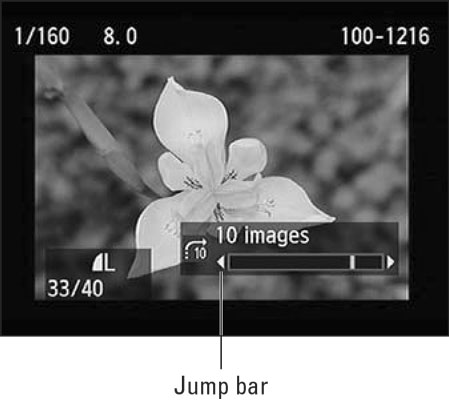 Rotate the Main dial to start jumping through pictures.
Rotating pictures on the Canon EOS Rebel T7/2000D
When you take a picture, the camera can tag the image file with the camera orientation: that is, whether you held the camera horizontally or vertically. When you view the picture, the camera can read the data and rotate the image so that it appears upright in the monitor, as shown on the left, instead of on its side, as shown on the right. The image is also rotated automatically when you view it in Canon Digital Photo Professional 4, the free photo software available for download from the Canon website. Some other photo viewing programs and apps also can read the rotation data.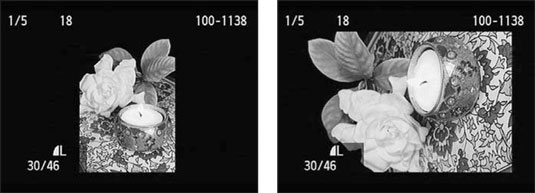 You can display vertically oriented pictures upright (left) or sideways (right).
Photographers use the term portrait orientation to refer to vertically oriented pictures and landscape orientation to refer to horizontally oriented pictures. The terms stem from the traditional way that people and places are photographed — portraits, vertically; landscapes, horizontally.
By default, the camera tags the photo with the orientation data and rotates the image automatically both on the camera and on your computer screen. But you have other choices, as follows:- Disable or adjust automatic rotation. Select Auto Rotate on Setup Menu 1, as shown on the left. Then choose from these options:
- On (Camera and Computer): Labeled in the figure, this option is the default; rotation happens both on the computer and camera. (The camera and computer symbols shown to the right of the word On tell you that rotation will occur on both devices.)
- On (Computer Only): Also labeled in the figure, this setting rotates pictures only on a computer monitor. Notice the absence of the camera icon, reminding you that photos won't be rotated when you view them on the camera monitor.
- Off: New pictures aren’t tagged with the orientation data, and existing photos aren’t rotated during playback on the camera, even if they're tagged.
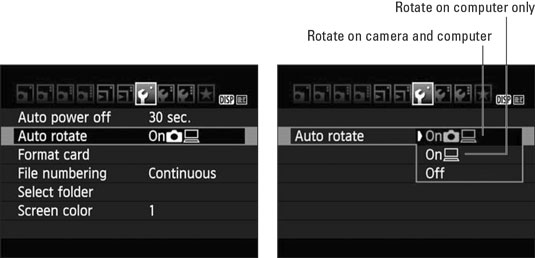 Go to Setup Menu 1 to disable or adjust automatic image rotation.
- Rotate pictures during playback. If you stick with the default Auto Rotate setting, you can rotate pictures to a different orientation during playback via the Quick Control screen. Highlight the Rotate option, as shown here, and then press the right or left cross keys to select one of the three orientation icons (labeled in the figure). Press the Q button a second time to exit the Quick Control screen.
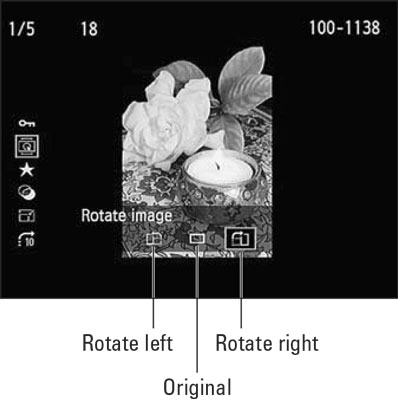 The fastest way to rotate individual images is to use the Quick Control screen (on left).
The Quick Control method does not work if you set the Auto Rotate option on Setup Menu 1 to Off or computer-rotation only. However, you can still rotate pictures via the Rotate Image option on Playback Menu 1, shown on the left.
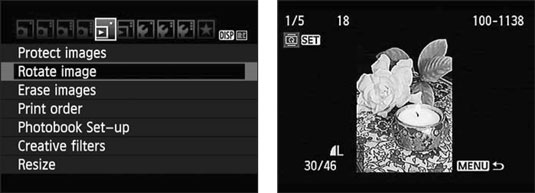 You also can rotate images via Playback Menu 1.
Choose the menu option and then press Set to display your photos. In Index display mode, use the cross keys to select the image that needs rotating. In full-frame display, just scroll to the photo. Either way, press Set once to rotate the image 90 degrees; press again to rotate 180 additional degrees; press once more to return to 0 degrees, or back where you started. Press Menu to return to the menu system or Playback to return to viewing pictures. The photo remains in its rotated orientation only if the Auto Rotate option is set to the default (rotation on for both computer and camera display).
All these rotation features apply only to still photos; you can’t rotate movies.
Zooming in for a closer view on the Canon EOS Rebel T7/2000D
During playback, you can magnify a photo to inspect details, as shown. In the example photo, I had to zoom way in to reveal the colorful visitor hanging on my rain chain, apparently searching for a tailor. (Get it? He's missing part of his tail, so he needs a tail … oh never mind. The good news is that his tail will grow back, so you needn't fret for his safety. My sanity is another story.)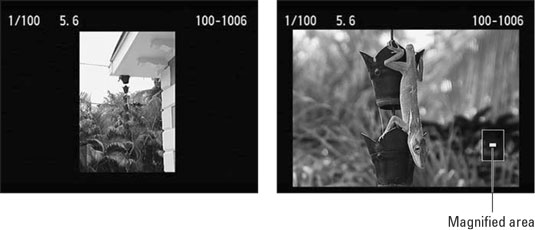 After displaying your photo in full-frame view (left), press the Magnify button to zoom in for a closer view (right).
At any rate, you can magnify only photos and only when you’re displaying photos one at a time. So if the camera is in Index display mode, press Set to return to full-frame view. Then use these techniques to adjust the image magnification:
- Zoom in. Press and hold the Magnify button until you reach the magnification you want. You can enlarge the image up to ten times its normal display size.
Note the plus sign in the middle of the magnifying glass part of the button icon. That's your reminder to use this button to increase the display magnification.
- View another part of the picture. When the image is magnified, a little thumbnail representing the entire image appears in the lower-right corner of the monitor, as shown in the right image in the preceding figure. The solid white box indicates the area of the image that is shown on the monitor. Press the cross keys to scroll the display to see another portion of the image.
- View more images at the same magnification. While the display is zoomed, rotate the Main dial to display the same area of the next photo at the same magnification. (The Jump feature, normally triggered by rotating the dial, is disabled while a photo is magnified.) For example, if you shot a group portrait several times, you can easily check each one for shut-eye problems.
- Zoom out. To zoom out to a reduced magnification, press the Index/Reduce button. Continue holding down the button until you reach the magnification you want.
Here again, the symbol inside the magnifying glass label offers a hint as to the button's purpose: The minus sign indicates that pressing the button decreases the magnification. After you zoom all the way out, pressing the button another time shifts the display to Index (thumbnails) view.
- Return to full-frame view when zoomed in. To exit magnified view, don’t keep pressing the Index/Reduce button until you zoom out all the way. Instead, just press the Playback button, which quickly returns you to full-frame view.


