


Canon EOS Rebel T7/2000D menu basics
Menus are organized into the categories labeled here. Notice that the icons that represent the menus are color coded: Shooting menu icons are red; Playback menu icons are blue; Setup menu icons are gold; and the My Menu icon is green.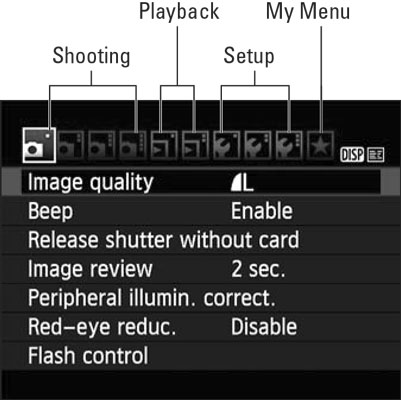 You see all these menus only when the Mode dial is set to P, Tv, Av, or M.
The number of dots above the icon tells you the menu number — one dot for Shooting Menu 1, two dots for Shooting Menu 2, and so on.
The highlighted icon marks the active menu; options on that menu appear automatically on the main part of the screen.To display all the menus shown, you must set the Mode dial to P, Av, Tv, or M. In other modes, you see only a handful of menus because you have limited control over camera operation in those modes. Additionally, when you set the camera to Movie mode, three of the four Shooting menus are replaced by Movie menus, which offer movie-recording options, and a limited version of Shooting Menu 1 is bumped to the right to make room for the Movie menus. The menu icon for the Movie menus changes to a movie-camera symbol to indicate the shift. In addition, Movie mode does not display the My Menu icon.
To cycle through menus, rotate the Main dial or press the left or right cross keys. After landing on a menu, press the up or down cross key to highlight the feature you want to adjust. Then press the Set button to display the available options. Use the cross keys to select a setting and press the Set button again.When you're ready to exit the menus and start shooting, press the shutter button halfway and release it, or press the Menu button.
How to navigate the Canon EOS Rebel T7/2000D's Custom Functions screens
When you select Custom Functions from Setup Menu 3 — a menu available only in the P, Tv, Av, and M exposure modes — you delve into submenus containing advanced settings. Initially, you see a screen similar to the one shown on the left.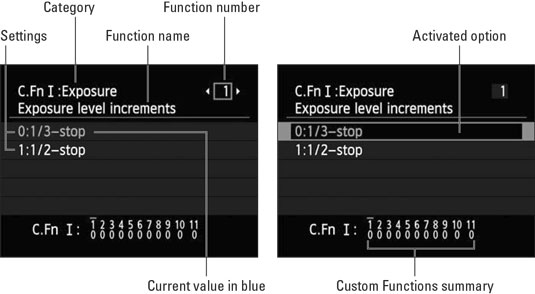 The Custom Functions menu screens are divided into several important areas.
Some explanation may help you make sense of these screens:
- Custom Functions are grouped into four categories: Exposure, Image, Autofocus/Drive, and Operation/Others. The category number and name appear in the upper-left corner of the screen.
- The number of the selected function appears in the upper-right corner. Custom Function 1 is indicated in the figure.
- Settings for the current function appear in the middle of the screen. The blue text indicates the current setting. The default setting is represented by the number 0.
- Numbers at the bottom of the screen show you the current setting for all Custom Functions. The top row of numbers represents the Custom Functions, with the currently selected function indicated with a tiny horizontal bar over the number. The lower row shows the number of the current setting for each Custom Function; again, 0 represents the default. So in the figure, all the Custom Functions are using the default settings.
As with normal menu screens, you can exit the menus and return to shooting by pressing the Menu button or pressing the shutter button halfway and releasing it.
