


How to switch from auto to manual focusing
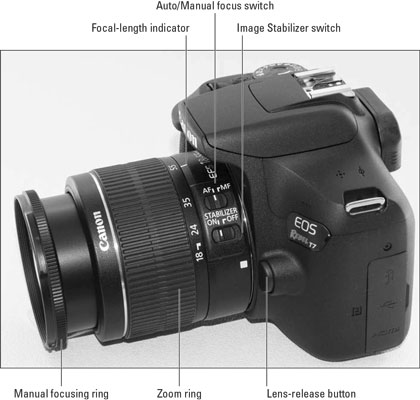
Assuming that your lens can autofocus with the T7/2000D, the first step is to set the lens to automatic or manual focusing by moving the focus-method switch on the lens. For example, the following figure shows the switch as it appears on the 18–55mm kit lens. On this lens, set the switch to AF for autofocusing and to MF for manual focusing. Then use these focusing techniques:- Autofocusing: Press and hold the shutter button halfway to initiate autofocusing.
- Manual focusing: After setting the lens switch to MF, rotate the focusing ring on the lens barrel until focus appears sharp. The position of the focusing ring varies depending on the lens.
With some lenses, you have the option to use automatic focusing with manual override: After using autofocusing to set the initial focusing distance, you can fine-tune focus by turning the focusing ring. This feature is usually indicated on the lens by a setting labeled AF/M. If your lens doesn't offer that feature, never try to rotate the focusing ring before setting the lens switch to the manual focusing position. You can damage the lens if you do.
 Here are a few features that may be found on your lens.
How to work with a zoom lens for your Canon EOS Rebel T7/2000D
If you bought a zoom lens, it most likely has a movable zoom ring that you use to adjust the focal length of the lens. The location of the zoom ring on the kit lens is shown in the preceding figure. To zoom in or out, rotate the ring.Some zoom lenses, though, don't offer a zoom ring. Instead, you push the lens barrel away from or toward the camera body to zoom to a different focal length. See your lens manual to be certain how its zoom function works.
You can determine the focal length of the lens by looking at the number aligned with the bar labeled focal-length indicator. In the figure, the focal length is 55mm, for example.
How to enable image stabilization
Many Canon lenses, including the kit lens, offer this feature, which compensates for small amounts of camera shake that can occur when you handhold the camera. Camera movement during the exposure can produce blurry images, so turning on Image Stabilization — IS, for short — can help you get sharper handheld shots. On the 18–55mm IS kit lens, as well as on many other Canon lenses, you turn the feature on and off via a lens switch.However, when you use a tripod, image stabilization can have detrimental effects because the system may try to adjust for movement that isn’t actually occurring. Although this problem shouldn't be an issue with most Canon IS lenses, if you do see blurry images while using a tripod, try turning the feature off. (You also save battery power by turning off image stabilization.)
On non-Canon lenses, image stabilization may go by another name: antishake, vibration compensation, and so on. In some cases, manufacturers recommend that you leave the system turned on or select a special setting when you use a tripod, so check the lens manual for information. Additionally, some lenses offer two types of stabilization, typically labeled Normal and Active. The first option is for everyday shooting; the Active option is designed for use in situations where you expect lots of motion, as when you're shooting from a speedboat.Whatever lens you use, image stabilization isn’t meant to eliminate the blur that can occur when your subject moves during the exposure. That problem is related to shutter speed.
How to remove a lens
After turning the camera off, press and hold the lens-release button on the camera, and turn the lens toward the shutter-button side of the camera until the lens detaches from the lens mount. Put the rear protective cap onto the back of the lens and, if you aren’t putting another lens on the camera, cover the lens mount with its cap, too.Always switch lenses in a clean environment to reduce the risk of getting dust, dirt, and other contaminants inside the camera or lens. Changing lenses on a sandy beach, for example, isn’t a good idea. For added safety, point the camera body slightly down when performing this maneuver; doing so helps prevent any flotsam in the air from being drawn into the camera by gravity.
