

You’ll love what they’ve done with Finder in Mojave.
Cleaning Up Your Desktop Automatically with Stacks
Many Mac desktops look something like the following figure.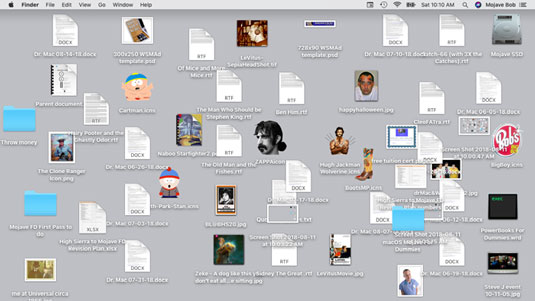 A messy, disorganized desktop.
In the past, my advice to people with messy desktops was to select all the icons on the desktop, put them in one folder, and then rename the folder something like Former Desktop icons. It worked okay but using Mojave’s new Stacks is better and easier.
You can organize your desktop using Stacks in two ways:
- Choose View→ Use Stacks.
- Right- or Control-click anywhere on the desktop, and then choose Use Stacks from the shortcut menu.
The Use Stacks command is available only when the desktop is active, so if an active window is on your screen, you’ll see Use Groups rather than Use Stacks.
When you choose Use Stacks, your desktop transforms instantly from the mess shown in the preceding figure to the six nicely organized stacks shown here. Folders on the desktop are not affected by using Stacks; all other icons on the desktop are organized automatically into stacks (Other, Screenshots, Documents, Images, PDF Documents and Spreadsheets in the figure).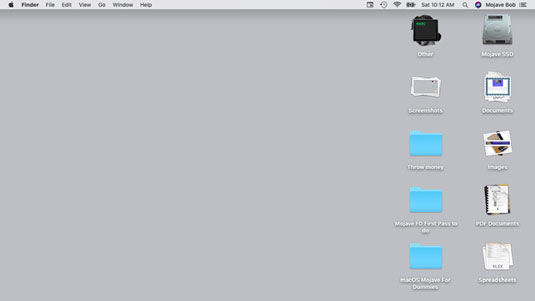 Stacks create order out of chaos.
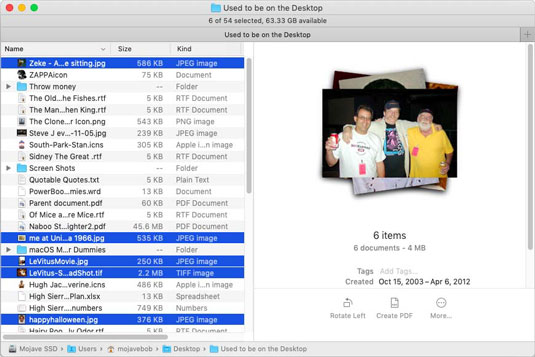
Single-click a stack to see its contents, as here for the Images stack.
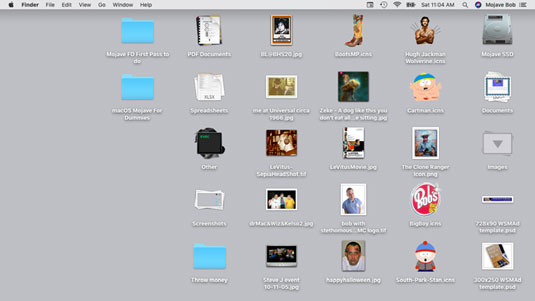 Single-click a stack (Images) to see its contents.
Notice that the expanded stack (Images) now displays a down-facing arrow (or a triangle, depending on how you look at it). That indicates that the stack is expanded, Click the stack to close it.
Managing your Stacks
Choosing Use Stacks is just the start of things. When you’re using Stacks, you can group items by choosing View → Group Stacks By, which offers the following choices:- None (no keyboard shortcut)
- Kind (Control+Command +2)
- Date Last Opened (Control+Command +3)
- Date Added (Control+Command +4)
- Date Modified (Control+Command+5)
- Date Created (no keyboard shortcut)
- Tags (Control+Command +7)
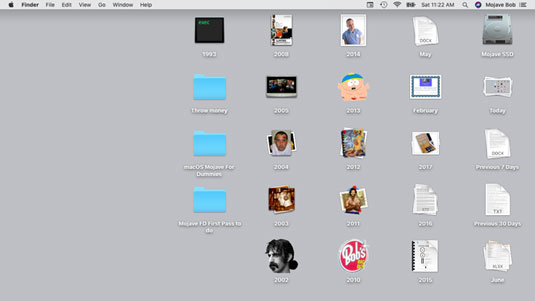 Grouping stacks by Date Created gives you a different perspective than grouping them by Kind.
You can also right- or Control-click and choose Group Stacks By, which offers all of the commands above except None. Strangely, None isn’t available on the shortcut menu.
Finally, if you’re not already using Tags to organize your files, Stacks may be just the incentive you need to start.Quick Actions: Now Playing All Over Mojave
Before Mojave, Quick Look windows and the Preview pane in Finder windows were mostly for show. What I mean is they showed you the contents of a selected file or files, but that was about all they could do. If you wanted to annotate, rotate, or edit an image, you had to launch Preview or another image editor. And if you wanted to snip out part of a video file, you had to launch QuickTime Player.Mojave adds some oomph to Quick Look, the Preview pane in Finder windows, and shortcut menus by adding Quick Actions that include marking up, video trimming, and creating PDFs.
Getting the most out of Markup
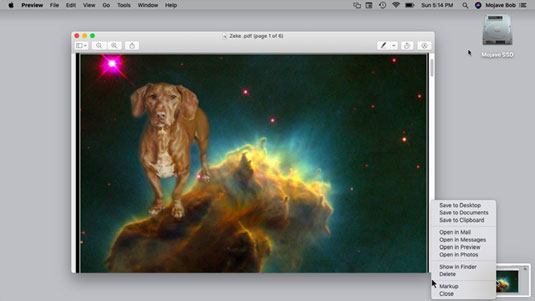
In Mojave, the Markup icon and with the Rotate icon are available in Quick Look windows and the Preview pane of Finder windows, and the commands are in the Finder’s shortcut menu (right- or Control-click).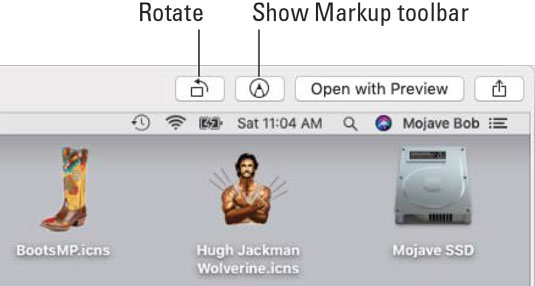 Click the Markup button to see the Markup toolbar; click the Rotate button to rotate your image in 90° increments.
When you click the Rotate button, the default is to rotate your document counterclockwise by 90°. If you’d rather rotate clockwise, press Option before you click.
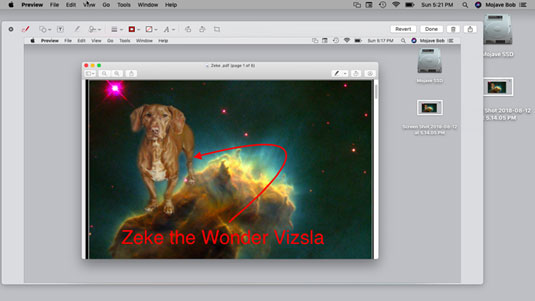
When you have an image selected and you click the Markup button in a Quick Look overlay, in a Preview pane in a Finder window, or in a Finder shortcut menu, an overlay appears displaying the image below the Markup toolbar, as shown here.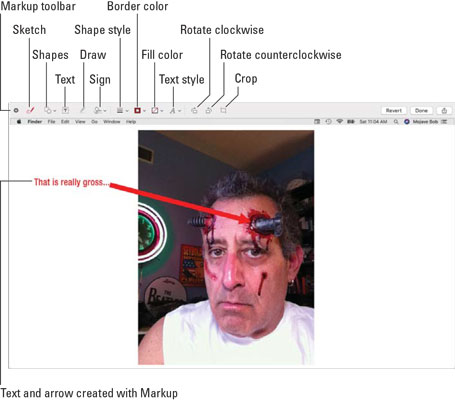 The Markup toolbar above an image to which I added text and an arrow by using Markup.
And here’s how the tools work:
- Sketch: Sketch a shape with a single stroke. Here’s the cool part: If your drawing is recognized as a standard shape — a circle, a rectangle, an arrow, or such — it’s replaced by a perfectly drawn rendition of the shape. If you don’t like it perfect, you can use what you drew instead by choosing it from the palette that appears after you use the tool.
- Shapes: Click a shape to place it on the image, and then drag the shape where you want. To resize a shape, use its blue handles. If the shape has green handles, you can use them to alter the shape.
You can also zoom in or out and highlight specific shapes using the pair of tools at the bottom of the Shapes drop-down:
- Highlight: Drag the highlight where you want. To resize it, use the blue handles.
- Loupe: Drag the loupe over the area you want to magnify. To increase or decrease the magnification level, drag the green handle; to increase or decrease the size of the loupe, drag the blue handle. To further magnify an area, you can create additional loupes and stack them, using the yellow guides that appear to align them.
- Text: Type your text, and then drag the text box where you want.
- Draw: Use your finger to draw a shape with a single stroke. Press more firmly on the trackpad to draw thicker, heavier lines. Note that this tool is available only on computers with a Force Touch trackpad.
- Sign: If signatures are listed, click one and drag it where you want. To resize it, use the blue handles.
To create a signature:
- Using your trackpad: Click the Sign tool, click Create Signature if shown, and then click Trackpad. Click the text as prompted, sign your name on the trackpad using your finger, and then click Done. If you don’t like the results, click Clear and try again. If your trackpad supports it, press your finger more firmly on the trackpad to sign with a heavier, darker line.
- Using your computer’s built-in camera: Click the Sign tool, click Create Signature if shown, and then click Camera. Hold your signature (on white paper) facing the camera so that your signature is level with the blue line in the window. When your signature appears in the window, click Done. If you don’t like the results, click Clear and try again.
- Shape Style: Change the thickness and type of lines used in a shape or add a shadow to a shape.
- Border Color: Change the color of the a shape's border.
- Fill Color: Change the color of a shape’s fill.
- Text Style: Change the font type, style, and color.
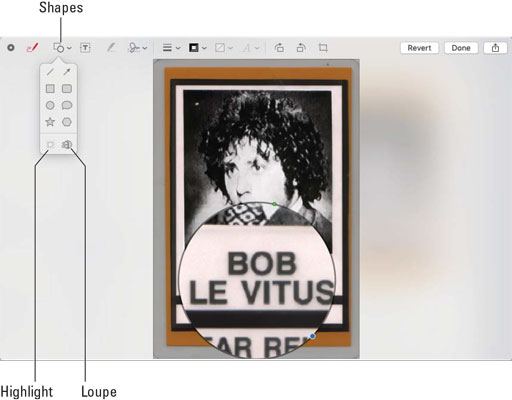 The shapes drop-down (left) and the loupe in action (right).
Trimming video without launching an app
Although QuickTime Player has allowed you to trim videos for years, you have to launch it and usually wait a few seconds for the video to appear. Mojave introduces a new, faster, easier way to trim your videos without launching QuickTime Player (or another app).When a video file is selected, you’ll find the new Trim icon available in Quick Look windows, in Finder preview panes, and in the shortcut menu (right- or Control-click a video and choose Quick Actions→ Trim).
Click the Trim button and a filmstrip appears below the video with handles for setting the beginning and end of the video, as shown here.
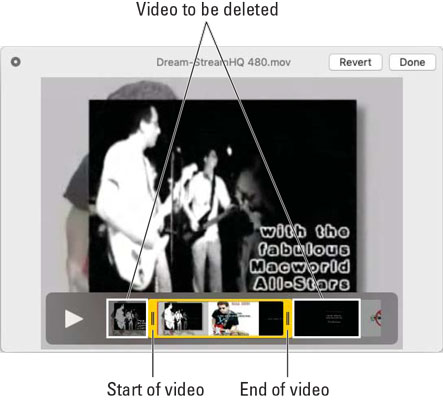 Drag the handles to set the start and end points.
Drag the left handle to where you want the video to begin, and then drag the right handle to where you want the video to end. Click Done and you’re done. Your video has been trimmed of excess footage without launching an app.
One more thing: All tools discussed in this section are part of a new Mojave feature called Quick Actions.
Do It Quicker with Finder Quick Actions
You’ve already seen several of Mojave’s Finder Quick Actions — Rotate, Markup, and Trim to be precise — but there are a couple of actions that can help you get more out of your Quick Actions.The first is the Create PDF Quick Action, which does what its name implies and more; the second is creating your own Quick Actions with Automator, which may be the coolest thing about Quick Actions.
Creating PDFs without launching an app
In most applications, you can create a PDF from the Print sheet. But wouldn’t it be nice if you could create PDFs without launching an application and choosing Print?In Mojave it’s no problem. Just use the Create PDF Quick Action, which you’ll find in Quick Look windows, in the Preview pane of Finder windows, and in the shortcut menu (right- or Control-click).
Actually, it is a problem if you want to use the Create PDF Quick Action on files other than images. It won’t work with a Word, Pages, Excel, or TextEdit document, or other document types. But, if your files are images — jpeg, tiff, png, and such — you can turn them into PDFs with a click.
You can tell if the file can be converted because the Create PDF command or button appears only when suitable files are selected, as shown here.
 I’ve selected image files, so the Create PDF Quick Action button appears.
Here’s a cool feature: If you select multiple image files, as I did here before using Create PDF, the result is a multipage PDF file with one image on each page — a kind of virtual contact sheet. Neat!
Creating custom Finder Quick Actions
The Markup, Rotate, Trim, and Create PDF Quick Actions are useful and a welcome addition to Finder, but wouldn’t you love to be able to create your own Quick Actions to appear in Quick Look windows, in the Preview pane of Finder windows, and in the shortcut menu(right- or Control-click)?You’ll be happy to know that you can, and doing so is relatively easy using Automator, which comes with Mojave. That’s all I have to say here.
4 More Cool Mojave Tricks
In addition to Stacks and Quick Actions, Mojave introduced several other enhancements, including a new interface for capturing still and video images from your Mac screen, desktop pictures that change to reflect the time of day, the recently used apps section of the dock, and using Mojave’s new Gallery view as a photo browser.Shooting screens
If you’ve used a Mac for long, you probably know that you can grab a picture of what’s on your screen by using the shortcuts Command +Shift+3 for the whole screen or Command +Shift+4 to select a window or part of the screen. Those shortcuts and features have been around since time immemorial. Sadly, I can’t remember the last time screenshots were upgraded or improved.Mojave ends the drought with new interface options for those good old screenshot keyboard shortcuts, and adds a new shortcut you’ll want to memorize immediately.
But first, when you take a screenshot using your old-school shortcuts — Command +Shift+3 or Command +Shift+4 — a thumbnail of the screenshot appears in the lower-right corner of the screen.
If you do nothing, the thumbnail disappears after about 5 seconds, and then the screenshot is saved on your desktop. To see additional options, right- or Control-click the thumbnail and choose from the shortcut menu, as shown here.
 After you take a screenshot, a thumbnail appears in the lower-right corner of the screen; right- or Control-click for additional options.
Or just single-click the thumbnail before it disappears and the image opens in a window with Markup tools so you can annotate the image before you save it, as shown here.
 Click the thumbnail to modify the screenshot with Markup tools.
When you have finished annotating, click Done to save the screenshot and annotations to the desktop, or click Revert to close the overlay without saving your annotations.
Now here’s the best part: Mojave introduces a new screen-shooting shortcut that provides even more control over screenshots and adds the capability to record screen movies.
This magical Mojave shortcut is Command +Shift+5, and it’s the only shortcut you really have to memorize because its floating toolbar, shown here, includes all the functionality of the Command +Shift+3 and Command +Shift+4 shortcuts and more.
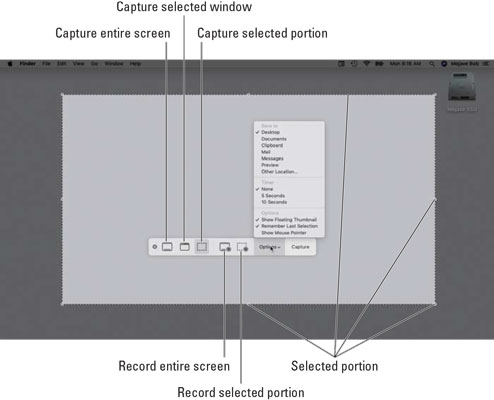 The screenshot toolbar appears when you press Command +Shift+5.
Notice the Options pop-up menu, which lets you do the following:
- Change the destination for screenshots from Desktop (the default) to Documents, Clipboard, Mail, Messages, Preview, or Other Location.
- Set a timer for shots.
- Turn on and off the floating thumbnail.
- Remember the last selection you made (or not).
- Show or hide the mouse pointer.
Bottom line: Memorize Mojave’s one keyboard shortcut to rule them all — Command +Shift+5 — and use it for all of your screen-capturing needs.
Dynamic desktop images
Mojave introduces a new feature I’d like to highlight here with the others: dynamic desktops.When you choose your desktop picture, you’ll find a pair of dynamic desktop options above all the normal desktop pictures in the Desktop & Screen Saver System Preferences pane.
Because a picture is worth a thousand words, take a gander here, which explains it all.
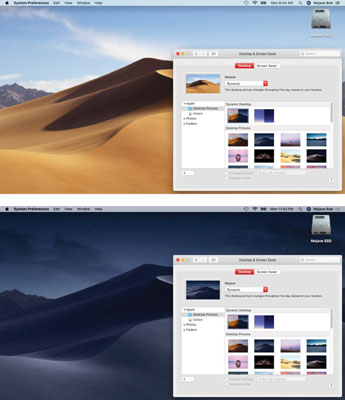 A dynamic desktop at 8:44AM (top) and 11:43PM (bottom).
That’s all.
Recently used apps in the dock
I’d be remiss if I didn’t point out that Mojave added a new feature to the dock: the Recently Used Apps section, which displays icons for the last three apps you’ve launched, regardless of whether their icons are in the dock permanently.Mentions of Gallery view
Mojave’s new Gallery View is great for browsing folders full of images, as shown here.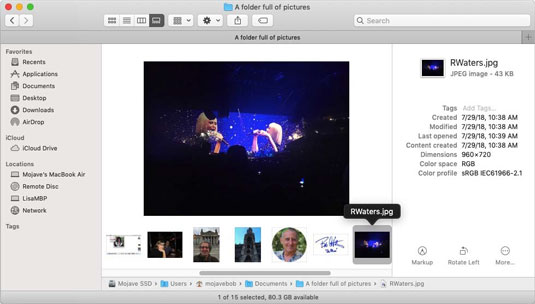 Gallery View makes a terrific browser for folders with images.
Use the arrow keys to see the next or previous image; click the Markup, Rotate, or More button to edit the current image.
And that retires the side, at least as far as new features in Mojave’s Finder are concerned. Onward!
