


Smartsheet uses spreadsheets, or just sheets (as they call them), as the basis for everything you need to do on a project, from creating project schedules and task lists to defining requirements lists and budgets. What differentiates these sheets from the standard spreadsheets you find in programs like Microsoft Excel or Google Sheets is that Smartsheets have all sorts of functionality baked into them, which enables you to customize them and use Smartsheet’s collaboration features within the sheet itself. Plus, Smartsheet has created a ton of templates that are ready for you to use, so you don’t necessarily have to start from scratch.
Smartsheet’s paid plans are based on the number of sheets (as well as storage space) allotted per user. The Basic plan (which costs $14 per month) gives you only ten sheets to use at any given time, so you have to use them wisely. If you manage a lot of different projects, the Basic plan may not be enough for you.
If you’re limited in the number of sheets you can use with your account, try this: When you finish a project, export all the sheets you created for that project and archive them on your computer. Then you can safely delete the sheets in Smartsheets, which adds back to your available sheet total. If you need to, you can always import the archived sheets back into Smartsheet.
Creating a new sheet
To create your first sheet, log in to Smartsheet, which takes you to your Home page. Then follow these steps:
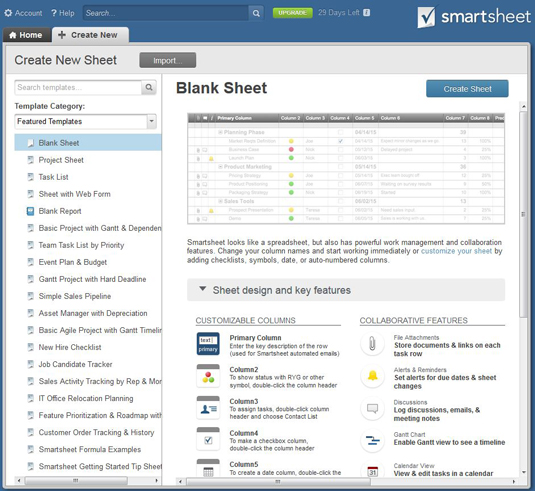
Click the + Create New tab at the top next to the Home tab. You see the Create New Sheet page in Figure 1.
On the left, choose either a blank sheet or one of the templates listed. You can also import a Microsoft Excel spreadsheet, a Microsoft Project file, or a Google sheet.
Smartsheet shows you a preview of the sheet you chose, with a features list below it. You can also scroll down and view helpful videos and other learning resources.
For templates, you can either search for a template or browse templates in specific categories, such as Project Management and I.T.
Click Create Sheet in the upper right.
In the dialogue box that appears, type in a name for your new sheet and click OK.
Your new sheet is created. If you created a blank sheet, you see the screen in Figure 2. Smartsheet provides you with some tips on working with your sheet, which you can close out of if you’re not interested.
Source: smartsheet.com
Understanding your sheet’s columns
If you created a blank sheet, you see several columns, a few with icons in the headings. Here’s what those columns are for:
Column of row numbers: All the rows of your sheet are automatically numbered sequentially. To the left of the row number, the shaded area enables you to reorder the rows. Just click and hold the shaded area and move the row up or down to its new spot.
Second column: This column is reserved for a drop-down menu that allows you to do several things with the row, such as cut, copy, and edit, or insert new rows above and below.
Attachments: The column with the paperclip icon enables you and your collaborators to attach external files to the row. You can upload files from your computer, attach files from Google Drive or Dropbox, or provide a URL to a file that’s hosted externally.
Discussions: The column with the conversation balloon enables you and your collaborators to add comments or discussions to the row. This is handy if you need to discuss a particular task in your project schedule with your collaborators.
Row action indicators: This column tells when a row is locked or has a reminder associated with it. It can also indicate whether resources have been overallocated or if there’s an update to the row pending.
Primary column: This is actually the first data column; that is, the first one that you’ll type info into. For a project schedule, this would likely be your task list.
Additional columns: The other columns to the right of the Primary column are customizable to what you need them to be. For example, for a project schedule, you may have columns for Start and End Dates, Resource Names, and so on.
 Figure 2: Your new sheet.
Source: smartsheet.com

