


Part of managing a project in Smartsheet is getting your collaborators to update the team on their progress. Only the owner and collaborators with Admin or Editor access to a sheet can send update requests. But you can send update requests to anyone; the recipient of the request doesn’t need access to the sheet itself. This is handy if you need updates from outside vendors or others who aren’t necessarily part of your internal project team.
Sending an update request for a row
You can send update requests at the row or task level. Just follow these steps:
Log in to Smartsheet and open the sheet you want to update.
Highlight the row for which you want to request an update. You can highlight multiple rows by using either the Shift or Ctrl key (or Command key on a Mac).
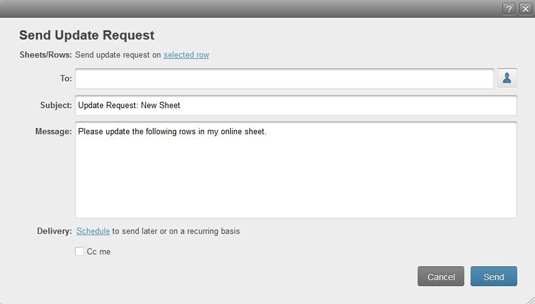
Click the down arrow in the second column of the row and choose Send Update Request. The Send Update Request dialogue box appears (see Figure 1).
In the To field, type in the e-mail address(es) of those from whom you’re requesting an update. You can also select people from your Smartsheet contacts list by clicking the button to the right of the To field. Separate multiple e-mail addresses with a semicolon.
In the Subject and Messages fields, type in what you want to say to the recipient.
If you have someone from whom you continually need to request updates, click Schedule next to Delivery to set up daily, weekly, or monthly requests.
To be copied on the request yourself, check the Cc me box.
Click Send.
Your update request is sent to your recipient(s), who will need to click the Update Rows button in the e-mail he or she receives. The recipient’s browser shows a pared-down version of the Smartsheet interface with only the rows you sent visible. The recipient can edit any unlocked rows and, when finished, click Send Changes to return the changes to the sheet. You need to refresh the sheet to view any changes submitted.
Source: smartsheet.com
Update requests provide one-time-only access to the specified information in the sheet. After the recipient clicks Send Changes, the access expires.
If you change your mind and want the update request to pertain to entire sheet instead of the specified row, look next to Sheets/Rows in the Send Update Request dialogue box. This tells you that you’re sending the request for the selected row. Click the Selected Row link, choose Entire Sheet, and click OK. Your request won’t be attached to the row any longer. Unfortunately, this doesn’t work in reverse; in order to change the request from the ntire sheet to a selected row, you have to cancel out of the Send Update Request dialogue box and follow the steps above.
Sending an update request for an entire sheet
You don’t have to specify a row to send an update request. If you have a non-task-specific update request to make, you can click the Update Requests tab at the bottom of your sheet. Doing so opens the same Send Update Request dialogue box as in Step 3 above. Just follow the rest of the steps above to complete the update request.

