


Smartsheet enables you to upload and attach files inside a sheet for easier access. No longer do you have to store files elsewhere and give your project team access to them. You can attach files to either an individual row or to the overall sheet.
The basic plan in Smartsheet comes with only 3GB of online storage space. If you’re working with small documents, like word-processing files or spreadsheets, then this will probably be enough for you. But if you’re dealing with larger files, such as image or video files, you may use up that 3GB fast. You may need to upgrade to the team plan, which allows for up to 45GB of storage (15GB per user).
Upload files to a row in Smartsheet
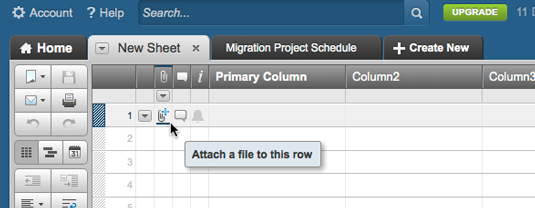
If you have tasks in your project schedule that require certain materials, you can attach those files directly to the row that the task is in. For example, say you have a set of wireframes for a new Web site to review. You can attach a PDF document of the wireframes directly to the task. Here’s how (see Figure 1 for reference):
Log in to Smartsheet and open the sheet you want to add files to.
Find the row containing the task you want to upload files to.
In the Attachments column (the one with the paperclip in the header), when you hover over the cell, you see a paperclip with a plus sign. Click that icon.
In the Row Attachments dialog box, either drag and drop a file from your hard drive or click the Attach button. You see the options for attaching below:
Upload from computer…: You can browse to the file on your hard drive.
Google Drive, Box, Dropbox, Evernote: You can attach a file from one of these cloud storage services. You have to log in to that service and give permission for Smartsheet to access it in order to do so.
Link: If your document is hosted publically on an external Web site or server, you can copy and paste in the URL.
After the file uploads, either click Close or click Attach again to upload more files.
After you upload a file, a paperclip icon appears in the row’s attachments cell. If you click that icon, you see the Row Attachments dialogue box from Step 4 with your file listed. Click on the file, and the Actions drop-down becomes active, which enables you to download, e-mail, delete, or upload a new version of the document.
Source: smartsheet.com
Upload files to the overall sheet in Smartsheet
Sometimes, you may have documents that pertain to the project as a whole, such as a list of resources for everyone to use. To add something like this to your sheet, click the Attachments tab at the bottom of your sheet; you can see that in Figure 1. You see the Sheet Attachment Summary dialogue box.
This dialogue box shows you all the files that are attached to the sheet, including those you’ve attached to rows. You can follow Steps 4 and 5 above to add a file to your sheet.
For better project management, you should really try to attach documents to tasks in rows, rather than the sheet as a whole. Since the idea is to use the project schedule as a blueprint for your project, any attachments would be easier to find if attached to the task they pertain to. If an attachment doesn’t have an associated task, then consider whether you should create a task for it. For example, if you created a project charter and want to attach it, but there’s no task for creating a project charter, you probably should have made one to begin with.

