

Using Logic Pro’s Compressor plug-in
The Logic Pro Compressor plug-in can emulate a wide variety of hardware compressors. Many compressors have become classics in the recording and mixing world, and there’s a giant market for software emulations of these compressors. Logic Pro doesn’t advertise its own compressor emulations, but savvy users know what they are.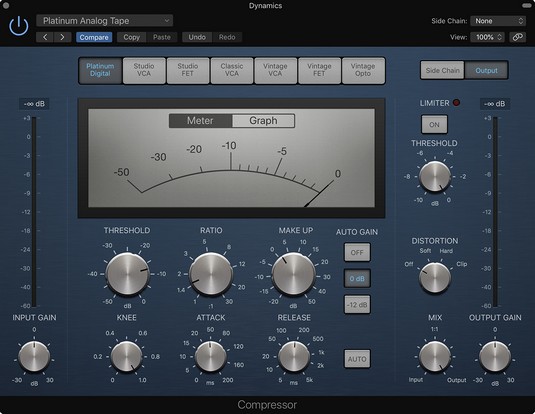 The Compressor plug-in.
Like Channel EQ, Compressor has its own meter in the channel strip, right below the EQ display. The meter shows you the amount of gain reduction. You can double-click the meter to open Compressor. If it’s not currently inserted on the channel strip, it’s added to an open slot. Here’s a description of Compressor parameters:
- Circuit Type: The Circuit Type menu is where you choose a compressor emulation:
- Platinum Digital: This compressor is Logic Pro’s original compressor. It’s a transparent compressor you can use on any audio source to control dynamics.
- Studio VCA: The studio VCA is similar to the Focusrite Red compressor. This compressor is colorful, with low distortion, and has a faster attack than FETs. Use it when you want to protect a track from clipping and on instruments with complex harmonics, such as pianos, harpsichords, or 12-string guitars.
- Studio FET: The studio FET is similar to the UREI 1176 Rev E “Blackface” compressor. FET-style compression is warm with a fast attack time. It’s often used on individual tracks and groups of tracks for both compression and color.
- Classic VCA: The classic VCA is similar to the dbx 160 compressor. It’s a clean compressor that’s used for low-distortion dynamic control and fast limiting.
- Vintage VCA: The vintage VCA is similar to the SSL compressor. This compressor has a fast response and a distinct sound, and is useful for protecting tracks from clipping. It’s often used on bass, kick, and snare. The vintage VCA is great for providing “glue” on groups of tracks or the entire mix.
- Vintage FET: The vintage FET is similar to the UREI 1176 Rev A “Bluestripe” compressor. This compressor can provide a lot of aggressive color to groups of instruments, such as drums, and individual instruments, such as bass and lead vocals.
- Vintage Opto: The vintage opto is similar to a Teletronix LA-2A. Electro-optical tube compression is smooth and rich, with a warm tone. It’s often used on piano, bass, and vocals as well on instrument groups and the entire mix.
- Threshold: Rotate the Threshold knob to adjust the level at which compression starts.
- Ratio: The Ratio knob sets the ratio of gain reduction when the threshold is reached.
- Make Up: Use the Make Up knob to raise or lower the gain after the signal has been compressed. You can choose to automatically raise the gain to –12 dB or 0 dB on the Auto Gain menu.
- Knee: The Knee knob adjusts how extreme the compression begins as the signal reaches the threshold. Low values compress harder, and higher values compress softer.
- Attack: The Attack time knob sets the reaction speed of the compressor.
- Release: The Release time knob sets the speed it takes for the compressor to release after the signal falls below the threshold. Click the Auto button to let the compressor choose the release time.
- Limiter Threshold and button: Click the Limiter button to turn on the limiter, which limits the signal from going beyond the level set by the limiter threshold.
- Limiter controls: You can choose the type of output distortion, which adds color to the compressor in varying degrees. You can adjust the output mix to blend the compressed signal with the original signal for parallel compression. Use the Output Gain knob to control the final signal level. You can also add a side-chain filter.
You can set Compressor to react to the dynamics in another track in the project. Choose the Logic Pro track that will trigger Compressor on the Side Chain menu at the top of the plug-in interface. Now Compressor will compress the audio only when the track chosen on the Side Chain menu reaches the threshold. This feature is useful when you want to make room for a track in the mix by automatically lowering any track that’s competing with it.
Using Logic Pro’s Limiter plug-in
The Limiter plug-in is used when you need to restrict the level from going any higher. Limiters differ from compressors in that they have a strict threshold, whereas compressors only reduce the level above the threshold. You might put a limiter on a single track to guarantee that it doesn’t clip or on a group of tracks to raise the volume as high as possible before it distorts. Limiters can have a big effect on the sound, so a little goes a long way.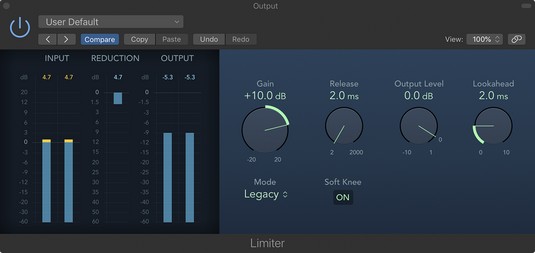 The Limiter plug-in.
Limiters are often added as the last insert effect in the chain. But sometimes you can add a limiter before a compressor that’s set to a slow attack time to catch any large peaks and avoid the pumping and breathing effect that can come from too much compression. A description of the Limiter parameters follows:
- Gain: Rotate the Gain knob to adjust the level of the input.
- Release: Rotate the Release knob to set the time it takes for the compressor to release after the signal falls below the threshold.
- Output Level: Rotate the Output Level knob to adjust the overall output level.
- Lookahead: Rotate the Lookahead knob to adjust how far in advance the limiter will analyze the signal. Higher levels cause latency, so it’s best not to use this setting on instrument or group tracks because it will change the timing. Higher lookahead times work better when Limiter is on the main output.
Using other dynamics Logic Pro X tools
Logic Pro comes with many dynamics tools that can make your time mixing easier. Dynamics tools can help you solve problems and be creative at the same time. As a beginner, it’s a good idea to use the presets that come with these plug-ins. The preset names are educational, and you’ll often find a preset that describes exactly what you want to do. Following are other dynamics tools you can use:- De-esser: Remove hiss from vocal sibilance. This frequency-dependent compressor can lower specific frequency ranges, such as those that cluster around sibilant sounds.
- Expander: Expand the dynamic range. For example, you can use an expander to reduce the amount of hi-hat leakage in a snare track by expanding the distance between the main snare sound and the background hi-hat.
- Noise gate: Lower the level of sounds below the threshold. The noise gate enables you to remove unwanted room noise, such as amp hump.
- Enveloper: Adjust the attack and release of a sound’s transients. An enveloper is a tone-shaping tool that works well with instruments having sharp transients, such as drums, picked and plucked sounds, and pianos.


