If you work on a network and need to use or just want to find out about the QuickBooks network features, read this article. If you’re the only one using QuickBooks, you can skip this article.
Sharing a QuickBooks file on a network
Two important features power the QuickBooks multiuser network capability: user permissions and record locking. The user permissions feature gives multiple users of a QuickBooks file unique permissions settings to access different areas of QuickBooks. Record locking, the second feature, enables more than one person to simultaneously log in to and work with a QuickBooks file.User permissions
QuickBooks enables you to set user permissions so that you can give different QuickBooks users different privileges. Jane Owner may be able to do anything she wants because, metaphorically speaking, she’s Da Man. Joe Clerk, though, may be able to enter only bills. Joe, a lowly clerk of perhaps dubious judgment and discretion, may not have the capability to view the company’s profit and loss statement, print checks, or record customer payments. This idea makes sense at a practical level, right? In a situation in which a bunch of people access the QuickBooks file, you want to make sure that confidential information remains confidential.You also want to make sure that people can’t intentionally or unintentionally corrupt your financial records. You don’t want someone to enter incorrect data (perhaps because he stumbles into some area of the QuickBooks program where he has no business). And you don’t want someone fraudulently recording transactions — such as fake checks — that she can go cash.
I think that if you reflect on this user-permissions stuff, you’ll realize that “Hey, yeah, that makes sense!” So I’m not going to talk a bunch more about it. Let me conclude by throwing out a couple of general observations about how you decide which user permissions are appropriate:
- Data confidentiality: This issue probably has the most to do with your management philosophy. The more open you are about stuff, the less you probably have to worry about people snooping for stuff. I want to point out, however, that payroll is always a touchy subject. If everybody knows what everyone else is paid, some interesting discussions occur — but you already knew that.
- Data corruption: Regarding data corruption, you need to know that people usually apply two general rules:
- Don’t give people access to tools they don’t know how to use. That’s only asking for trouble.
- Make sure that no one person can muck around unsupervised in some area of the accounting system — especially if that person records or handles cash.
If at all possible, employ a buddy system whereby people do stuff together so that people always double-check other people’s work — even if only indirectly. Maybe Joe records a bill, but Jane always cuts the check to pay the bill. Maybe Raul records customer invoices, but Chang sends them out. Maybe Saul records cash receipts, but Beth deposits them. You see the pattern, right? If two people deal with a particular economic event — again, especially one that involves cash — it’s a really good idea for Joe and Jane, Raul and Chang, and Saul and Beth to look over one another’s shoulders.
Record locking
The easiest way to understand record locking is to compare it with the other variety of locking: file locking. Most other programs use file locking. File locking means that if one person on the network has, say, a word processing document open, nobody else on the network can open and then edit that document. Others may be able to open a copy of the document that they can save on their computers, but they can’t edit the original document. The operating system locks the original document (the file) so that only one person can fool around with the file at a time. This locking ensures the integrity of the data and the changes that people make to the data. (If this business about ensuring integrity seems weird, think about the difficulty of making sure that both people’s changes end up in a word processing document that both people are editing simultaneously.)Record locking works differently. With record locking, more than one person on the network can open and edit the same file at once, but only one person can work with a specific record.
A record is a part of a file. In a file of bills that you owe to vendors, for example, the file is the entire collection of bills. The individual bills are records within the file, and more than one person can open the file of bills. Individual bills, though — the individual records that make up the file — are locked when a person grabs a record.
This information may sound like too much confusion, but differentiating between files and the records within a file is what makes sharing files possible. In QuickBooks, for example, if Jane is entering one bill for Alpha Company in a file, Joe can edit a bill for Beta Corporation because the two bills are different records. Because of record locking, however, Jane can’t fool around with the Beta Corporation bill that Joe is editing. And Joe — again, because of record locking — can’t fiddle with the Alpha Company bill that Jane is entering.Restated more generally, no two people can edit the same record in a file at the same time. Record locking enables employees to use a file in a multiuser environment because it lets more than one person work with a file.
Installing QuickBooks for network use
To install QuickBooks for network use, you must first install QuickBooks on all the computers on the network that need to access and work with the QuickBooks file. This task isn’t tricky. You don’t need to install QuickBooks in any fancy way to be able to share QuickBooks files.You need to purchase a copy of QuickBooks for each computer that’s going to run the program. If you have three computers on which you want to use QuickBooks, you need to buy three copies of QuickBooks. Or you could buy a special multiple-seat license version of QuickBooks. If you attempt to install a single copy of QuickBooks (with a single key code) on multiple computers, QuickBooks won’t allow two computers using the same key code to share a file in multiuser mode.
When you create the file that you want to share, you need to make sure that you store the file in a location where the other QuickBooks users can access it. That is, you may need to store the file on a server. You can also store the file on a client computer as long as you designate sharing permissions for either the folder or the drive on which you save the QuickBooks file.Another important thing: Whoever creates the QuickBooks file automatically becomes the file administrator. The file administrator has access to all areas of the file and sets up the other file users, so you don’t want just anybody setting up the QuickBooks file. Either the business owner or the head of accounting is well suited for this job. In any case, the person who sets up the file should be a trustworthy regular around the office who’s easy to reach for any questions or problems that arise. Also, this person probably should have a strong background in accounting. See the following section for more details.
Setting User Permissions
You can tell QuickBooks who else will use the file and set permissions for these other people during QuickBooks Setup or later.User permissions in Enterprise Solutions
To set permissions in Enterprise Solutions, follow these steps:1. Tell QuickBooks that you want to set user permissions.
Choose the Company→Users→Set Up Users and Roles command. QuickBooks displays the Users and Roles dialog box (not shown).
2. Indicate that you want to set up a new user.Click the New button so that QuickBooks displays the New User dialog box (not shown) which lists a variety of accounting roles that a QuickBooks user might fill. These roles give a user the capability to perform appropriate accounting tasks with the QuickBooks program. The Description box at the bottom of the dialog box summarizes the tasks that someone in a given role might be expected to perform.
3. Select the role that best matches the user you’re describing and then click Add.Owners, by the way, should have the Full Access role so that they can do anything they want. Note that you can give a user more than one role.
If you want to change an existing user’s permissions, select the user on the User List tab and then click the Edit button. QuickBooks displays the Edit User dialog box (not pictured), which resembles the New User dialog box and allows you to change a user’s role or roles.
4. Click OK to return to the Users and Roles dialog box.You can review the permissions (basically, the list of capabilities that QuickBooks allows) for a particular person or a predefined role. To see the permissions that a user has, select the User List tab of the Users and Roles dialog box, click the View Permissions button, select the user in the list box, and then click the Display button. QuickBooks displays a large dialog box that specifically identifies what the user can do. To see the permissions that a particular role has, select the Role List tab of the Users and Roles dialog box, click the View Permissions button, select the role, and then click the Display button.
User permissions in QuickBooks Pro and Premier
To set permissions in QuickBooks Pro or QuickBooks Premier, follow these steps:1. Choose the Company→Set Up Users and Passwords→Set Up Users command.
QuickBooks displays the User List dialog box (refer to the figure).
 User List dialog box
2. Click the Add User button.
QuickBooks displays the Set Up User Password and Access dialog box, which you use to add new users and specify passwords.
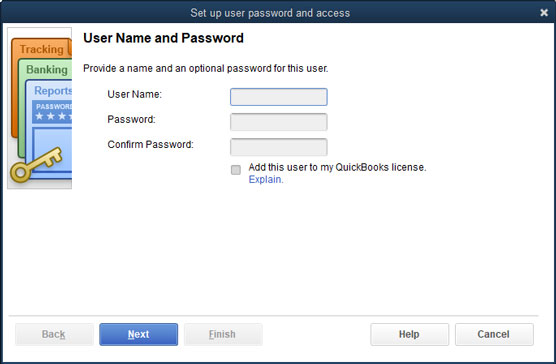 Set Up User Password and Access dialog box
3. Type a username and password of the additional person whom you want to be able to use the QuickBooks file; then type the password again in the Confirm Password text box.
Re-entering the password confirms that you typed the password correctly the first time.
From this point, when someone opens the QuickBooks file, QuickBooks asks for a username and password. So, for another person to access the QuickBooks file, she must enter the username and password that you set.
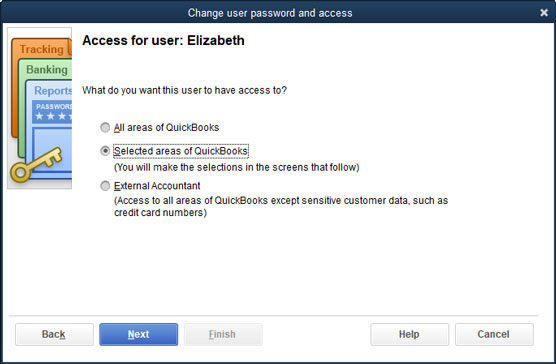
4. Specify the user’s access.QuickBooks displays a dialog box asking whether you want the person to have access to all areas of the QuickBooks file or only some areas.
If you specify that you want to give access to only some areas — the usual case, probably — QuickBooks displays a series of dialog boxes that enable you to set permissions for each area. You select the No Access option button to make a particular area (such as banking stuff) off limits for the user, select the All Areas of QuickBooks option button to give the user permission to create and print transactions and reports in the area, or select the Selected Areas of QuickBooks option button to give the user partial access to the area. If you choose the Selected Areas option, you need to specify the limited access by stepping through the wizard’s pages and describing in rigorous detail the access you want the user to have. You can also specify whether other applications (such as TurboTax) get access to the QuickBooks data.
 Specifying which areas a user can access
5. Review the user’s access.
After you finish stepping through the Set Up User Password and Access dialog boxes, QuickBooks shows a summary of the permissions for a user. Click the Back button if you need to go back and change permissions for an area, or click Finish to indicate that you’re done specifying what the particular user can do. QuickBooks displays the User List dialog box again, with the new user added. Click Add User to add another new user, click Edit User to edit the selected user, or click Close to close the dialog box.
A user can log on and open a QuickBooks file from any computer on the network as long as the computer has QuickBooks installed and has network access to the QuickBooks file. If a person attempts to open a restricted area or perform an unauthorized action, however, QuickBooks displays a message box indicating that the person lacks the permissions necessary to perform the action.
Specifying and working in multiuser mode
For more than one person to work with a QuickBooks file at once, users must work with the QuickBooks file in multiuser mode. The first person who opens the file needs to specify multiuser mode for others to be able to open the file. To specify multiuser mode, choose File-->Switch to Multiuser Mode. You can tell that you’re working in multiuser mode because the QuickBooks title bar indicates so. When other people open the QuickBooks file, it automatically opens in multiuser mode. For another user to work in single-user mode, the other users must close the QuickBooks file, and the user who wants to work in single-user mode needs to choose File-->Switch to Single-User Mode.Sharing a QuickBooks file over a network involves a couple of tricks. First, you need to make sure that no one who is in single-user mode is using the file that you want to open. If someone is using the file, and you try to open it, QuickBooks displays a message indicating that someone is using the company file in single-user mode. Tell the person to switch to multiuser mode and then click the Try Again button.
As soon as you begin creating or editing a transaction, QuickBooks locks the transaction. This way, no one else can edit the transaction while you work on it. You can tell whether you have a transaction open in edit mode by what QuickBooks displays in the title bar at the top of the form: Editing Transaction. Other users can open the transaction while you edit it in edit mode, but they can’t make changes in it until you’re finished.
If you attempt to edit a transaction that your co-worker Harriet already has open in edit mode, for example, QuickBooks displays a message that reads (and here, I paraphrase) Excuse me, Bubba. Harriet is working with that transaction. You need to come back later.