1. Turn on the PC.
Find and flip on the computer’s power switch. Depending on which version of Windows you’re using (Windows 7, 8, or 10), your screen may look a little different from the figures here. I’m using Windows 10, by the way. (Not that you care or that it matters.)
If you’re installing QuickBooks on a computer running a professional or business edition of Windows, you may need to log on as either the administrator or a user with administrator rights. In the business flavors of the Windows operating systems, Windows security features require an administrator to install the QuickBooks program.
2. Download the QuickBooks software and then click Next.You probably purchased QuickBooks directly from the Intuit website. If so, after you download the software, Windows prompts you to run the InstallShield Wizard (another program), which starts the QuickBooks installation program. Eventually, Windows displays a little message box that tells you Welcome to QuickBooks Desktop.
Alternatively, you may have purchased the QuickBooks program someplace like an office-supplies store. In that case, you need to rip open the QuickBooks package and get out the CD (which looks exactly like the ones that play music). Next, you insert the CD into your CD-ROM drive. Windows recognizes that you inserted the QuickBooks CD, eventually starts the QuickBooks installation program, and displays a little message box that tells you Welcome to QuickBooks Desktop.
Click Next in the message box to really get things started. (You may need to click Next again.)
3. Indicate that you accept the QuickBooks licensing agreement and then click Next.After the QuickBooks installation program starts, QuickBooks asks whether you agree to play by its rules, as outlined in tedious detail in the licensing agreement displayed onscreen. Assuming that you do — and you have to agree to install the software — select the check box labeled I Accept the Terms of the License Agreement (But Only Because I Have No Other Choice) and then click Next.
4. Provide the License and Product Numbers and then click Next.When the License and Product Numbers window appears, enter these two bits of licensing information (they should be printed on a yellow sticker on the back of the CD sleeve or displayed on the purchase receipt window if you downloaded the software) and then click Next.
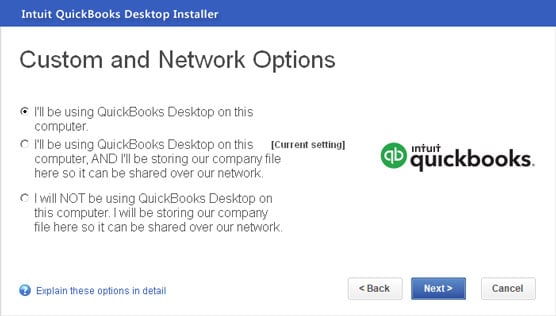
5. Describe any network sharing you plan.When the Custom and Network Options window appears, specify whether you’ll share the QuickBooks data file over a network. Most small businesses don’t. If your business is in this situation, when asked, simply indicate that you’ll use QuickBooks only on the computer on which you’re installing the software.
You may have a couple of other options, however, depending on the version of QuickBooks you install. You can install QuickBooks on the computer and make the QuickBooks data available to other computers on the network, or you can skip installing the QuickBooks software but store the QuickBooks data file on the computer.
 The Custom and Network Options window
6. Select the installation location and then click Next.
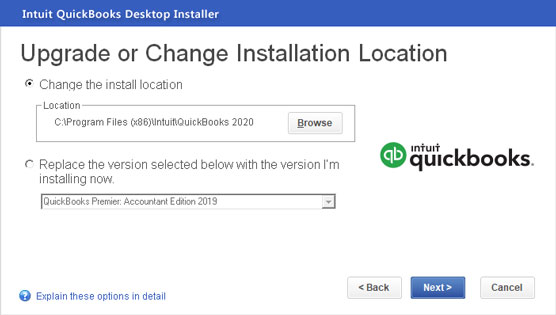
When the Upgrade or Change Installation Location window appears, click the Next button to use the Intuit default installation location. (The default installation location is fine for 999 of 1,000 users.)
You don’t have to choose the suggested installation location. You can instead choose to have the QuickBooks program and data files stored in some other location. I don’t talk about this option here because most people won’t want to (and shouldn’t) make this customization. What’s more, if you’re someone who can safely customize the QuickBooks installation location settings, you don’t need my help figuring out how this change works.
 The Upgrade or Change Installation Location window
7. Begin the installation by clicking Install.
The installation program tells you, at long last, that it’s ready to begin as soon as you click Install. Click Install. The program begins installing QuickBooks Desktop.
While the installation program runs, a little bar shows your progress.
If you need to cancel the installation at any time, just click Cancel. QuickBooks warns you that the setup is incomplete. That’s okay; just start the setup from scratch next time around.
8. Take a few minutes or so to contemplate the meaning of life or get a drink of water.9. When the Install program finishes, click Open QuickBooks.
Congratulations. You’re finished with the installation. You have a new item on the Programs menu and probably new shortcuts on your desktop.
10. Activate QuickBooks.The first time you open QuickBooks, the program prompts you to activate QuickBooks. Essentially, activation means telling QuickBooks who you are. If QuickBooks can guess your identity by using the old product-registration information that it finds on your computer, it simply asks you to confirm that its guess is correct. Otherwise, you need to jump through some hoops and provide additional identifying information.
You’ll probably want to register QuickBooks before you begin using it.If you work on a network and want to share a QuickBooks file stored on one computer with another computer on the network, you need to install QuickBooks on all the other computers that you want to use to work with the file. Note: You need a separate copy of QuickBooks (such as from the five-pack version) for each computer on which you want to install QuickBooks.
By the way, running QuickBooks on a network with multiple QuickBooks users isn’t super-tricky or terribly complicated. QuickBooks takes care of the hard stuff. If you have more than one person using QuickBooks, you owe it to yourself (and your business) to set up a network and then purchase and install multiple copies of QuickBooks.
