In the first QuickBooks Setup dialog box, click the Express Start button.
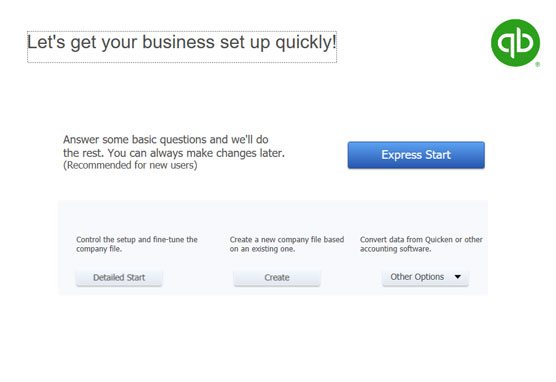
QuickBooks displays the Glad You’re Here! dialog box.
Specify the business name.

The name you specify goes on QuickBooks reports and appears on invoices you send customers. Accordingly, you want to use your “real” business name. If your business is incorporated or formed as a limited liability company (LLC), you want to use the right suffix or acronym in your name. Don’t use Acme Supplies, for example, but Acme Supplies, Inc., or Acme Supplies LLC.
Note: QuickBooks also uses the company name for the QuickBooks data file.
Identify your industry. If you’re in the construction business, for example, type construction. When you type something in the Industry field, QuickBooks turns the box into a drop-down menu showing the industries that it recognizes. You can choose an industry from this menu (or choose the industry that’s closest to your business).
Be thoughtful and cautious about the industry you specify. QuickBooks sets up a starting chart of accounts for you based on the industry. A chart of accounts lists the asset, liability, income, and expense accounts (or categories) that QuickBooks will use to categorize your business’s finances.
Identify the tax return you file. Use the Business Type field to specify the tax return that your business files. You can click that field and then make a choice from the menu that QuickBooks provides.
The QuickBooks menu of tax return options includes only two options for LLCs: single-member LLCs that file their taxes with the LLC owner’s 1040 tax return, and multiple-member LLCs that file their taxes as a partnership by using a 1065 tax return. An LLC, however, can also file its taxes as an S corporation or regular C corporation (part of the reason why accountants love LLCs). If you’re running an LLC that files its taxes as an S corporation, do select the S corporation tax return option. And if you’re running an LLC that files as a regular C corporation, select that tax return option.
Provide your Employer Identification Number. Use the Employer Identification Number (EIN) field to provide your business taxpayer identification number. If you’re a sole proprietorship without employees, your tax identification number may be your Social Security number. In all other cases, your taxpayer identification number is your EIN.
Provide your business address information.
Use the Business Address fields to provide your firm’s address and contact information.
If you ever decide that you want to change some piece of information that you entered on a previous page of the QuickBooks Setup dialog box, you can click the Back button to back up.
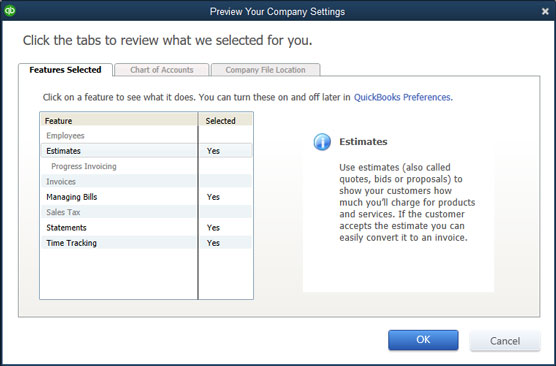
If you’re an observant person, you may have noticed the Preview Your Settings button that appears on the Glad You’re Here! dialog box. You can safely ignore this button, but if you’re a truly curious cat, go ahead and click it. QuickBooks displays the dialog box shown, which identifies the standard QuickBooks features that the QuickBooks Setup process is turning on, as well as the asset, liability, income, and expense accounts that will initially appear in your chart of accounts. Oh, one other thing: The Preview Your Company Settings dialog box also provides a Company File Location tab that identifies where your QuickBooks data file will be located.
Create the QuickBooks data file.
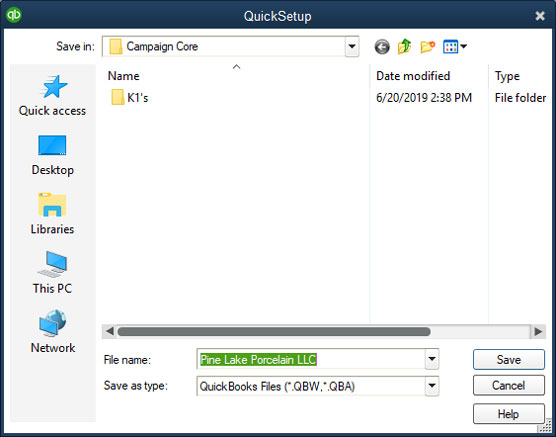
After you provide the business contact information requested by QuickBooks, click the Create Company button. QuickBooks may display the QuickSetup dialog box, which lets you name and specify the location of the company file. You can use the QuickSetup dialog box to make these changes or simply let QuickBooks be QuickBooks and make these decisions for you. After you click Save, QuickBooks creates the data file it will use to store your financial information. (In some versions of QuickBooks, creating the file takes a few minutes.)
When QuickBooks finishes creating your file, it displays the Get All the Details into QuickBooks Desktop dialog box.
Identify your customers, vendors, and employees.
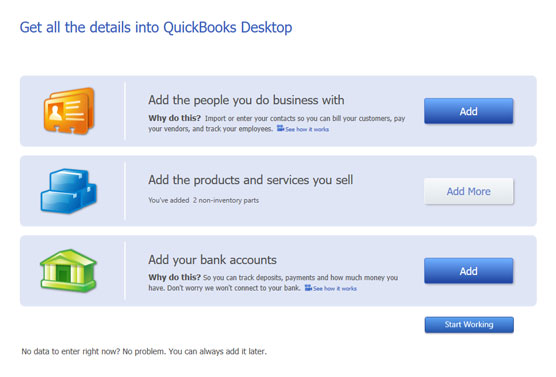
With the Get All the Details into QuickBooks Desktop dialog box displayed, click the blue Add button in the Add the People You Do Business With section. QuickBooks displays another dialog box that asks, “Perchance, are contact names and addresses stored electronically someplace else, like Microsoft Outlook or Google Gmail?”
- If you do have contact name and address information stored someplace else that QuickBooks will retrieve: Click the appropriate button and then follow the onscreen instructions.
- Otherwise: Click the Paste from Excel or Enter Manually button and then click Continue.
Describe your customers, vendors, and employees.
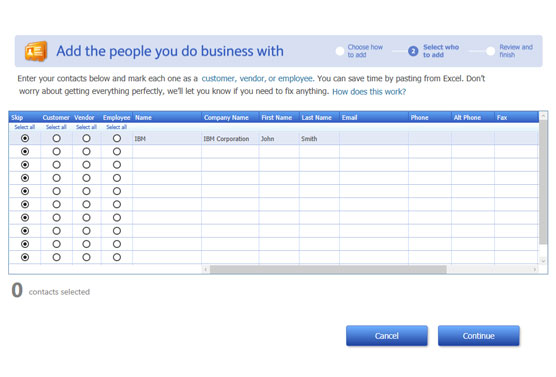
When QuickBooks displays the Add the People You Do Business With dialog box, use the rows of the displayed worksheet to describe your customers, vendors, and employees. To enter a contact in the next empty row.
- Select the Customer, Vendor, or Employee option button (as appropriate).
- Describe the contact by using the fields provided: Name, Company Name, First Name, Last Name, Email, Phone, and so forth. Each contact goes in its own row.
- Click the Continue button twice when you finish identifying your contacts to return to the Get All the Details into QuickBooks Desktop dialog box.
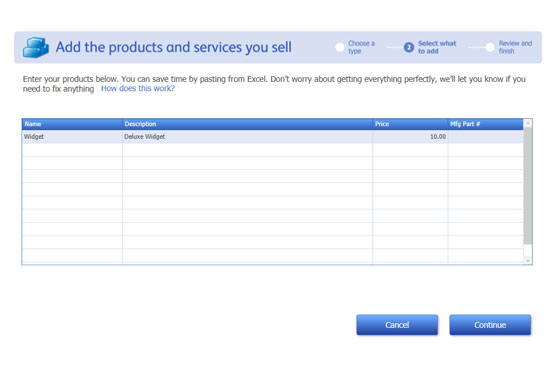
Identify the items (the stuff) you sell.
In the Name column, which is used for customers and vendors, provide an abbreviated name or a nickname for a contact. You’ll use what you specify in the Name column within QuickBooks to refer to the contact, so you want to use something short and sweet. If you’re working with customer John Smith at IBM Corporation, you might enter IBM in the Name column, IBM Corporation in the Company Name column, John in the First Name column, and so on.
If you add any customers or vendors, after you click the Continue button to leave the Add the People You Do Business With dialog box, QuickBooks asks about open balances that customers owe you or that you owe vendors. You don’t need to worry about these open balances at this point of the setup process.
Describe your bank account(s).
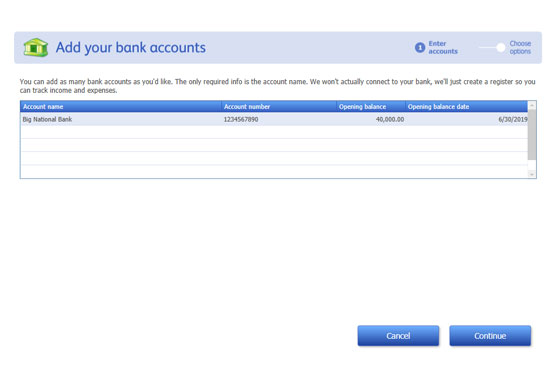
With the Get All the Details into QuickBooks Desktop dialog box displayed, click the Add button in the Add Your Bank Accounts section. When QuickBooks displays the Add Your Bank Accounts dialog box, use the worksheet to describe each bank account you use for your business: its name, account number, balance at the conversion date, and the actual conversion date. Click the Continue button when you finish identifying your bank accounts to return to the Get All the Details into QuickBooks Desktop dialog box.
With the Get All the Details into QuickBooks Desktop dialog box displayed, click the Start Working button. QuickBooks displays the QuickBooks program window. You’re done.
If you didn’t register during the installation process, at some point after QuickBooks starts, you see a message box that asks whether you want to activate QuickBooks. If you don’t activate, or register, you can use the product for a few times or so, and then — whammo! — the program locks up, and you can no longer access your files. Either you register it, or you can’t use it. I don’t like being forced to do something, but getting worked up about having to register QuickBooks is a waste of time.
The simplest option is to register when you see that message. Here’s how: When QuickBooks displays the message box that asks whether you want to register, click the Online button to register online, or click the Phone button to register over the phone. If you go with the Phone option, QuickBooks displays another dialog box that gives you a telephone number to call and provides a space for you to enter your registration number.