


Outlook is like a chameleon. Its buttons and features can vary quite a bit depending on what kind of accounts you have. If you’re using a Microsoft Exchange email account for your workplace, for example, you’ll have access to a host of features that other people never get to see, like scheduling conference rooms and other meeting spaces when you schedule a meeting and creating automatic out-of-office replies for email. And if you have a POP email account, you have options such as status flags and color categories that you can assign to messages and calendar events. People with IMAP email accounts don’t get those. So if your screen looks different from what’s shown in this article, that’s one reason why. Another reason is you might be using Office 365, which Microsoft periodically updates, so you may have more features or a slightly different look to some screens.
Simpler Account Setup . . .
Over the years, Microsoft has made Outlook’s account setup process progressively easier, detecting more and more of the needed settings with each version. At this point, in Outlook 2019, it’s practically foolproof. Gone is the need to know technical details like mail server names and port numbers (unless you’re setting up some special type of account, or you’re connecting to an Exchange server). In most cases, you just tell Outlook your email address and password and it does the rest.Here’s how to set a new Outlook account up automatically.
- Choose File → Info → Account Settings → Account Settings to open the Account Settings dialog box.
- Click New.
- Enter the desired email address.
- Click Connect.
- When prompted, enter your password and click OK.
- At the confirmation screen, click Done.
 Choose to configure the account manually.
Then in the Advanced Setup box, choose the mail server type. Then when prompted to enter your password, do it and click Connect.
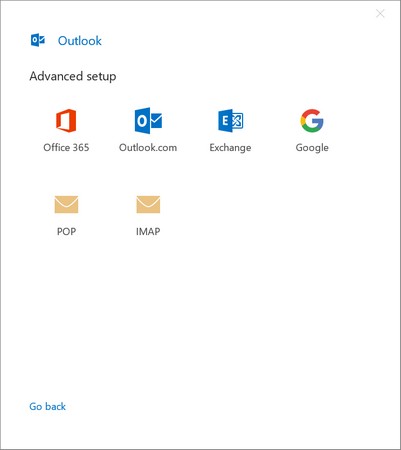 Select the mail server type.
But wait, the techie among you are saying, how is selecting the server type “advanced setup?” You’re right, it isn’t. If you really need to get in there and change the settings, like the security, the port number, the mail server address, that sort of thing, see the next section.
Depending on the server type, sometimes Outlook does prompt you for the server information when you choose Advanced Setup (for example, if you’re connecting to an Exchange server). But for regular old IMAP and POP accounts, it keeps it simple.
. . . But Trickier Advanced Account Setup
In its quest to make mail setup simple, Microsoft has made it more cumbersome for those of us who want to access the mail server settings. The average person will never find them. And maybe that’s the objective — to keep unskilled users out of areas they shouldn’t be in — but it’s frustrating to us who actually do have reasons to go there.You might think that the Change command would give you access to the server settings, but it doesn’t. See for yourself:
- Choose File → Info → Account Settings → Account Settings to open the Account Settings dialog box if it’s not already open.
- Select the account to modify and then click Change.
 Choose Change after selecting an account.
 - In the Account Settings dialog box, make any settings changes as desired.But as you can see below, the available settings have nothing to do with the mail server configuration.
- Select Next and then select Done.
 These are the changes you can make post-configuration to the account.
Here’s where it gets tricky. To get at the actual mail server settings, you have to use the Repair command, like this:
- From the Account Settings dialog box, select the account and then click Repair.
- Select Advanced Options.
- Mark the Let me repair my account manually check box. Then click Repair.
- Finally here are the settings you need. Change the incoming mail server information here.
 These are the changes you can make post-configuration to the account.
 - Click Outgoing mail to see the outgoing mail server settings. Make any changes to them as needed.
 These are the changes you can make post-configuration to the account.
 - Select Repair to apply the settings changes.
- At the confirmation message, click Done.
Cutting through the Clutter with Focused Inbox
The Focused Inbox feature divides your Inbox folder into two tabs across the top of the message list pane: Focused and Other. Then it tries to intelligently decide which are the most important messages, which appear when you selected Focused. When you select Other, you see the messages that Outlook determined were less important. This can help reduce the clutter in your inbox from commercial messages and silly memes/jokes. This is a Outlook 2019 feature that was widely touted as an improvement for Office 2019 when it was initially announced, but more people hate it than like it.To turn Focused Inbox on/off, choose View → Focused Inbox.
If you don’t see the Focused Inbox command on the View tab, Focused Inbox may not be available for you. It depends on your Outlook version, the mail server type, and other factors. Microsoft documentation states that Focused Inbox requires a Microsoft Exchange or Office 365 email account. However, even if you are on an Exchange server, you may not see it if your administrator has disabled the feature.
There was previously a feature in Outlook called Clutter, which operated by moving the “Other” items to a separate folder. Focused Inbox is less intrusive, changing only your view of the inbox content, and not the actual content.
@Mentions
Sometimes when people get in a hurry to send a message, they forget to include someone on it who is referenced in the message. To help combat such oversights, Outlook 2019 features the @Mentions option. It enables you to easily tag someone mentioned in an email so that they automatically receive a copy of the message. To use it when you are composing a message, simply precede the person’s name with an @ sign. A drop-down list appears containing the names of people in your Contacts list. Choose the name you want from the list to automatically add them to the recipient list.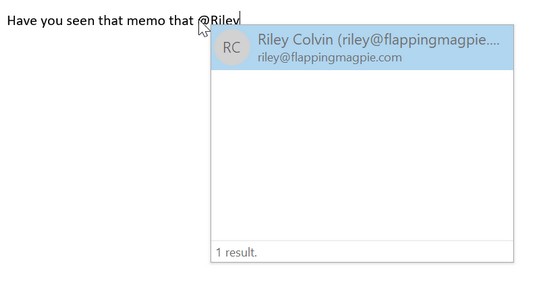 Automatically cc someone you are talking about by using an @ mention.
When the recipients view the message, they’ll see the mentioned name highlighted. The name is an active hyperlink that opens an information pane about that person (from the recipient’s Contacts list) when clicked. (Not all recipients see that — only those who are using a version of Outlook that supports the feature.)
Hearing Your Messages with Read Aloud
Ever wish you could lean back in your chair, feet up on the desk, and have an assistant read your incoming messages to you? That can be a reality (well, sort of) when you use the Read Aloud feature in Outlook 2019.If the Read Aloud button appears on the Home tab, the Outlook 2019 feature is enabled. If it’s not there, select File → Options → Ease of Access. Mark the Show Read Aloud check box under the Application Display Options heading and click OK.
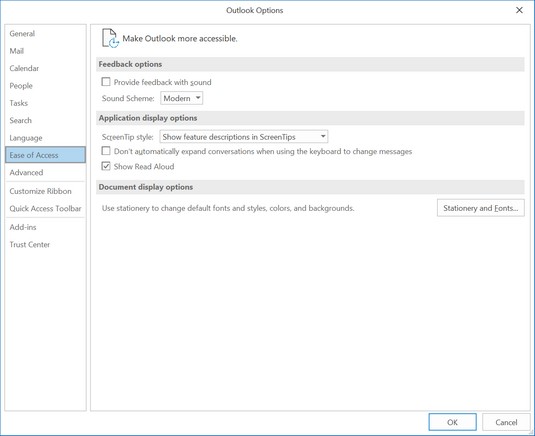 Enable the Read Aloud Outlook 2019 feature in Outlook Options.
To use the Read Aloud feature, select a message and then click Home → Read Aloud. Make sure your system volume is not muted.
Automatic Marking as Read for Deleted Messages
You probably don’t read every message before you delete it. If it’s obviously an advertisement or some other foolishness you don’t have time for, you might just select it and press the Delete key. The trouble with that has historically been that it doesn’t give Outlook time to register the email as having been read, and you end up with a bunch of unread messages in your Deleted Items folder.New in Outlook 2019, you can choose to have all messages marked as read immediately when they are deleted. To set this feature up, choose File → Options → Mail. Scroll all the way down to the bottom, to the Other section, and mark the Mark Messages As Read When Deleted check box.
More Flexibility for Outlook Reminders
Outlook has traditionally been a “polite” program, in that it doesn’t overlay its Reminders window on top of any other applications you might be running in the foreground. You can, however, change that behavior in Outlook 2019 to make sure that you never miss a reminder. Choose File → Options → Advanced. Then in the Reminders section, mark the Show Reminders On Top of Other Windows check box.Scheduling in Multiple Time Zones
When you are trying to schedule a meeting with people in multiple time zones, it can get confusing to try to figure the shifts in your head. To add a second or third time zone to your calendaring module, choose File → Options → Calendar. Under Time Zones, choose Show a second time zone (and Show a third time zone too, if needed). Enter a label in the Label box for each time zone. This ability to label the zones can come in handy if you want to name them as certain branch offices or clients rather than the actual name of the time zone.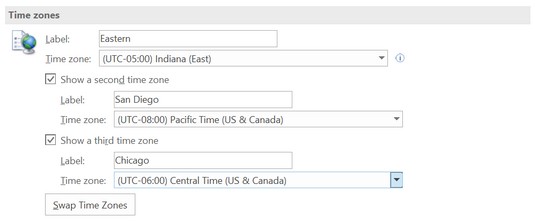 You can now configure up to three time zones.


