


Follow these steps to create a quick and dirty email message:
- Start Outlook. The Mail module appears, showing your Inbox.
- Click the New Email button.
- Enter an email address in the To box.
- Enter a subject in the Subject box.
- Enter a message in the Message box.
- Click the Send button. Nailed that one, didn’t you? Was that easy or what?
The slow but complete way to create a message in Outlook 2019
You may prefer a more detailed approach to creating an email message. If you have a yen for fancy email — especially if you want to take advantage of every bell and whistle Outlook can add to your message — follow these steps:1. In the Mail module, click the New Email button on the Ribbon (or press Ctrl+N).
The New Message form opens, as shown.
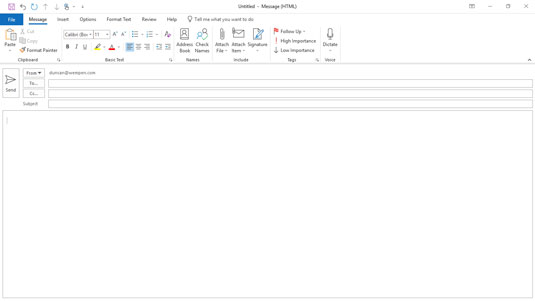 The New Message form.
2. Click the To text box and type the email addresses of the person to whom you’re sending your message.
If you’re sending messages to multiple people, separate their addresses using either commas or semicolons.
You can also click the To button itself, find the names of the people to whom you’re sending the message in your Address Book, double-click their names to add them to the To text box, and then click the OK button.
3. Click the Cc text box and type the email addresses of the person to whom you want to send a copy of your message.You can also click the Cc button to add people from the Address Book.
4. Click the Check Names button on the New Message form’s Ribbon (or press Ctrl+K).If you haven’t memorized the exact email address of everyone you know (gasp!), the Check Names feature lets you enter a part of an address and then it looks up the exact address in your Address Book so you don’t have to be bothered. Double-check what Check Names enters; sometimes, it automatically enters a similar address from your address book instead of the one you intended, which can yield embarrassing results if you don’t realize it and send the message to someone for whom it would be inappropriate, like a romantic note designed for your mate going to your boss.
5. Type the subject of the message in the Subject text box.You should keep your subject line brief. A snappy, relevant subject line makes someone want to read your message; a long or weird subject line doesn’t.
If you forget to add a subject and try to send a message, Outlook opens a window that asks whether you really meant to send the message without a subject. Click the Don’t Send button to go back to the message and add a subject. If you want to send your message without a subject, just click the Send Anyway button (but not before you’ve written your message).
6. Type the text of your message in the Message box.If you use Microsoft Word as your word processor, you’re probably familiar with the formatting, graphics, tables, and all the tricks available in Word to make your email more attractive. Those same tricks are available in Outlook by using the tools at the top of the message form on the Format Text tab.
There may be times when you don’t need to put anything in the Message text box, such as when you’re forwarding a message or sending an attachment. If that’s the case, simply skip this and move on to the next step.
Be careful how you format email to send to people on the Internet. Not all email systems can handle graphics or formatted text, such as boldface or italics, so the masterpiece of correspondence art that you send to your client may arrive as gibberish. Also, many people read email on their cell phones, which can do odd things to the text you send. If you don’t know for sure how your recipient receives your email, go light on the graphics. When you’re sending email to your colleagues in the same office or if you’re sure that the person you’re sending to also has Outlook, the formatting and graphics should look fine.
7. Select the Review tab and click the Spelling & Grammar button at the top of the message screen (or press F7).Outlook runs a spell-check to make sure that your message makes you look as smart as you actually are.
8. Click the Send button (or press Ctrl+Enter or Alt+S).Outlook moves your mail to the Outbox. If your computer is online, Outlook immediately sends any messages from the Outbox. If Outlook is configured to not immediately send messages (as might be the case in some offices), you can press F9 (or select the Send/Receive tab on the Ribbon and click the Send/Receive All Folders button) to send any email messages that are queued up in the Outbox. If you composed messages while your computer was offline, you can press F9 to send your messages when it’s again connected to the Internet. When a message is sent, it automatically goes to the Sent Items folder.
Yet another way to tell Outlook to send messages from the Outbox is to click the small button that looks like two overlapping envelopes located on the Quick Access Toolbar at the upper-left corner of the Outlook window, which is visible from any module within Outlook. If you hover the mouse pointer over this button, a ScreenTip appears, telling you that this is the Send/Receive All Folders button. Whenever you send messages by clicking the Send button in a message, by clicking the Send/Receive All Folders button, or by pressing F9, you’re also telling Outlook to retrieve all incoming messages, so don’t be surprised if you receive some messages whenever you tell Outlook to send messages.
How to set email message priorities in Outlook 2019
Some messages are more important than others. The momentous report you’re sending to your boss demands the kind of attention that wouldn’t be appropriate for the wisecrack you send to your friend in the sales department. Setting the importance level to High tells the recipient that your message requires some serious attention.You can choose from three importance levels:
- Low
- Normal
- High
1. While typing a message in the Mail module, select the Message tab on the Ribbon and click the Properties button in the lower-right corner of the Tags group.
The Properties dialog box opens, as shown. This dialog box enables you to define a number of optional qualities about your message.
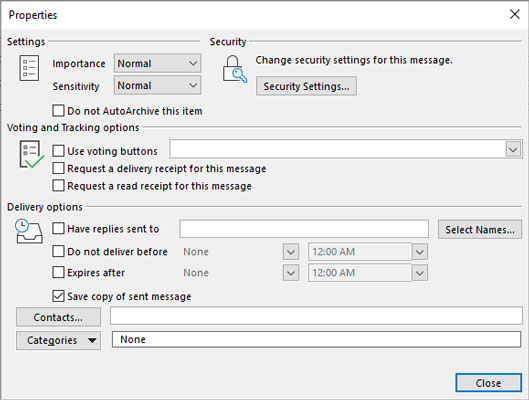 Use the Properties dialog box to set the priority for your message.
2. Click the triangle beside the Importance box.
A menu of choices drops down.
3. Choose Low, Normal, or High.Usually, Importance is set to Normal, so you don’t have to do anything.
4. Click the Close button (or press Esc) to close the Properties dialog box.An even quicker way to set a message’s priority is to use the buttons on the Ribbon’s Message tab, in the Tags group. The High Importance button (with the red exclamation point) marks your message as High importance. The Low Importance button (with the blue arrow pointing downward) marks your message as a Low importance message.
You might wonder why anyone would mark a message Low importance. After all, if it’s so unimportant, why send the message in the first place? Apparently, some bosses like their employees to send in routine reports with a Low importance marking so the bosses know to read that stuff after all those exciting new email messages they get to read every day. You can also assign importance to messages received in your Inbox to tell yourself which messages can be dealt with later — if at all.How to set email message sensitivity in Outlook
You may want your message to be seen by only one person, or you may want to prevent your message from being changed by anyone after you send it. Sensitivity settings enable you to restrict what someone else can do to your message after you send it, and they let you set who that someone else can be.To set the sensitivity of a message, open the Properties dialog box for a message. Click the list box arrow next to the word Sensitivity and one of the levels shown, as described shortly.
Most messages you send will have Normal sensitivity, so that’s what Outlook uses if you don’t say otherwise. The Personal, Private, and Confidential settings only notify the people getting the message that they may want to handle the message differently from a Normal message. (Some organizations even have special rules for dealing with Confidential messages.) For what it’s worth, I’ve been using Outlook for over 20 years and I’ve never once changed a message’s Sensitivity setting in the course of normal business.
Sensitivity means nothing, as a practical matter. Setting the sensitivity of a message to Private or Confidential doesn’t make it any more private or confidential than any other message; it just notifies the recipient that the message contains particularly sensitive information. Many corporations are very careful about what kind of information can be sent by email outside the company. If you use Outlook at work, check with your system administrators before presuming that the information you send by email is secure.
The Permission command appears on the Options tab on the Ribbon when composing a message. Unlike Sensitivity, Permission actually has the potential to prevent certain things from happening to your message, such as having someone forward your message to everyone you know. (How embarrassing.) However, you and your recipient must be set up on a compatible email system with something called an Information Rights Management Service to make that work. You also can’t be sure that it will work with some all email services; some of the web-based ones like Hotmail or Yahoo! Mail may not support it. Find out more about Information Rights Management.


