


All about Teams conversations
If you know your way round Facebook or LinkedIn, you know what conversations are. You can post to a conversation, respond to others’ posts, and like a post.Conversations are more than a way for coworkers to discuss a topic. A conversation can also be an important record of a topic, its history, and its background. Newcomers to a channel can browse a conversation and thereby get up to speed on a project. Coworkers can examine a conversation to see how a project is progressing, find out what questions were asked in the past, and look into the history of a project to see how it evolved.
These pages explain how to bookmark a conversation, like a conversation, and create and reply to conversations.
Liking and bookmarking conversations
Follow these steps to like and bookmark a conversation in Teams:- Browse to the Conversations page of a channel. Within a channel, the Conversations page appears first.
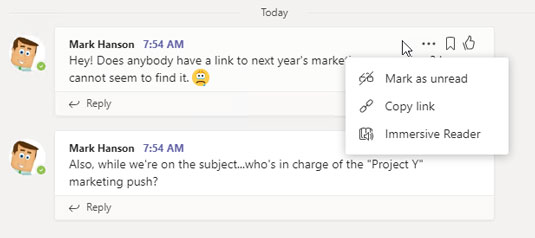
- Hover your mouse over a post. As shown in the following figure, you see three buttons:
-
- More Options: Opens a drop-down list with options for marking a post as unread, copying a link to the post to the Clipboard, or opening the post in Immersive Reader. Immersive Reader is a separate view in Microsoft Teams that makes reading long conversations easier.
- Save This Message: Saves the post so that you can review it later. To view saved posts, open the user menu and choose Saved.
- Like This Message: Likes the post. Other team members can see posts you liked.
 You can perform many actions on channel posts, including liking and saving them for future reference.
Starting a conversation
Follow these steps to start a conversation:- Browse to the Conversations page of a channel.
- In the text box, enter a message.
Below the text box are tools for entering emoji, hyperlinks, and other goodies, as shown. To notify a colleague about the conversation you plan to start, type the at (@) symbol followed by the colleague’s name in the text box.
Besides notifying colleagues, you can link the conversation to other channels. Type the at (@) symbol followed by a channel name.
- Press Enter or click the Send button. Your conversation is visible to all team members.
 Enter a message in the text box to start a conversation.
Posting to a conversation
Follow these steps to post a reply to a conversation:- Browse to the Conversations page of a channel.
- In the message to which you want to reply, click the Reply button.
- Type your message and press Enter or click the Send button.
Chatting privately with a Teams colleague
Sometimes questions, comments, and concerns are not appropriate for all members of a team. Sometimes what goes on in a conversation is better left to two people or a handful of select coworkers. Use the Chat feature to conduct conversations in private.Never enter a comment in Teams that you wouldn’t want your boss or IT manager to see. Even a chat message that is supposed to be meant for a select few isn’t really private. For security and regulatory compliance reasons, Teams administrators can audit and view all content within a Teams workspace.
Follow these steps to initiate and participate in a private chat with one or two people of your choosing:- Click New Chat button on the Navigation bar along the top of the screen. To find the New Chat button, look for the pen-and-paper icon to the left of the Search box. As you start and participate in chats, a list of recent users appears in the Chat page. You can select a name if you want to pick up on a previous conversation.
- Type your message and press Enter
You see a Chat window similar to the one shown.
A notification pops up in the lower-right corner of the screen when someone wants to chat with you. Click this notification to open the Chat window and start chatting.
- In the Type a New Message box, enter a message and press Enter or click the Send button.
Click the Add People button to include more people in a chat. This button is located in the upper-right corner of the screen.
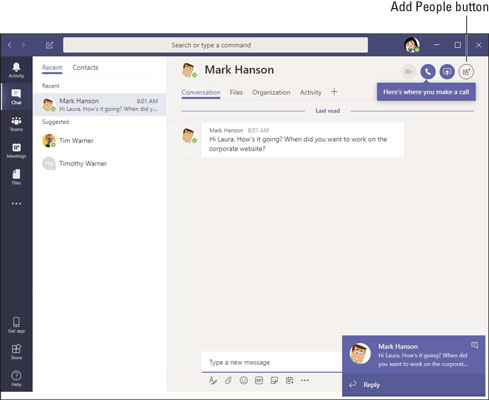 Conducting a chat.
Sharing and editing files with coworkers
Conversations and chats are well and good, but they usually involve dealing with files: sharing them and working on them collaboratively. Herewith are instructions for uploading files to a channel and working together on a file with coworkers. One of the cool things about Teams is that you can edit Office 365 documents inside the Teams interface.Uploading a file to a channel
Follow these steps to upload a file from your computer to a channel:- Visit the Files tab of a Teams channel.
The names of files that were uploaded to the channel appear in a list, as shown.
You can click column headers on the file list to sort the list by file type, name, or modification date. office-channel-files
A channel’s file list. - Select a file repository. A file repository is simply a collection of files that are accessible to you. The Files menu offers a Recent list, a Microsoft Teams entry, and possibly more file location destinations, as configured by the network administrator.
- Click Microsoft Teams.
- Click Upload. The Open dialog box appears.
- Select the file you want to upload and click Open. You can upload more than one file at a time by selecting more than one file.
Move the mouse over a filename to see options for handling the file. You can open, move, copy, and download files, among other tasks.
Collaborating on a file
Follow these steps to open an Office 365 file and work on it collaboratively:- In a document library, click the More button next to the name of the file you want to open. The button doesn't say "More"; instead, it appears with an ellipsis (three dots.) A pop-up menu appears.
- Select Edit in Teams.
- Edit or co-edit the file. Coworkers can edit a file at the same time. A name badge and icon shows where others are working on a file.
- Click the Close button when you finish editing. As well as clicking the Close button, you can click a tab on the Teams sidebar.
If you look for a Save button in an Office Web application, you will look in vain. Edits are saved automatically as you make them in Web apps.
How to hold meetings with coworkers
Teams offers two ways to hold a meeting. You can conduct an audio or video meeting with a colleague, or do it the old-fashioned way by scheduling a person-to-person meeting on a specific day at a specific time. Keep reading.Conducting a video or audio meeting
Follow these steps to conduct a video or audio meeting:- Locate the person you want to meet. Perform a global search or find the person’s user icon in your Chat or conversation history.
- Click the person's name to open that person’s user card. The following figure shows a user card. The card lists a person’s name and shows his or her image.
- In the user card, click the Video Call or Audio Call button. The person to whom you made the call gets a notification. At that point, the person can decline or accept the call.
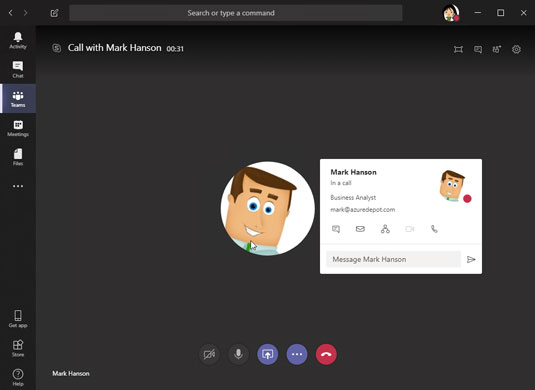 Initiate a call by clicking a button in the user card.
Use the buttons at the bottom of the Call window to conduct or terminate the conversation:
- Webcam: Turns the webcam on or off.
- Microphone: Mutes or unmutes microphone.
- Sharing: Shares your screen with participants.
- More Options: Opens a menu for putting the call on hold, transferring, and invoking the keypad.
- Hang Up: Hangs up the call.
Scheduling a meeting and inviting attendees
Follow these steps to schedule an in-person meeting with a coworker:- Click the Meetings tab on the Navigation bar.
- Click Schedule a Meeting. The New Meeting window appears, as shown.
- In the New Meeting window, describe the meeting and invite others to attend. Give the meeting a name, provide a location, declare when it is to occur, and invite coworkers.
- Click the Schedule button. The meeting is entered on your Calendar.
 Organizing a meeting.
Coworkers receive a meeting request in the form of a message. The message includes an Accept, Tentative, and Decline button for invitees to click to RSVP. A meeting that is accepted is entered immediately on the Calendar.


