


Microsoft processes billions of authentications monthly and the cloud intelligence they gather from such a scale allows them to detect and block tens of millions of attacks every day. As new types of attacks are detected in various parts of the world, Microsoft's systems automatically protect customers, such as those in your organization. For organizations that have implemented risk policies, Microsoft has seen compromises reduced by 96 percent. For those who implement multifactor authentication specifically, they see a 99.9 percent risk reduction. If you have any doubt as to whether you should embrace multifactor authentication, those statistics should be convincing.
Admin tasks for setting up multifactor authentication in Microsoft 365 Business
By default, Microsoft 365 Business tenants are enabled for modern authentication, a protocol required for multifactor authentication. If you're running a version of Office older than Office 2016 or have users who check email using Apple Mail, however, end users will need to create multifactor authentication app passwords because those legacy systems do not support two-step verification.To configure multifactor authentication service settings in Microsoft 365 Business, follow these steps:
- Log in to Microsoft 365 Admin Center.
You need your Microsoft 365 Global Admin credentials.
- On the left, Under Users, click Active Users.
The Active Users page is displayed.
- Click the More Settings icon (…) and then select Setup Multifactor Authentication from the drop-down menu that appears.
 Navigating to the Multifactor Authentication setup page.
The Users tab of the Multifactor authentication page appears.
- Click Service Settings.
The Service Settings page appears.
 The multifactor authentication Service Settings page.
 - Ensure that the options appropriate for your organization are selected, and then click the Save button.
The system saves the changes and displays a validation window to confirm that the updates were successful.
- From the Updates Successful window, click the Close button.
The validation window disappears, and the Service Settings page is displayed.
Enabling end users for multifactor authentication in Microsoft 365 Business
To enable multifactor authentication for a user licensed for Microsoft 365 Business:- Log in to Microsoft 365 Admin Center.
You need your Microsoft 365 Global Admin credentials.
- From the left menu, Under Users, click Active Users.
The Active Users page appears.
- Click the More Settings icon (…) and then select Setup Multifactor Authentication from the drop-down menu that appears.
The Users tab of the Multifactor authentication page appears.
- In the list of users, select the box to the left of the user you want to enable for multifactor authentication.
The right pane displays additional information about the user and actions you can take for the user.
- On the right pane below the end user's contact information, click Enable.
 Enabling multifactor authentication for an end user.
The system displays a validation window to confirm your intent to enable multifactor authentication for the user.
- Click the Enable Multi-Factor Auth button.
The system processes the changes and displays the Updates Successful window.
- Click the Close button.
The Users tab of the Multifactor authentication page is displayed.
In the Service Settings page is an option to enable the Remember Multifactor Authentication feature. This handy feature allows end users to bypass second-factor authentications on trusted devices for a certain number of days after they've successfully signed in using multifactor authentication. Although this is a great experience for end users, Microsoft recommends NOT enabling this feature and this is advice you should definitely heed. Otherwise, the device will pose a security risk if it is compromised. If you decide to enable this feature and a device is compromised, you must perform a task to restore multifactor authentication on all devices on which users have logged in with multifactor authentication.
You can enable multifactor authentication for multiple users at the same time by selecting more than one user from the list. For large organizations, a bulk update option is available to save the IT admin from clicking thousands of users. To enable multifactor authentication for a large number of users, click the Bulk Update button, upload a file in .csv format with all the users to be enabled for multifactor authentication, and then follow the prompts to complete the process. From the same window, you can download a sample file to ensure that your .csv file follows the required format.
How an end user registers for Microsoft 365 Business multifactor authentication
You've done your due diligence as an IT admin and have communicated that multifactor authentication will be implemented in your organization to access Microsoft 365 Business. It's now time for your end users to do their part.The first step an end user needs to take is to register other methods for authentication. It is not enough that an end user is enabled for multifactor authentication; the end user also needs to complete the registration process. Here's the fastest way for an end user to register for multifactor authentication:
- Navigate to Microsoft’s sign-in page.
The sign-in page is displayed.
- Enter your username and click Next.
The Enter Password window appears.
- Enter your password and click the Sign In button.
The More Information Is Required window is displayed.
- Click the Next button.
The Additional Security Verification page is displayed.
- Choose the appropriate option under Step 1.
 Setting up additional security verification.
To follow along with the example, choose Mobile App.
- Select Use Verification Code under How Do You Want To Use the Mobile App? section, and then click the Set Up button.
The Configure Mobile App window appears.
 Configuring the mobile app for multifactor authentication.
 - Follow the instructions and then click the Next button.
This example uses the Microsoft Authenticator app. After the app displays the six-digit code, the system displays the Verifying App window and a notification appears on the Authenticator app asking you to Approve or Deny the sign-in request.
- On your mobile device, in the Authenticator app, tap Approve.
 Approving the verification request from the Authenticator app.
The Additional Security Verification page appears.
- Click the Save button.
The system processes the changes and then displays the Updates Successful window.
- Click the Close button.
The user's Account page appears.
Managing multifactor authentication for Microsoft 365 Business
It happens. No matter how much you empower your end users to self-serve, those members in your Azure Active Directory will invariably reach out to you for help with requests related to multifactor authentication. Or you may need to take action to mitigate a risk from a compromised device.You manage user settings for multifactor authentication in the same location that you enabled multifactor authentication: the Multifactor authentication page.
From the Users tab of the Multifactor authentication page, note the three statuses in the Multi-Factor Auth Status column:
- Enabled: The user is enabled for multifactor authentication but has not yet completed the registration.
- Enforced: The user is enabled for multifactor authentication and has completed the registration.
- Disabled: The user is not enabled for multifactor authentication.
If an enabled user's device is compromised, click Manage User Settings under Quick Steps in the right pane. In the Manage User Settings window that appears, select one or more options. Then click the Save button.
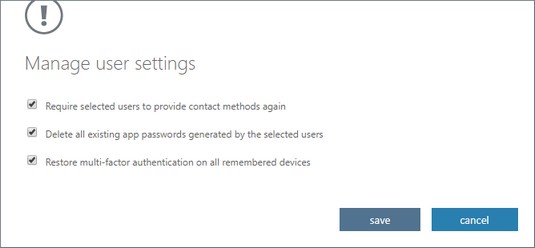 Managing multifactor authentication user settings.
Having trouble getting the green light for adoption? Use these ten tips to help get executive buy-in for Microsoft 365 Business.


