Print margins indicate how much white space Excel 2010 places between the worksheet data and the edge of the page. The Normal margin settings that Excel applies to a new workbook have top and bottom margins of 0.75 inches and left and right margins of 0.7 inches. You also can specify margins for the header and footer and center your worksheet horizontally or vertically on the page to improve the appearance of a printed report.
In addition to the Normal margin settings, Excel enables you to select two other standard margins from the Margins button's drop-down menu on the Page Layout tab of the Ribbon:
Wide margins with 1-inch top, bottom, left, and right margins and 0.5 inches separating the header and footer from the top and bottom margins.
Narrow margins with top and bottom margins of 0.75 inches, and left and right margins of 0.25 inches with 0.3 inches separating the header and footer from the top and bottom margins.
 Excel 2010 provides a few margin presets on the Margins drop-down menu.
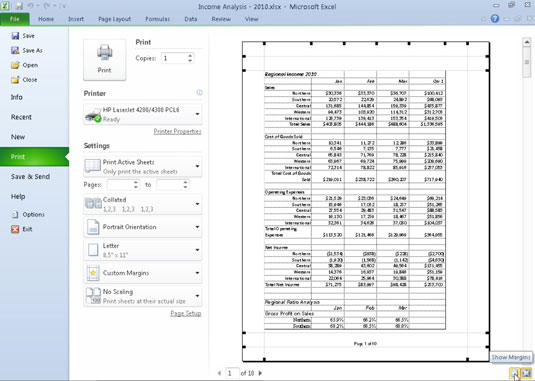
You also can manually adjust the margins of a report either from the Margins tab of the Page Setup dialog box or by dragging the margin markers in the Print panel of Excel's Backstage view (press Ctrl+P and then click the Show Margins icon). To get more columns on a page, try reducing the left and right margins. To get more rows on a page, try reducing the top and bottom margins.
Follow these steps to adjust margins using the Page Setup dialog box:
On the Page Layout tab, in the Page Setup group, click the Margins button and select the Custom Margins command from the drop-down menu.
You can also click the Page Setup dialog box launcher in the bottom-right corner of the Page Setup group. The Page Setup dialog box appears.
Click the Margins tab.
 Adjust your report margins from the Margins tab in the Page Setup dialog box.
Enter the new margin settings in the Top, Bottom, Left, and Right text boxes.
You also can use the spin buttons to change the margin settings in small increments.
(Optional) Select one or both Center on Page check boxes to center the data between the current margin settings.
Click OK.
You can click the Print Preview button in the Page Setup dialog box at any time to see how the changes you make affect the preview of your report.
If you select the Show Margins icon near the bottom-right corner of the Print panel in Backstage view, you can modify the margins by dragging margin markers. When you release the mouse button, Excel redraws the page, using the new margin setting. (You can also adjust column widths like this.)