


These entries are active, so you can interact with them. You can also move cells around and copy the resulting material to your Google Drive. Of course, while interacting with the Welcome page is both unexpected and fun, the real purpose of the information below is to describe how to interact with Colab notebooks. The following information describes how to perform basic notebook-related tasks with Colab.
Creating a new Google Colaboratory notebook
To create a new notebook, choose File → New Python 3 Notebook. You see a new Python 3 notebook like the one shown below. The new notebook looks similar to, but not precisely the same as, those found in Notebook. However, all the same functionality exists. You can also create a new Python 2 notebook if desired. Create a new Python 3 Notebook using the same techniques as normal.
The notebook shown here lets you change the filename by clicking on it, just as you do when working in Notebook. Some features work differently but provide the same results. For example, to run the code in a particular cell, you click the right-pointing arrow on the left side of that cell. In contrast to Notebook, the cell focus doesn’t change to the next cell, so you must choose the next cell directly or by clicking the Next Cell or Previous Cell buttons on the toolbar.
Opening existing Google Colaboratory notebooks
You can open existing notebooks found in local storage, on Google Drive, or on GitHub. You can also open any of the Colab examples or upload files from sources that you can access, such as a network drive on your system. In all cases, you begin by choosing File → Open Notebook. You see the dialog box here. Use this dialog box to open existing Colab notebooks.
The default view shows all the files you opened recently, regardless of location. The files appear in alphabetical order. You can filter the number of items displayed by typing a string into the Filter Notebooks field. Across the top are other options for opening notebooks.
Even if you’re not logged in, you can still access the Colab example projects. These projects help you understand Colab but won’t allow you to do anything with your own projects. Even so, you can still experiment with Colab without logging into Google first. The following information discusses these options in more detail.
Using Google Drive for existing Colab notebooks
Google Drive is the default location for many operations in Colab, and you can always choose it as a destination. When working with Drive, you see a list of files similar to those shown above. To open a particular file, you click its link in the dialog box. The file opens in the current tab of your browser.Using GitHub for existing Colab notebooks
When working with GitHub, you initially need to provide the location of the source code online. The location must point to a public project; you can’t use Colab to access private projects. When using GitHub, you must provide the location of the source code.
After you make the connection to GitHub, you see two lists: repositories, which are containers for code related to a particular project; and branches, a particular implementation of the code. Selecting a repository and branch displays a list of notebook files that you can load into Colab. Simply click the required link and it loads as if you were using a Google Drive.
Using local storage for existing Colab notebooks
If you want to use the downloadable source for any local source, you select the Upload tab of the dialog box. In the center is a single button, Choose File. Clicking this button opens the File Open dialog box for your browser. You locate the file you want to upload, just as you normally would for opening any file.Selecting a file and clicking Open uploads the file to Google Drive. If you make changes to the file, those changes appear on Google Drive, not on your local drive. Depending on your browser, you usually see a new window open with the code loaded. However, you could also simply see a success message, in which case you must now open the file using the same technique as you would when using Google Drive. In some case, your browser asks whether you want to leave the current page. You should tell the browser to do so.
The File → Upload Notebook command also uploads a file to Google Drive. In fact, uploading a notebook works like uploading any other kind of file, and you see the same dialog box. If you want to upload other kinds of files, using the File → Upload Notebook command is likely faster.
Saving Google Colaboratory notebooks
Colab provides a significant number of options for saving your notebook. However, none of these options works with your local drive. After you upload content from your local drive to Google Drive or GitHub, Colab manages the content in the cloud and not on your local drive.Using Drive to save Colab notebooks
The default location for storing your data is Google Drive. When you choose File → Save, the content you create goes to the root directory of your Google Drive. If you want to save the content to a different folder, you need to select that folder in Google Drive.Colab tracks the versions of your project as you perform saves. However, as these revisions age, Colab removes them. To save a version that won’t age, you use the File → Save and Pin Revision command. To see the revisions for your project, choose File → Revision History. You see the output shown below. Notice that the first entry is pinned. You can also pin entries by checking the entry in the History list. The revision history also shows you the modification date, who made the revision, and the size of the resulting file. You can use this list to restore a previous revision or download the revision to your local drive.
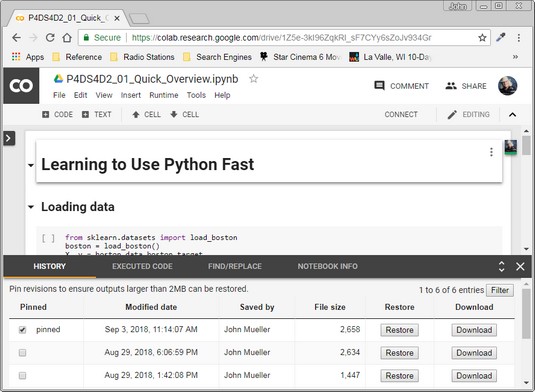 Colab maintains a history of the revisions for your project.
You can also save a copy of your project by choosing File → Save a Copy In Drive. The copy receives the word Copy as part of its name. Of course, you can rename it later. Colab stores the copy in the current Google Drive folder.
Using GitHub to save Colab notebooks
GitHub provides an alternative to Google Drive for saving content. It offers an organized method of sharing code for the purpose of discussion, review, and distribution.You may use only public repositories when working with GitHub from Colab, even though GitHub also supports private repositories. To save a file to GitHub, choose File → Save a Copy in GitHub. If you aren’t already signed into GitHub, Colab displays a window that requests your sign-in information. After you sign in, you see a dialog box similar to the one you see below.
 Using GitHub means storing your data in a repository.
Notice that this account doesn’t currently have a repository. You must either create a new repository or choose an existing repository in which to store your data. After you save the file, it will appear in your GitHub repository of your choice. The repository will include a link to open the data in Colab by default, unless you choose not to include this feature.
Using GitHubGist to save Colab notebooks
You use GitHub Gists as a means of sharing single files or other resources with other people. Some people use them for full projects as well, but the idea is that you have a concept that you want to share — something that isn’t quite fully formed and doesn’t represent a usable application. You can read more about Gists here.As with GitHub, Gists come in both public and secret form. You can access both public and secret Gists from Colab, but Colab automatically keeps your files secret. To save your current project as a Gist, you choose File → Save a Copy as a GitHub Gist. Unlike GitHub, you don’t need to create a repository or do anything fancy in this case. The file saves as a Gist without any extra effort. The resulting entry always contains a View in Colaboratory link, as shown below.
 Use Gists to store individual files or other resources.
Downloading Google Colaboratory notebooks
Colab supports two methods for downloading notebooks to your local drive:.ipynb files (using File→Download .ipynb) and .py files (using File → Download .py). In both cases, the file appears in the default download directory for your browser; Colab doesn't offer a method for downloading the file to a specific directory.


