


When you write some code that you want to contribute to a repository, you create and submit a pull request. Your code contains some proposed changes to the target repository. A pull request is your way of offering these changes to the maintainer of the repository. It gives the repository maintainers an opportunity to review the changes and either accept them, reject them, or ask for more changes to be made.
Pushing code to GitHub
To push code to GitHub, you need a repository. Open the repository of your choice.The first thing to do is create a new branch. Creating a new branch before writing new code is standard operating procedure with Git.
A pull request doesn’t consist of an arbitrary set of changes or commits. A pull request is always associated with a branch. In other words, a pull request is a request to merge one branch into another.
While it’s true that a pull request can target any branch (except itself), the most common scenario is to target the main branch of a repository, typically named master.
new-work for this example, but feel free to name it whatever you want by replacing new-work with your own branch name in the following command:$ git checkout -b <em>new-work</em>
Now that we have a branch, we need to create a commit in that branch. For this example, the specific contents of the commit are not important. You can choose any file and make some edits to the file, such as adding some text to the end. Or manually edit the README.md file manually or run the following command to append some text to end of the file:
$ echo "\n## Installation" >> README.md
Now that you have a file with some changes, commit those changes. You can use the following command, for example, to commit all your changes. The commit message is not important here. The important thing is to have a commit in a branch to work with that is not in the master branch.
$ git add -A
$ git commit -m "Add text to the README"
Now push this new branch to GitHub.com (replace new-work with your branch name):
$ git push -u origin new-work
The git push command tells Git to push local commits to a remote repository. The -u flag specifies where to push it — in this case, to a branch also named new-work on the remote named origin.
The -u flag is only needed the first time you push a new branch to the server. From that point on, the new-work branch on your local machine is associated with the new-work branch on GitHub.com and any subsequent pushes to that branch do not need the flag.
How to open a pull request
Before you can open a pull request, your GitHub.com repository must have at least one branch other than the default branch. If you followed the preceding steps, you have a branch that is not yet merged into master. In our case, the branch is namednew-work branch, but you may have named yours something else. Visit the repository on GitHub.com to open a pull request.When you visit the repository on GitHub.com, you see a new message in the section labeled Your recently pushed branches, as shown.
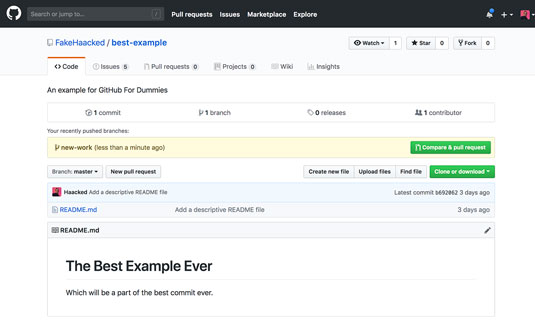 Repository home page with recently pushed branches listed.
Click the Compare & pull request button to navigate to the Open a pull request page, as shown in the following figure. The target branch (the branch you want to pull your changes into) is the default branch for the repo. Your branch is listed next to the target branch, and a status of whether your branch can be merged into the target branch is next to that. The pull request title is the same as the most recent commit message — in this example Add text to the README — and your description is blank. The following figure shows an example description.
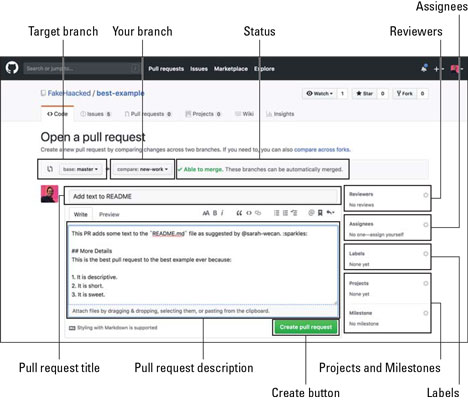 The Open a pull request page.
You can change the default branch by choosing Settings→Branches section of your repository.
The pull request
From the Open a pull request page, you can enter a summary and description. Most of the conventions for commit messages also are supported in a pull request — for example, mentioning people using the@USERNAME format. In the preceding question, I mention @sarah-wecan. When I create the pull request, @sarah-wecan receives a notification.You can reference issues and other pull requests using the #ISSUEID format. And, of course, you can add emojis, such as :sparkles:.
In this section, we cover what to write here in more detail. There's a lot that goes into a good pull request.
How to add reviewers
To the right of the pull request summary and description fields is a set of options for the pull request.The first one, Reviewers, lets you specify one or more people that you want to review your pull request. To add reviewers:
- Click the gear to see a list of people you can mention. For repositories with a large number of users, you can start typing to filter the set of users.
- Click each user to add them to the list of reviewers. When you add a reviewer, they’re immediately notified when you finish creating the pull request. The following figure shows the reviewers list with two reviewers selected.
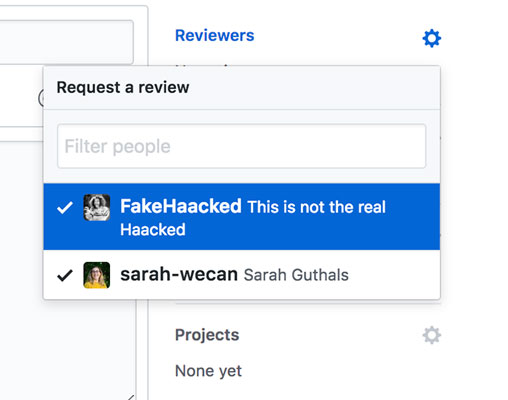 List of potential reviewers with two reviewers selected.
How to specify assignees
The next option after Reviewers is an option to specify assignees. An assignee is the person who should take action on the pull request. Often, a pull request represents a work in progress and not the final result of some work. If more work needs to be done on a pull request, you’d assign the pull request to the person that should do the work.To specify assignees:
- Click the gear to see a list of assignees. The assignee dialog box works just like the reviewers dialog box. It allows you to select one or more assignees.
- Click each user to add them to the list of reviewers.
In most cases, it’s best to just assign one person who will be responsible for the next step. Assigning one person reduces the chances that multiple assignees all think the other assignees are responsible for the work.
How to specify labels
Labels are a way to figure out what to work on next. Labels work the same way for pull requests. They provide convenient grouping and context to help you decide what to work on next or what to review next.The set of labels you can use on issues and pull requests are the same, but some labels make more sense for issues than pull requests and vice versa. For example, many repositories have a “ready for review” label specifically for pull requests.
Specify projects and milestones
The last two options allow you to specify the project board and milestone that this pull request belongs to.How to create the pull request
After you have the pull request written and specified all the pull request options, click the Create pull request button to save all your work and create the pull request. This figure shows a pull request created on my repository.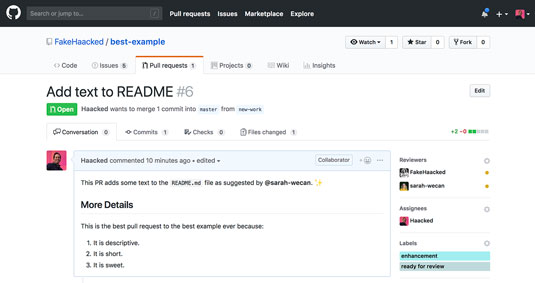 A created pull request.


