To get a better understanding of what a repository is and how it is structured, you need to create your first GitHub repo:
- Go to the home page of GitHub.com by clicking the Octocat. A list of your repositories appears on the bottom left side of the screen.
- Click the green New Repository button.
The Create a New Repository dialog page, shown in the following figure, opens.
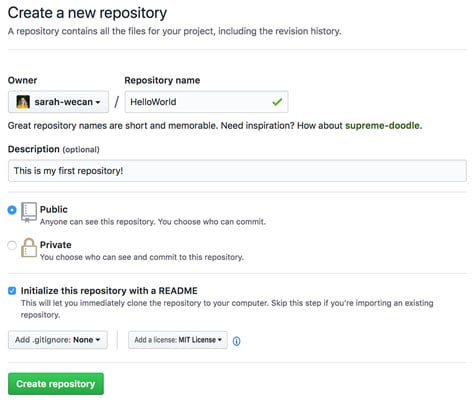 The page to create a new repository.
 - Type the name of your repository in the Repository name text box. I named my repository HelloWorld.
- Type a short description in the Description text box.
- Select the Public radio button.
- Click the Initialize this repository with a README check box. You do not need to add a .gitignore.
- Choose a license from the Add a license drop-down list.
- Click Create Repository. The home page of your repository appears. It should look similar to the one shown in the following figure. Notice that a markdown file — README.md — is already in the repository. Markdown is a lightweight markup language used to style the words that you write with a plain text syntax. You can make words bold, turn them into headers, and even create a table for data.
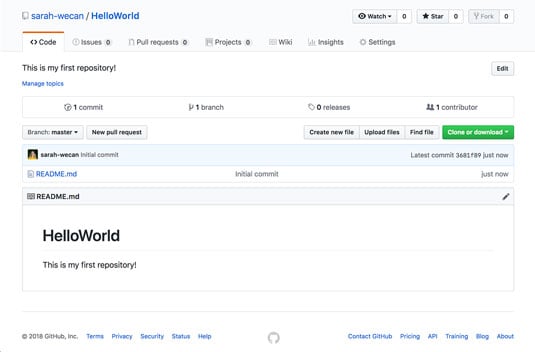 The home page of my HelloWorld repository.
Information at the top of your GitHub repository
At the top of the repository is the username of the author and title of the repository. When you fork a repository, you see the original author underneath for a quick link. To fork a repository is to make a copy of it, where the changes you make to your copy can be suggested to the original author.To the right of your username are three buttons:
- Watch: You can choose what kind of notifications you want to receive based on the type of activity happening on this repo.
- Star: Starring can help you quickly navigate to certain repositories, as well as give GitHub insight into things you’re interested in so that recommendations will be more accurate for you. To access your starred repositories, just click your avatar on the top right of GitHub.com and choose Your Stars.
- Fork: If you are not the author of the repository, then you have the option to fork it.
We highly recommend choosing either Not watching or Releases only for the majority of repositories so that you only get notifications when you’re specifically mentioned or actively participating in a discussion on an issue or a pull request. Otherwise, your inbox will be filled with emails about every single action taken on the repository, which will get out of hand very quickly. If you notice this happening, go to GitHub.com and unwatch all or some of the repositories you’re watching with a quick click.
Tabs on your GitHub repository
Seven tabs appear across the top of your repo. Each tab provides different features for the repo:- Code: The Code tab is where you can find all your code and browse folders and files. You can click a file to view its contents or click the pencil icon to modify the file, right in your Internet browser. (See the upcoming “Code tab” section for more details.)
- Issues: Issues are a really neat feature for repos. Issues can help you track things you want to still make, problems you’re having, or suggestions for other people.
- Pull requests: Pull requests, also referred to as PRs, are similar to issues in that they have a title and a description, but they also have code changes that you’re requesting to be pulled into the main branch. The safest way to contribute code is to create a new branch, make your code changes on that branch, and then request for that branch to be merged with the master branch. A PR gives you an interface for merging the two branches, showing you the diff between the files you modified and the ones that are on the master branch and giving you a place to have a conversation with collaborators on whether the code should be merged or changes should be made first.
- Projects: You may already be familiar with project boards like Trello or Kanboard. GitHub has project boards linked directly with your repo. The best part is that the cards on a GitHub project board can be directly related to issues or PRs and can automatically move when something happens.
- Wiki: Wikis are a great place to store documentation, project status, and roadmaps for your project. It’s a great go-to place for collaborators to see what is going on and where they can jump in to help!
- Insights: The Insights tab, shown in the following figure, gives you an overview of all collaborators and actions happening on the repo. It’s really neat to see this tab on popular open source projects. For example, TensorFlow has had 158 contributors in the last month!
- Settings: The Settings tab is visible only if you have the right permissions on the repository. In this tab, you can decide who has access to what and how collaborators should collaborate. You can also integrate apps that tell you how much of your code is covered with tests.
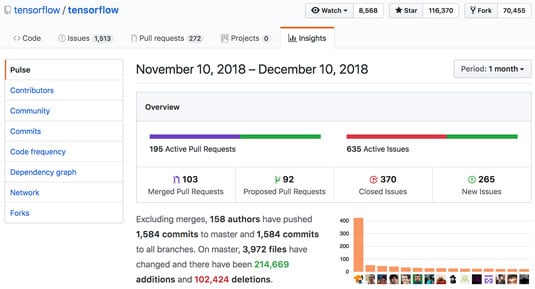 The Insights tab.
Code tab of your GitHub repository
The Code tab, shown in the following figure, has a lot of additional important metadata about your repo that will come in useful in future development:- Description and topics: At the top of the Code tab is a description and a place where you can put in topics to make your repository more discoverable. Adding topics is particularly important if you want to attract other coders to help you build your software.
- Metadata: This bar contains information and links to the number of commits, branches, releases, and contributors for the repo.
- Action buttons: On the left side of the repo is a drop-down menu where you can change which branch you’re looking at or browse the files for a particular branch. The New pull request button allows you to quickly create a pull request. The best way to create a pull request is to switch to another branch, make some changes, and then click New pull request. On the right side are three buttons related to files: Create new file, Upload files, and Find file. Finally, you can click on the green Clone or download drop-down list to clone or download the code to your local machine.
- Code: At the bottom of the Code tab is a list of all the code in this repo. If a md file appears in this list, then the file shows up below the list. For any file, you can click the filename to go to a page where you can see the file and edit it if you want.
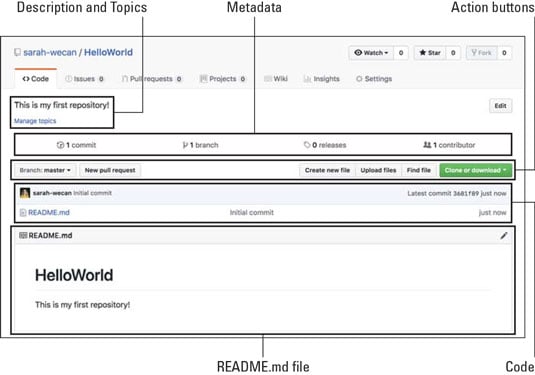 The Code tab.