

Forms allow you to capture input from your website visitors. Capturing input from visitors allows you to modify existing content on the page. For example, price and date filters on airline websites allow for finding a desired flight more quickly. You also can store the input for later use.
For example, a website may use a registration form to collect your email, username, and password information to allow you to access it at a later date.
Understanding how forms work
Forms pass information entered by a user to a server by using the following process:
The browser displays a form on the client machine.
The user completes the form and presses the submit button.
The browser submits the data collected from the form to a server.
The server processes and stores the data and sends a response to the client machine.
The browser displays the response, usually indicating whether the submission was successful.
For now, all you need to know is that server-side programming languages such as Python, PHP, and Ruby are used to write scripts that receive and store form submissions.
Forms are very flexible, and can record a variety of user inputs. Input fields used in forms can include free text fields, radio buttons, checkboxes, drop-down menus, range sliders, dates, phone numbers, and more. Additionally, input fields can be set to initial default values without any user input.
| Attribute name | Possible values | Description |
|---|---|---|
| type | checkbox submit text password radio (a complete list of values has been omitted here for brevity) |
Defines the type of input field to display in the form. For example, text is used for free text fields, and submit is used to create a submit button. |
| value | text | The initial value of the input control. |
Creating basic forms
You create a basic form by
Defining a form with the form element.
Start by adding an opening tag and closing tag.
Using the action attribute, specify in the form element where to send form data.
Add an action attribute to your opening tag and set it equal to the URL of a script that will process and store the user input.
Using the method attribute, specify in the form element how to send form data.
Add a method attribute to your opening tag and set it equal to POST.
The method attribute is set equal to GET or POST. In general, POST is used for storing sensitive information (such as credit card numbers), whereas GET is used to allow users to bookmark or share with others the results of a submitted form (such as, for example, airline flight listings).
Providing a way for users to input and submit responses with the input element.
Between the opening and closing tags, create one tag.
Your form will have only one opening and closing tag; however, you will have at least two tags to collect and submit user data.
Specify input types using the type attribute in the input element.
For this example, set the type attribute equal to "text".
The tag does not have a closing tag, which is an exception to the “close every tag you open” rule. These tags are called self-closing tags.
Finally, create another tag and set the type attribute equal to submit.
The following example code shows the syntax for creating the form shown.
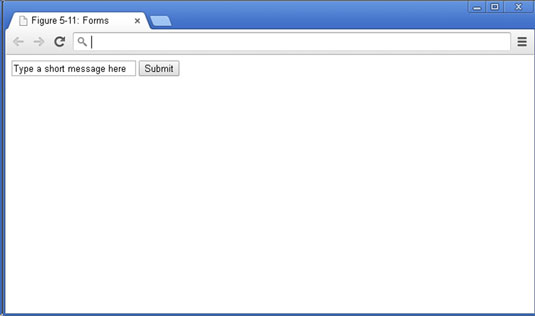
<form action="mailto:nikhil.abraham@gmail.com" method="POST">
   <input type="text" value="Type a short message here">
   <input type="submit">
</form>
The action attribute in this form is set equal to mailto, which signals to the browser to send an email using your default mail client (such as Outlook or Gmail). If your browser is not configured to handle email links, then this form won’t work. Ordinarily, forms are submitted to a server to process and store the form's contents, but in this example form the contents are submitted to the user's email application.