The three second timer delay is popular for landscape and product photographers as it diminishes the chance of camera shake due to the photographer touching the iPhone.
The ten second timer delay is useful for group family portraiture when you (as the photographer) need to set your iPhone up on a tripod and then run into the group so that you can be included in the photo.To activate either timer, follow these instructions based on your model of iPhone:
- For iPhone 11 series models: Tap on the top-middle arrow to reveal the extra options. Tap on the icon that looks like a clock timer and choose either 3s or 10s, as shown in the figure.
- For X series models and earlier: Tap the timer icon at the top of your camera screen and choose either 3s or 10s. Tap the shutter button to take your photo and watch the countdown on your screen.
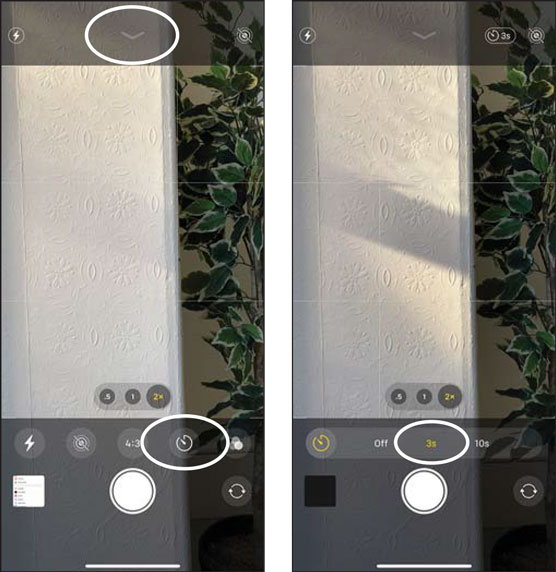 Activating your camera’s three or ten second timer.
When the camera starts to take the photo, it will take ten consecutive photos rapidly. When you’re doing group family photos, inevitably one person is blinking or making a funny face, which can ruin the entire photo unless you have decent photo-editing skills! To avoid this problem, you get to choose the best image out of ten images taken.
To choose the best of the ten photos, follow these easy steps:
1. Go to your Photos app and locate the photo that you just took.
2. Tap Select at the bottom middle of your screen (see the following figure).
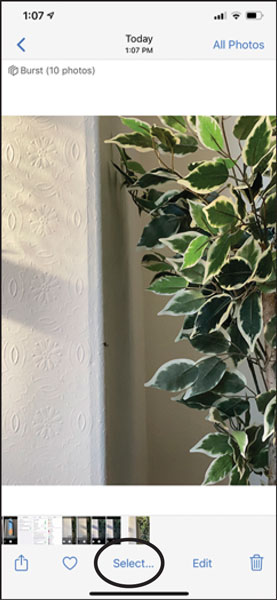 Tap Select at the bottom middle of your screen to start the best photo selection process.
This option is visible only if you see an icon at the top left of your screen that reads Burst (10 photos).
At the very bottom of your screen, you have the option to scroll through ten photos that pretty much look identical (see the following figure).
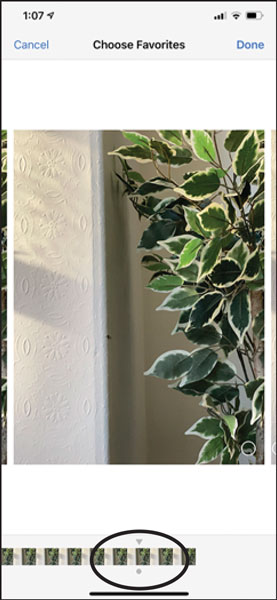 Scroll through and review the ten photos using the slider at the bottom of your screen.
3. Tap on the little circle icon at the bottom right of the photo that you like the best.
The icon now changes to blue and includes a check mark (see the following figure).
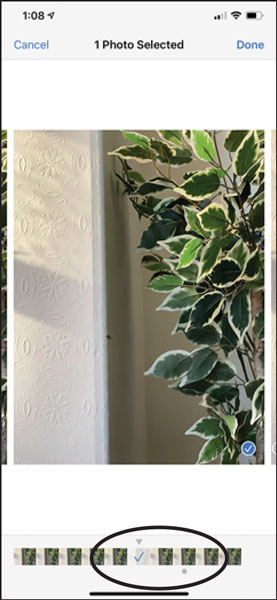 A blue checkmark activates when you tap on your favorite of the ten photos.
4. Tap on Done at the top right.
5. To keep all the photos, tap the Keep Everything option; to keep just the single photo that you chose as the best choose the Keep Only 1 Favorite option (see the following).
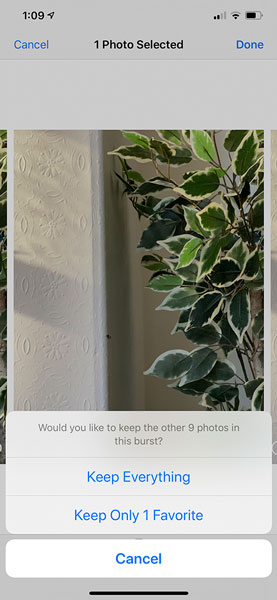 To save space on your device, choose the Keep Only 1 Favorite option.
You don’t need to choose only one best photo. Feel free to choose as many favorite photos as you like by tapping multiple circle icons at the bottom right of each photo that you’d like to keep.
Family portraits
To create successful family portraits that include you in them, follow these simple steps:- Gather your group within an attractive setting and flattering light, such as early morning or evening.
- Put your camera on a tripod or propped up on a stable surface, such as a fence or large boulder.
- Ask the group to save a space for you when it’s time to get into the composition.
- Press the 10s option, and as soon as you see the numbers start to count down, quickly join the group.
If you see a little white light flashing every second next to your camera lens, everything is working normally.
The flashes intensify, giving you about a two second warning that the camera will take the photo.
When reviewing your group photo, you can choose the best family portrait then, or choose on another day. There is no time limit to choosing the best photo out of the ten taken.Selfies with a tripod or stand
iPhones are adept at taking quality selfies. However, seeing such a large and close-up view of your face on the screen can sometimes feel a bit awkward. Maybe you feel that your face takes up a huge amount of the selfie photo!To remedy this problem, you can back away a bit from the camera to allow more of the background and surroundings into your selfie. Choose a tripod, a mobile device stand set on a stable platform, or a selfie stick to allow your camera to be further from your face.
With your iPhone on a tripod or a stand, choose the three second timer. The three seconds gives you enough time to take your hand away from the camera and establish your brilliant smile!
Landscape photography using your timer
Landscape photographers love using the three second timer to create incredible tack-sharp photos. Did you know that even the act of tapping your camera’s shutter button can cause the minutest amount of camera shake?To avoid camera shake when your iPhone is on a tripod, set up your landscape scene as you like and then take your photo using the three second timer.
The three second timer is better than the ten second timer for landscapes because even within ten seconds, the lighting outside may change, ruining your brilliant landscape photo.
Either after your photo has been taken or in a warm café sipping your cappuccino, choose the best of ten landscape photos. Do they all look the same to you? If so, the iPhone has an incredible feature created just for you!When you’re reviewing your landscape photo in the Photos app and you press Select, do you see that your iPhone has already selected the photo that it thinks is best? It’s signified by a little gray dot at the bottom of one of the ten photos just taken. iPhone thinks this photo is the sharpest, and you can accept its judgment or choose your own best photo.
You may be wondering how your iPhone could possibly know what photo is best. Well, it all comes down to advancements in Artificial Intelligence, and your iPhone’s brilliant programming. The computer will analyze all ten photos almost instantly and choose the photo that exhibits the most amount of sharpness and other beneficial image qualities. Your iPhone is looking out for you!