- Press and hold down the side button (found a little bit below the top of the upper-right side of newer iPhone models) or the top button (on the first-generation iPhone SE and earlier models) until the Apple logo appears. A screen appears, asking you to enter your Apple ID.
- Enter your Apple ID. If you don’t have an Apple ID, follow the instructions to create one.
- Follow the series of prompts to set up initial options for your iPhone. You can make choices about your language and location, using iCloud (Apple’s online sharing service), whether to use a passcode, connecting with a network, and so on.
Contacts and Calendars are downloaded via iCloud, or (if you’re moving to iPhone from an Android phone) you can download an Apple app called Move to iOS from the Google Play Store to copy your current Android settings to your iPhone.
You can also transfer to your computer any content you download directly to your iPhone by using iTunes, the App Store, or non-Apple stores.
Meet the Multi-Touch Screen
When the iPhone Home screen appears, you see a colorful background and two sets of icons, as shown in the image below.The iPhone 14 Home screen showing a variety of app icons
One set of icons appears on the dock, which is along the bottom of the screen. The dock contains the Phone, Safari, Messages, and Music app icons by default, though you can swap out one app for another. You can add new apps to populate as many as 14 additional Home screens, for a total of 15 Home screens. The dock appears on every Home screen.
Other icons appear above the dock. Different icons appear in this area on each Home screen. You can also nest apps in folders, which gives you the ability to store even more apps on your iPhone, depending on your phone's memory.
Treat the iPhone screen carefully. The newest models have Ceramic Shield, Apple's toughest screen ever for the iPhone, but it's still made of glass and will break if an unreasonable amount of force is applied.
The iPhone uses touchscreen technology: When you swipe your finger across the screen or tap it, you’re providing input to the device just as you do to a computer by using a mouse or keyboard.You'll read more about the touchscreen in the next task, but for now, go ahead and play with it — really, you can’t hurt anything. Use the pads of your fingertips (not your fingernails) and try the following:
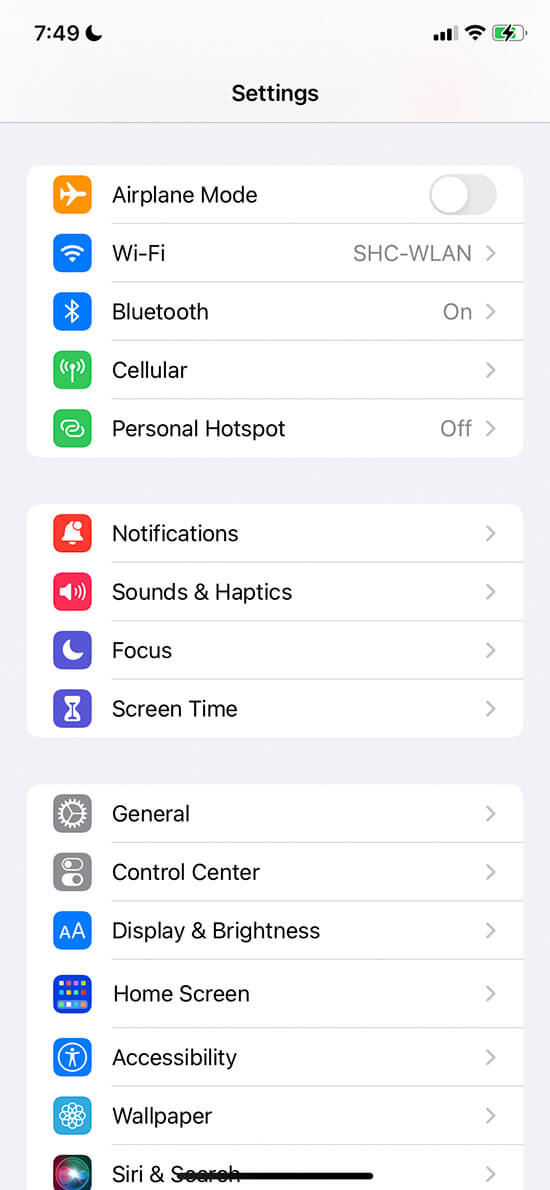
- Tap the Settings icon. The various settings categories appear, as shown in the figure below. To return to the Home screen, press the Home button or, if you have an iPhone without a Home button, swipe up from the very bottom edge of your screen.
- Swipe a finger from right to left on the Home screen. This action moves you to the next Home screen.The little white dots at the bottom of the screen, above the dock icons, indicate which Home screen is displayed. If you see the search field instead, just lightly move your finger on your iPhone’s screen and the dots will appear in its place.
- To experience the screen rotation feature, hold the iPhone firmly while turning it sideways. The screen flips to the horizontal (or landscape) orientation, if the app you’re in supports it.To flip the screen back, just turn the device so that it’s short side is up again (portrait mode). Some apps force iPhone to stay in one orientation or the other.
- Drag your finger down from the very top edge of the screen to reveal such items as notifications, reminders, and calendar entries.Drag up from the very bottom edge of the Home screen to hide these items. Then drag up (iPhones with a Home button) or swipe down from the top-right corner to the center (iPhone without a Home button) to display Control Center, which contains commonly used controls and tools.
 ©John Wiley & Sons, Inc.
The Settings menu on the iPhone 14
Say Hello to Tap and Swipe
You can use several methods for getting around and getting things done in iPhone by using its multi-touch screen, including- Tap once. To open an application on the Home screen, choose a field (such as a search box), choose an item in a list, use an arrow to move back or forward one screen, or follow an online link, tap the item once with your finger.
- Tap twice. Use this method to enlarge or reduce the display of a web page or to zoom in or out in the Maps app.
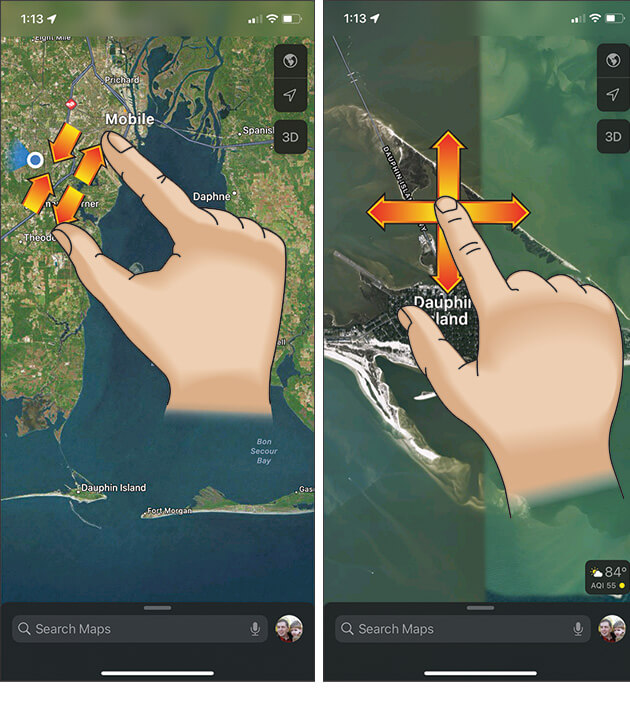
- Pinch. As an alternative to the tap-twice method, you can pinch your fingers together or move them apart on the screen (see the figure below) when you’re looking at photos, maps, web pages, or email messages to quickly reduce or enlarge them, respectively. This method allows you to grow or contract the screen to a variety of sizes rather than a fixed size, as with the double-tap method.Use a three-finger tap to zoom your screen even larger or use multitasking gestures to swipe with four or five fingers. This method is handy if you have vision challenges.
- Drag to scroll (known as swiping). When you touch your finger to the screen and drag to the right or left, the screen moves (see the figure below). Swiping to the left on the Home screen, for example, moves you to the next Home screen. Swiping up while reading an online newspaper moves you down the page; swiping down moves you back up the page.
- Flick. To scroll more quickly on a page, quickly flick your finger on the screen in the direction you want to move.
- Tap the status bar. To move quickly to the top of a list, a web page, or an email message, tap the status bar at the top of the iPhone screen. (For some sites, you have to tap twice to get this to work.)
- Press and hold down. If you’re using Notes or Mail or any other application that lets you select text, or if you’re on a web page, pressing and holding down on text selects a word and displays editing tools that you can use to select, cut, or copy and paste the text.
 ©John Wiley & Sons, Inc.
The pinch gesture (left) and swiping gesture (right) on the iPhone 14 Multi-Touch screen
When you rock your phone backward or forward, the background moves as well (a feature called parallax). You can disable this feature if it makes you seasick. From the Home screen, tap Settings @@--> Accessibility @@--> Motion and then turn on the Reduce Motion setting by tapping the toggle switch (it turns green when the option is enabled).
Bezel gestures
Your iPhone enables you to perform bezel gestures, which involve sliding left to right from the very outer edge of the phone on the glass to go backward and sliding right to left to go forward in certain apps.You can try these methods now:
- Tap the Safari icon on the dock at the bottom of any iPhone Home screen to display the Safari web browser.
- Tap a link to move to another page.
- Double-tap the page to enlarge it; then pinch your thumb and finger together on the screen to reduce its size.
- Drag one finger up and down the page to scroll.
- Flick your finger quickly up or down on the page to scroll more quickly.
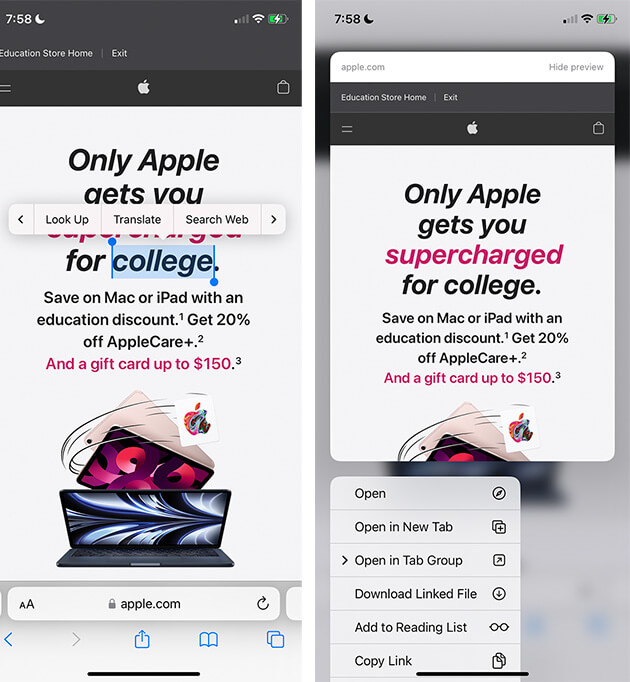
- Press and hold down your finger on a word that isn’t a link. (Links take you to another location on the web.) The word is selected, and the tools shown in the figure below are displayed. (You can use this tool to either get a definition of a word or copy it.)
- Press and hold down your finger on a link or an image. A menu appears (shown in the figure below) with commands that you select to open the link or picture, open it in a new tab, open it in a tab group, download a linked file, add it to your reading list, copy it, or share it. If you press and hold down on an image, the menu also offers the Add to Photos command. Tap outside the menu to close it without making a selection.
- Position your thumb and finger slightly apart on the screen and then pinch your thumb and finger together to reduce the page. With your thumb and finger already pinched together on the screen, move them apart to enlarge the page.
- Press the Home button or swipe up from the bottom of the screen (iPhone without a Home button) to go back to the Home screen.
 ©John Wiley & Sons, Inc.
Selecting a word (left) on an iPhone 14, and opening a link or picture (right)