How to Install Linux from Ubuntu Live

The Ubuntu installation process is one of the simplest in the Linux world. Ubuntu guides you through all the steps required to set up the system, then installs the entire Ubuntu system without prompting you for too much information.
You can start the installation process from two locations after you boot from the Live DVD or USB stick:
- Directly from the boot menu without starting Ubuntu
- From the Install desktop icon after you start the Ubuntu Live system
Both locations start the same installation process, which guides you through several steps of options.
After you have a Live DVD or USB stick in your hand, you can start the installation process. Just follow these steps:
1. Place the Ubuntu Live DVD in the DVD tray of your PC (or plug the USB stick into a USB port), and restart your PC.
Your PC then boots from the Ubuntu Live DVD or USB stick, and you see the main Ubuntu Live menu, shown.
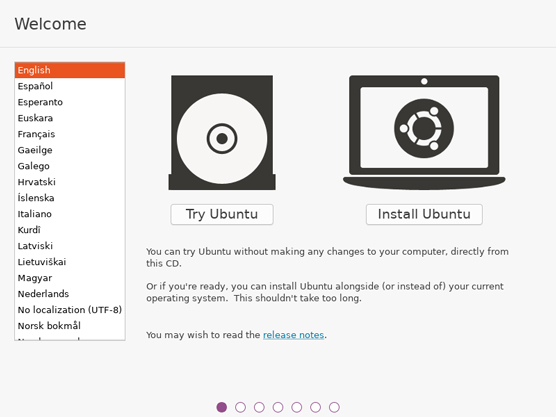
2. From the menu, select your language, and then choose either to install Ubuntu directly, or to try out Ubuntu first by running it from the DVD or USB stick.
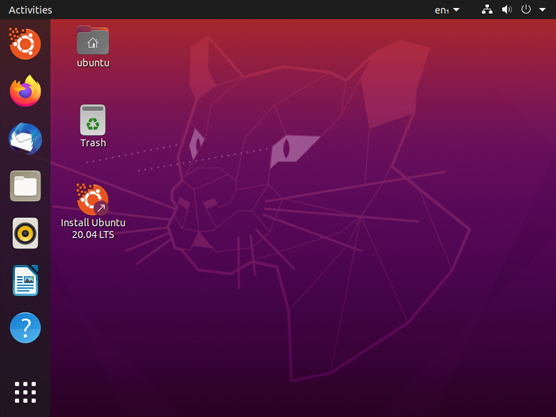
The great feature about the Live versions is that you can test drive Ubuntu without having to mess with your hard drive. This gives you an idea of what'll work and what won't. After you've completed your test drive, if you decide to install Ubuntu, just click the Install icon on the desktop, shown. If you decide to run the install from the main menu, skip to Step 4.
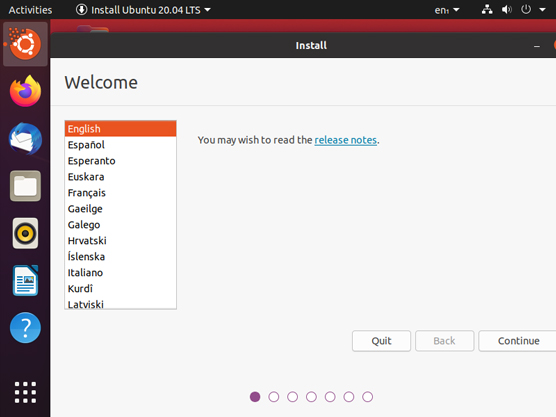
3. Select the language to use for the installation, then click Continue.
If you install Ubuntu from the desktop installation icon it asks you again for the default language, shown.
Ubuntu uses this language to display text messages during the installation process, plus sets the default language used when the operating system runs. However, this doesn't necessarily mean that all the applications running on the system will use that language. Each individual application may or may not detect the default language configured in Ubuntu.
4. Select a Keyboard, and then click Continue.
Next up in the installation process is to identify the keyboard you'll use with the Ubuntu system. While this may sound like a simple option, it can get complicated if you have a keyboard that includes special keys. Ubuntu recognizes hundreds of different keyboard types, and lists them all in the Keyboard Layout window, shown.
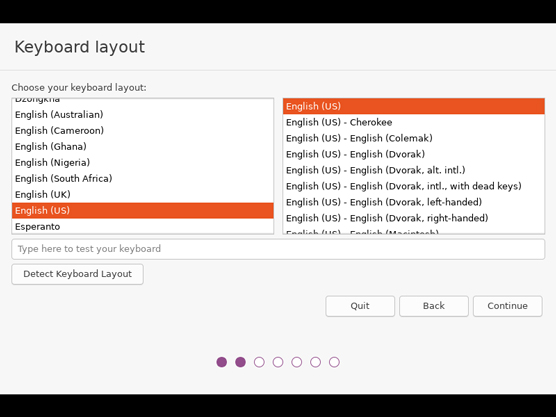
The Keyboard Layout window lists the different types of keyboards commonly used based on your country. The left-side listing lists countries, and the right-side listing lists the different known keyboard types used in the country selected. Select your country from the left-side listing first, then select your keyboard type from the right-side listing.
For most standard keyboards, the Ubuntu installation script automatically detects the correct keyboard and you won't have to do anything. There's also a button to force the installer to attempt to detect your keyboard again if something went wrong the first time. If you have a special keyboard, under the two listings is an area where you can test the keyboard selection. Just type any special or unique characters available on your keyboard to see whether the setting you selected produces the proper characters.
5. Select what software you'd like installed by default in your Ubuntu desktop, and then click Continue.
The Ubuntu installer gives you some choices on just what software to install, as shown.

The Ubuntu installer gives you two options for the software packages to install:
- Normal Installation: Includes software for web browsing, office automation (such as word processing and working with spreadsheets), games, and playing audio and video
- Minimal Installation: Provides a minimal desktop software bundle, which includes only software for web browsing and standard desktop utilities to control your desktop environment
For most Ubuntu desktop installations, select the Normal Installation. If you're using an older workstation with a small hard drive you may have to go with the minimal desktop installation and then manually install any other software packages you need.
The last option is to install third-party software. This topic is a bit controversial in the Linux world. Some hardware companies use proprietary drivers so Linux can interact with their hardware. These drivers aren't open source, so many Linux purists prefer not to use them. There are also certain audio and video formats that are proprietary as well, and as you can suspect, these also cause consternation among Linux purists. I'll leave the decision as to whether to select this option to you, but just beware if you choose to not install this bundle your desktop may not work with some of your hardware devices, or be able to play some of the more popular audio and video formats.
6. Select how to install Ubuntu on your hard drive, then click Install Now.
This step in the installation is quite possibly the most important, and also the most complicated. Here's where you need to tell the Ubuntu installer exactly where to place the Ubuntu operating system on your system. One bad move here can really ruin your day.
The options you get in this window during the installation depend on your hard drive configuration, and if you have any existing software on your hard drive. The figure shows an example of what the Installation type window looks like.
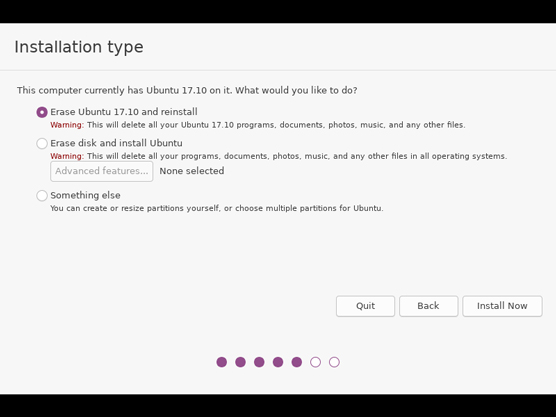
The Ubuntu installer tries to detect your exact system setup and provides some simple options:
- If your entire hard drive is currently used for Windows, the Ubuntu installer offers to shrink the partition to make room for an Ubuntu partition, and create a dual-boot environment.
- If you've already shrunk your existing Windows partition manually, the Ubuntu installer offers to install Ubuntu on the available empty partition and create a dual-boot environment.
- If you have a previous version of Ubuntu already installed, the Ubuntu installer offers to upgrade only the OS and leave your data intact if possible.
- If you have a second hard drive in your workstation the Ubuntu installer offers to use it for Ubuntu, leaving your existing hard drive alone, and create a dual-boot environment.
- If you have a single hard drive that already contains an existing Windows or Linux partition, the Ubuntu installer offers to erase the entire partition and just install Ubuntu.
- Allows you to manually partition your hard drive to create your own partitions.
Which option you select depends on just what type of setup you want to try. If you want to run an Ubuntu-only workstation, the option to erase the existing operating system is the quickest and easiest way to go.
If you select an option to keep an existing operating system on your hard drive, the Ubuntu installer allows you to select how much disk space to allocate for the new Ubuntu partition. You can drag the partition separator to redistribute disk space between the original operating system and the new Ubuntu partition.
If you select the manual partition process, Ubuntu turns control of the partition process over to you. It does provide a great partition utility, shown, for you to use to create, edit, or delete hard drive partitions.
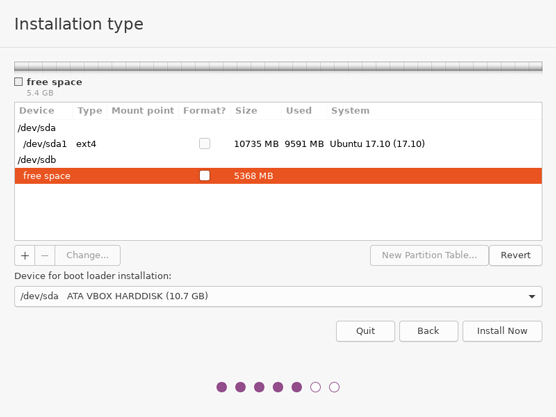
The manual partition utility displays the current hard drives, along with any existing partitions configured in them. Once you become an experienced Linux user you can manually remove, modify, or create individual partitions on any hard drives installed on the system to customize your Linux setup.
7. If you're performing a manual partition, select a filesystem for your Ubuntu partition.
Part of the manual partition process is to assign a file system to each partition. A filesystem is a method used for storing and accessing files on the partition. Unlike some other operating systems, Ubuntu supports several different filesystems. You can select any of the available file systems for any of the partitions Ubuntu will use. The table shows the filesystem types available for you when creating disk partitions in Ubuntu.
Ubuntu Partition Filesystem Types
The most common partition type (and the default used by the Ubuntu guided methods) is the ext4 format. This filesystem format provides a journaling filesystem for Ubuntu. A journaling filesystem logs any file changes into a log file before attempting to commit them to the disk. If the system should crash before it can properly commit the data, the journal log file is used to complete the pending file commits, and return the disk to a normal state. Journaling filesystems greatly reduce file corruption in Linux.
8. If you're performing a manual partition, select the mount points for the partitions.
After selecting a filesystem for the partition, the next item that Ubuntu wants for the partition is where to mount the partition in the virtual filesystem. The Ubuntu virtual filesystem handles hard drives by plugging them into specific locations in the virtual filesystem. The table lists the possible locations where you can mount a partition.
Mount Point Locations
If you create just one partition for Ubuntu, you must mount it at the root mount point (/). If you have additional partitions available, you can mount them in other locations within the virtual filesystem.
9. If you’re erasing an existing partition, or creating a new one, select any advanced disk features to use, and then click OK.
Ubuntu provides the option for you to use the Logical Volume Manager (LVM) feature in Linux with your hard drive partitions. LVM provides a way for you to easily add more space to an existing directory at any time if needed, even if there's data already in the directory. You may also choose to encrypt the logical volume if you need to. The other option is to use the ZFS filesystem, which is a commercial filesystem recently released to the open source world.
10. Click Install Now to accept the proposed hard drive partition changes and continue with the installation.
Up until this point you can change your mind about the hard drive changes. However, after you click Install Now here you're committed to those changes and there's no going back!
11. Select your location, and then click Continue.
Because Ubuntu is in use worldwide, you'll need to manually select just where in the world you are located so Ubuntu can assign the correct time zone and locale settings.
2. Create a Login ID, and then click Continue.
Up next in the installation process is the Login ID window, shown.
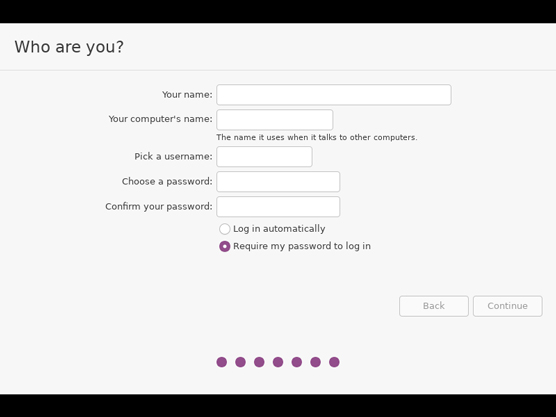
The login ID you create in this process is somewhat important. Unlike other Linux distributions, the Ubuntu distribution doesn't use an administrator login account (usually called root in the Unix/Linux world). Instead, Ubuntu provides the ability for normal user accounts to belong to an administrators group. Members in the administrators group have the ability to become temporary administrators on the system.
Besides identifying yourself, you'll also need to assign a name to the computer itself. Ubuntu uses this name when advertising its presence on the network, as well as when referencing the system in log files. You should select a computer name that's unique on your network, is less than 63 characters long, and not contain any special characters (although hyphens are allowed).
One final setting — you must determine whether you want the system to automatically log you into your desktop, or to prompt for your login password. I wouldn't recommend using this feature on laptops that you may accidentally leave behind somewhere. If you'll be the only one using the desktop PC (and there aren't any nosy people around) you can utilize the automatic login feature to save some time. Otherwise, set it to prompt you for a password each time you log into your system.
13. Sit back and enjoy the show!
As the installation process proceeds the installer presents a series of informational slides. Scan over these slides to learn about the features available in your new Ubuntu system.
After the Ubuntu system is installed on the hard drive, the installation program prompts you to reboot. The next time your system boots, you'll be in Ubuntu-land!
About This Article
This article can be found in the category:
Hot off the press
Explore Related content


