


Windows Server 2019 supports two variations on containers:
- Windows container: The Windows container is the traditional container model. It’s fast, lightweight, and easy to use. The downside is that it shares the kernel with the host operating system (OS).
- Hyper-V container: If you have a workload that requires different versions of the kernel, or highly secure workloads that can’t share a kernel, the Hyper-V container is the better choice. The Hyper-V container has a higher performance hit on the host server, but because it runs each virtual machine (VM) in its own container, you can have containers that have different versions of the kernel, and you have true isolation because the container is not sharing the kernel of the host OS with the host and other containers.
In this chapter, I show you how to install Windows containers and Hyper-V containers, as well as how to install the Docker pieces that are needed to make everything work.
How to install Windows containers
Installing Windows containers is simple. You just enable the feature, and then install Docker. This section covers installing the feature.- From Server Manager, choose Manage → Add Roles and Features.
- On the Before You Begin screen, click Next.
- On the Select Installation Type screen, click Next.
- On the Select Destination Server screen, click Next.
- On the Select Server Roles screen, click Next.
- On the Select Features screen, select Containers (shown in the following figure), and then click Next.
- On the Confirm Installation Selections screen, click Install.
- Click Close and restart the server.
 To use Windows Containers, you only need to install the Containers feature and then install Docker.
How to install Hyper-V containers
To install Hyper-V containers, you also have to install the Hyper-V role. You can install them both at the same time. Follow these steps:- From Server Manager, choose Manage→Add Roles and Features.
- On the Before You Begin screen, click Next.
- On the Select Installation Type screen, click Next.
- On the Select Destination Server screen, click Next.
- On the Select Server Roles screen, select Hyper-V, click Add Features, and then click Next.
- On the Select Features screen, select Containers and then click Next.
- On the Hyper-V screen, click Next.
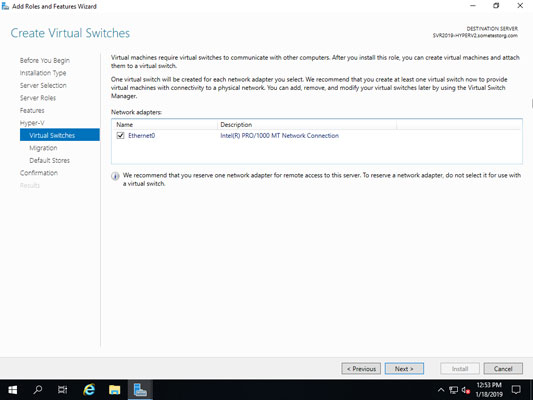
- On the Create Virtual Switches screen, select your network adapter, and click Next (see the following figure).
- On the Virtual Machine Migration screen, click Next.
- On the Default Stores screen, click Next.
- On the Confirm Installation Selections screen, click Install.
- After the installation is complete, click Close and then restart the server.
 When setting up Hyper-V, you can provision the virtual switch at the same time.
How to install Docker
At this point, you’ve at least got the containers feature installed. You may have even installed the Hyper-V role and the containers feature at the same time. Now you need to install the Docker Engine. This is the piece that really ties all the other pieces together.You’ll need to open PowerShell to run these commands, as well as the commands that follow under “Test Your Container Installation.” To open PowerShell, right-click on Start and select Windows PowerShell (Admin).
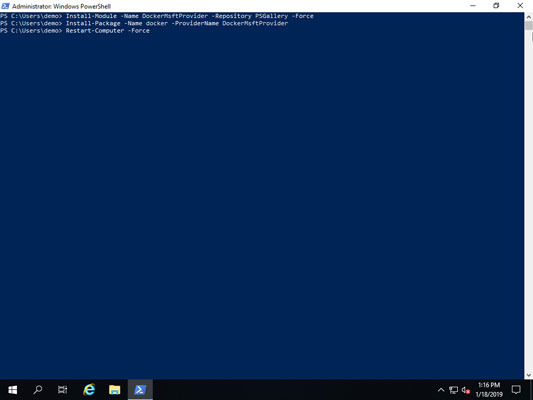
After you’ve opened PowerShell, your first step is to install the Microsoft Package Provider for Docker. This is done with the following command:
Install-Module -Name DockerMsftProvider -Repository PSGallery -Force
Now you can install the latest version of Docker with the following command:
Install-Package -Name docker -ProviderName DockerMsftProvider
After Docker is installed, you need one more restart. You can do this through the graphical user interface (GUI), or you can just type the following into PowerShell:
Restart-Computer -Force
These commands are shown in the following figure. If everything went well, you get no output. The PowerShell prompt will simply return, and you can run the next command.
 It takes two PowerShell cmdlets to install Docker on Windows Server 2019, three if you count the restart cmdlet at the end.
Test your container installation
After your server is configured and Docker is installed, you’ll want to test to ensure that your container installation is working properly.Test a Windows container
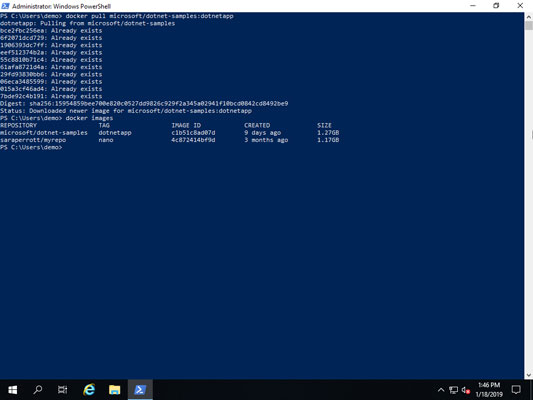
There is a simple way to test that your Windows container installation is installed properly: Download and run a container image. One of my favorites is a sample image because it prints out a “Hello world”–style message and then exits.To run this test, you use the docker run command. Because the container image is not downloaded yet, it will download the container image first, and then run it. If you want to stage the image so you can play with it later, you can use the docker pull command instead of docker run, and it will only download the container image. Here is the command to download the sample container:
docker pull microsoft/dotnet-samples:dotnetapp
Note that the download may take a few minutes because it's pulling down a copy of Nano Server. You can watch the progress on the screen. See the following figure for the output from running the command.
 Downloading the sample container from Docker Hub is simple using the
 docker pull command.The container images must use the same kernel version as the container host. If you try to run the container with a kernel version that doesn’t match the container host’s kernel version, you’ll get an error similar to the screenshot in the following figure. Notice the first line of the error, which ends in “The container operating system does not match the host operating system.”
 You get an error if you try to run a container image that does not match the container host’s OS.
Test a Hyper-V container
Testing the Hyper-V container is similar to testing a Windows container, but because the kernel isn’t shared, you have far more freedom as far as which container images you want to run. The command itself is similar — you just need to include--isolation=hyperv to tell it that you want it to launch the container as a Hyper-V container rather than a Windows container.docker run –-isolation=hyperv microsoft/dotnet-samples:dotnetapp
As you can see in the following figure, the container image, which was downloaded previously in the Windows container section, ran and gave us the Hello message with the super adorable .NET Foundation’s robot mascot.
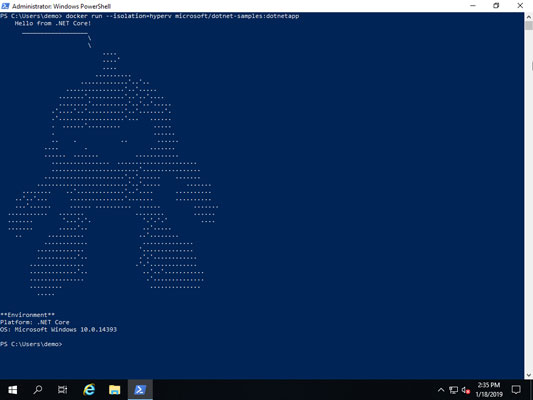 The sample container image prints Hello along with the .NET Foundation’s robot mascot.


