

For your BeagleBone, you should have a 4GB microSD card of at least Class 4 with an adapter. You have two options for writing the .img file to a microSD card:
If your computer has an SD card slot, insert your microSD card into a microSD card adapter and connect it to your computer.
If your computer doesn’t have an SD card slot, you need an external SD card writer. Insert your microSD card into a microSD card adapter; then insert your SD card into your external SD card writer and connect it to your computer.

Flashing an image file to your microSD card isn’t like copying a photograph or document to your common flash drive. You need to use a special program that converts the Linux distribution to a couple of files that your BeagleBone is able to read.
You have to be really careful while flashing your microSD card. Before pressing Enter or Return, you need to be completely sure you are selecting the right device name. Selecting the wrong device name results in irreversible data loss, such as erasing your computer’s hard disk.
Flashing your microSD card completely erases it. Make sure that you’ve copies of any files on the microSD card that you may need later.
Flashing a microSD card in Windows
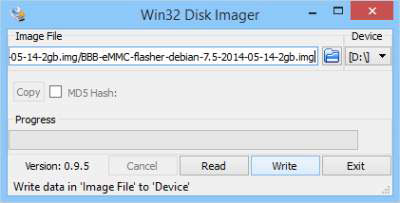
Flashing a microSD card in Windows requires an application called Win32 Disk Imager, which is available for free download.
Follow these steps to install it:
Go to the Win32 Disk Imager download page.
Click the Download button to retrieve the installer.
Run the Win32 Image Writer application installer.
With Win32 Disk Imager installed, you’re ready to write the .img file to your microSD card. Follow these steps:
Connect your microSD card to your computer.
Open Win32 Disk Imager.
Select your Linux-distribution .img file.
Select your microSD card as the device.
This process erases and overwrites the selected device. Be certain that you’ve selected the microSD card, and be certain that you have copies of any files that you need from the card. Be certain that the microSD card is the device you chose!
Click Write to start writing the image to the microSD card.
This process takes between 10 and 20 minutes, depending on your microSD card class number and your SD card writer’s transfer speed.
Flashing a microSD card in Mac OS X
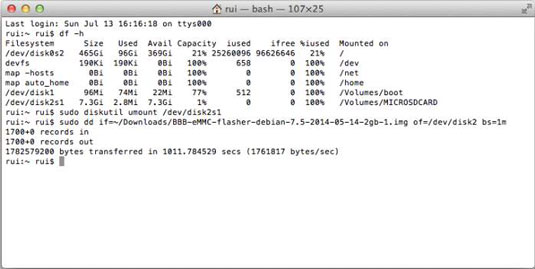
On a Mac, you can use the Terminal application to copy the image to your microSD card.
Follow these steps:
Navigate to /Applications/Utilities.
Double-click Terminal to open a new Terminal window.
Connect your microSD card to your computer.
Type df –h to get a listing of the devices connected to your computer.
Find out which device is your microSD card.
It will be something similar to /dev/sdisk2s1.
Be very careful that you choose the right /dev device. Using an incorrect device name results in permanent data loss from the device you choose. You can even overwrite the disk that contains your computer’s OS. Be certain that the microSD card is the device you choose!
Type sudo diskutil umount /dev/disk2s1 to unmount your micro SD card.
The command is umount even though you say “unmount.”
For the next command, you have to ignore the device number. For this example, /dev/disk2s1 becomes /dev/disk2.
Run sudo dd if=~/
/ ..img of=/dev/disk2 bs=1m This process takes between 10 and 20 minutes, depending on your microSD card and your SD card writer’s transfer speed.
Flashing a microSD card in Linux
With Linux, you don’t have to install extra applications; the OS already has everything you need to decompress the .xz file and flash your microSD card with the latest OS.

To flash a microSD card in Linux, follow these steps:
Press Ctrl+Alt+T to open the terminal window.
Connect your microSD card to your computer.
Type cd to navigate to your Downloads folder (cd /Downloads).
Type xz -dk
.img.xz to decompress your .xz file.Type df –h to get a list of the devices connected to your computer.
Find out which device is your microSD card.
It will be something similar to /dev/sdb1.
Be very careful that you choose the right /dev device. Using an incorrect device name results in permanent data loss from the device you choose. You can even overwrite the disk that contains your OS. Be certain that the microSD card is the device you choose!
Type sudo umount /dev/sdb1 to unmount your micro SD card.
For the next command, you have to ignore the device number. For this example, /dev/sdb1 becomes /dev/sdb.
Run sudo dd if=~/
/ ..img of=/dev/sdb bs=1m This process takes between 10 and 20 minutes, depending on your microSD card and your SD card writer’s transfer speed.

