


Pressing the Nikon D3300 Menu button gives you access to a slew of options in addition to those you control via the external buttons and dials. But what type of menu screens you see depends on the setting of the Mode dial:
Guide: Pressing the Menu button brings up the first screen of the guided menus, which provide a simple, walk-me-through-it approach to using the camera.
All other settings: Pressing the Menu button brings up the normal, text-based menus.
The guided menus work much like interactive menus you encounter in other areas of your life — on cellphones, bank machines, grocery-store self-checkout kiosks, and the like — except that instead of pressing buttons on the screen, you use the Multi Selector and OK button to make your menu selections.
And thankfully, your camera also doesn’t nag you to hurry up and “please place the item in the bagging area!” every 3 seconds.
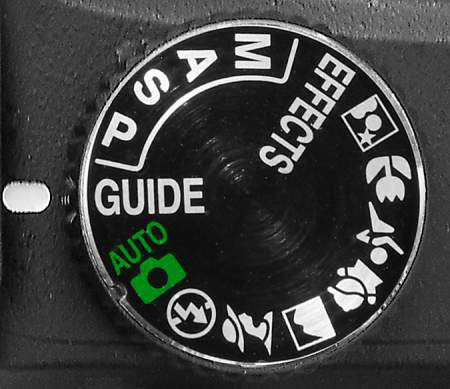
To explore the guided menu feature, set the Mode dial to Guide, as shown in the figure.
You see the initial guided menu screen, shown on the left in the figure. Using the Multi Selector, highlight one of these options:

Shoot: Select this icon to access screens that walk you through the process of choosing basic picture-taking settings and shooting pictures.
View/Delete: Select this category to access picture-playback functions and erase pictures from your memory card.
Retouch: This choice takes you to the built-in photo editing functions, such as red-eye removal and cropping.
Set Up: Choose this icon to access camera setup options — things like setting the date and time, adjusting monitor brightness, and so on.
After choosing an option, press OK to display the first screen associated with that category. For example, if you choose Set Up, you see the screen shown on the right in the figure. From there, use the Multi Selector to choose a task and press OK to move on to the next screen.
Just keep highlighting your choice and pressing OK to make your way through the menus. To return to the preceding screen, press the Multi Selector left (the Back symbol at the bottom of the screen reminds you of this trick).
First, you can’t access all your camera’s features through the guided menus. Second, some choices Nikon made for the arrangement of the guided menus set you up for confusion down the line. For example, the Image Size and Image Quality options, which control resolution and file type, are found in the Set Up section of the guided menus but live on the Shooting menu in the regular menus.
So if you get used to selecting those options in one place when you use guided menus, you have to learn a whole new organization when you move on to the regular menus. Additionally, when you adjust certain settings, including Image Size and Image Quality, your changes apply only in Guide mode. So when you return to another shooting mode, you have to adjust those settings again.


