


The ISO setting adjusts the Nikon D7000’s sensitivity to light. At a higher ISO, you can use a faster shutter speed or a smaller aperture (higher f-stop number) because less light is needed to expose the image. But remember that a higher ISO also increases the possibility of noise.
On the D7000, you can choose ISO values ranging from 100 to 6400, plus four Hi settings, 0.3, 0.7, 1, and 2, which stretch the ISO range from 8000 (Hi 0.3) to 25600 (Hi 1). You also have the option of choosing Auto ISO; at this setting, the camera selects the ISO needed to expose the picture at the current shutter speed and aperture.
The number of settings available between the top and bottom of the ISO range depend on the ISO Sensitivity Step Value option. By default, ISO settings are presented in one-third stop increments.
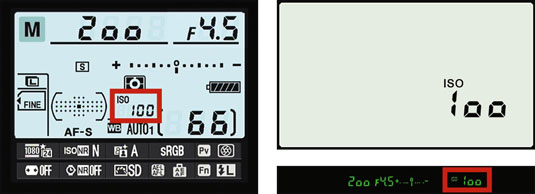
You can view the current ISO setting in the Information display. But the viewfinder and Control panel show the ISO setting only when Auto ISO is enabled. At other settings, press the ISO button to hide all other data but the ISO value in the Control panel. In the viewfinder, the ISO value replaces the shots remaining value while the button is pressed.
You can adjust the setting in two ways:
Press the ISO button while rotating the Main command dial. In the P, S, A, and M modes, the Auto setting doesn't appear as an option when you rotate the dial, but you can request auto ISO control by another means.
Shooting menu: Select ISO Sensitivity Settings and then choose ISO Sensitivity.

If you don't like this setup, you can modify things a little through the ISO Display and Adjustment option found on the Custom Setting menu.
A more important ISO topic to consider is the way that the camera handles ISO adjustment when you enable Auto ISO:
Auto ISO in the fully automatic exposure modes: In Auto, Auto Flash Off, and Scene modes, the camera selects the ISO for you, but doesn't go up any higher than ISO 1600.
Auto ISO in P, S, A, and M modes: Auto ISO doesn’t appear on the ISO settings list, but you can enable Auto ISO as sort of a safety net. Here’s how it works: You dial in a specific ISO setting. If the camera decides that it can’t properly expose the image at that ISO given your current aperture and shutter speed, it automatically adjusts ISO as necessary.
To use this feature, set the Auto ISO Sensitivity Control option to On. Then use these two options to tell the camera exactly when and how it should step in and offer ISO assistance:

Maximum Sensitivity: Specify the highest ISO setting the camera may select when it overrides your ISO decision.
Minimum Shutter Speed: Set the minimum shutter speed at which the ISO override engages.
If the camera is about to override your ISO setting, it alerts you by blinking an ISO-Auto label in the displays. And in playback mode, the ISO value appears in red if you view your photos in a display mode that includes the ISO value.
To disable Auto ISO override for the P, S, A, and M modes, just reset the Auto ISO Sensitivity Control option to Off.

